適配器應用
本章節主要講述適配器應用的開發、部署、調試等功能。
修改記錄及版本信息
序號 | 版本號 | 修改內容 | 修改時間 |
1 | Rev1.0 | 文檔創建 | 2021-05-20 |
2 | Rev1.1 | 補充 4.2 | 2021-05-25 |
3 | Rev1.2 | 補充 6 | 2021-05-27 |
4 | Rev1.3 | 更新附錄2:查看日志 | 2021-05-28 |
5 | Rev1.4 | 更新6:示例代碼 | 2021-06-03 |
1 基本概念說明
本文提到的邊緣應用,是指部署在物業管理一體機的邊緣應用,是基于IoT的領域服務對接方案實現的邊緣應用。領域服務對接方案里有服務模型定義和數據模型定義,下面介紹一些相關的基本概念:
服務模型:
針對某項業務,可提供一組完整功能的HTTP接口。例如停車場領域服務模型。 邊緣應用開發者可以根據對應的場景需求和業務需求進行這套接口定義。
服務提供方:
服務提供方即是可以提供服務模型里定義的服務功能的應用。服務提供方既可以是云端應用,也可以是邊緣端應用。
服務依賴方:
服務依賴方即是使用服務模型里定義的服務功能的應用。服務依賴方也可以是云端應用或邊緣端應用。
數據模型:
使用場景:本地系統/設備上報的消息可以基于數據模型進行定義,例如人臉通行事件。
通過數據模型和IoT數據總線機制,可實現應用間的數據信息流轉。
IoT平臺提供了對數據進行增刪改查的4個API,以及HTTP2方式的消息訂閱機制。
(數據提供方)應用可以通過數據添加的API接口,將本地系統或設備的消息送入數據總線。
(數據消費方)應用可以通過查詢數據模型的API接口獲取消息,也可以通過數據變更消息訂閱方式獲取消息。
數據模型支持圖片文件上傳,例如人臉通行事件的人臉照片。
物業管理一體機框架:
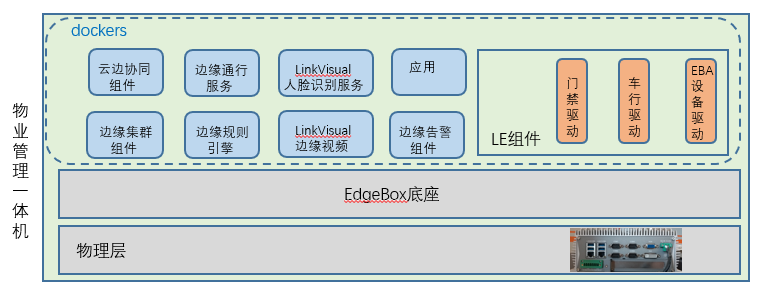
物業管理一體機是基于K8s系統實現的,底層是EdgeBox底座,上面是基于docker的各種應用和服務。
LE組件也是基于docker的服務程序,里面包含了支持各種設備接入驅動,例如門禁驅動,車行驅動,EBA設備驅動等。
邊緣應用也是基于docker的應用程序。邊緣應用可通過編譯出的jar包,打包成鏡像,然后通過IoT云端平臺將應用下發到指定的物業管理一體機。邊緣應用啟動入口,可以通過應用jar包里的docker file指定。
2 整體架構
下面將介紹邊緣端適配器應用在整體架構里的位置以及上下游模塊的關系,便于更好的理解邊緣應用開發方法。
2.1 核心模塊功能說明
云端應用:即SaaS應用,一般由ISV提供,即服務模型依賴方,負責服務模型的調用和數據訂閱。
物聯網云平臺:即IoT云端平臺。在領域服務對接方案里,與邊緣端核心服務一起提供服務總線和數據總線框架服務。
適配器應用:即運行在物業管理一體機的邊緣應用,是服務模型的提供方。一方面該應用接受云端應用通過IoT平臺的服務調用,然后將調用轉換成本地系統支持的接口調用,另外一方面該應用接受本地系統的事件上報,然后通過邊緣數據總線,將消息安裝數據模型格式要求,上傳到IoT云端平臺。
本地系統:即項目現場的本地各種系統,例如立方停車場系統。
2.2 核心流程說明
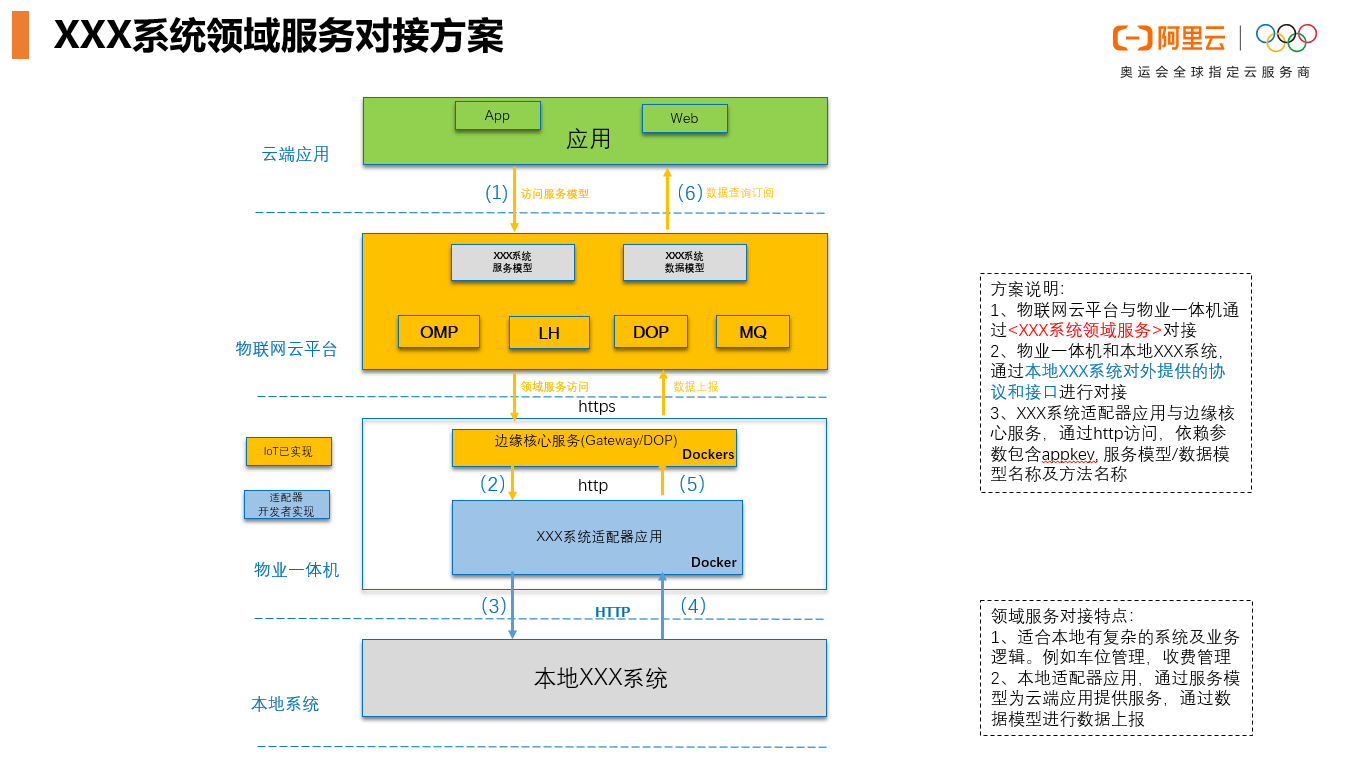
基于邊緣適配器應用的領域服務對接方案,核心流程包括兩個:至上而下的服務模型調用,至下而上的數據上報。下面分別說明。下面的序號,與框架圖中的序號一一對應。
服務調用:
(1)云端SaaS應用調用服務模型提供的HTTP服務。 發起服務調用時,需提供項目Appkey, 路徑名稱(path)里需包含服務模型ID+接口方法名稱。
(2)邊緣適配器應用,偵聽到對應的服務調用后,進行適當的適配轉換,再調用本地系統提供的HTTP服務。
(3)本地系統有一套對外開放的HTTP服務。偵聽到來自邊緣適配器應用調用后,完成相應的功能并將結果返回。
數據上報:
(4)本地系統發生事件,可以將事件內容通過HTTP接口發送給邊緣適配器應用。接口的URL可以雙方(適配器應用/本地系統)約定。
(5)邊緣適配器應用偵聽到事件請求后,可以將事件內容轉化成數據模型要求的格式,然后根據(邊緣)IoT平臺提供的數據插入接口,上報數據到邊緣數據總線,然后內部流轉到云端數據總線。
(6)云端SaaS應用,可以通過IoT平臺提供的查詢數據模型的API接口獲取數據,也可以通過數據變更消息訂閱方式獲取數據。
3 邊緣應用開發指導
這里介紹的邊緣應用,是服務提供方應用。
3.1 邊緣應用對接服務模型
邊緣應用偵聽到對應的服務調用后,進行適當的適配轉換,再調用本地系統提供的HTTP服務。
邊緣應用對接服務模型,可以參考IoT公開鏈接:服務總線:服務提供的開發示例:
3.2 邊緣應用對接數據模型
具體對接可參考IoT公開鏈接:邊緣應用數據總線對接:http://m.bestwisewords.com/document_detail/145523.html?spm=a2c4g.11186623.6.595.81bc5ee4wgidUt
這里只補充說明一些需要關注的內容:
通過本地系統環境變量獲取appkey and appSecrect:
public static final
String
appkey =
System
.getenv(
"iot.hosting.appKey"
);
public static final
String
appSecret =
System
.getenv(
"iot.hosting.appSecret"
);
//邊緣端數據模型服務路由
private static finalStringDATA_EDGE_PATH =System.getenv("iot.hosting.api.domain");
請求參數:
請求參數里的modelId,就是對應的數據模型Id。
request.putParam(
"modelId"
,
"value1"
);
對于邊緣端應用,下面兩個請求參數可以忽略掉。
request
.
putParam
(
"scopeId"
,
"value2"
);
request.putParam(
"appId"
,
"value3"
);
上傳文件數據模型接口說明:
下面鏈接文檔提供的接口只是獲得了需要上傳的文件名稱和URL:
如返回接口示例:
{
"id":"6fr2c332-c1db-417c-aa15-8c5trg3r5d92",
"code":200,
"message":null,
"localizedMsg":null,
"data":{
"fileName":"5269712352e5.jpg",
"URL":"https://xxxxx.xxx.xx.com/xxx/file/5269712352e5.jpg?Expires=1557902379&OSSAccessKeyId=uyedjYLHD****&Signature=sotMFFIq4RP%2BWJSDScE8SxvOlvo%3D"
}
開發者還需將真正需要上傳的文件,上傳到接口返回值里指定的fileName和URL,示例代碼如下:
// response為上傳文件數據模型接口的返回
result = new String(response.getBody(), "UTF-8");
UploadResult uploadResult = JSON.parseObject(result, UploadResult.class);
data nameAndPath = uploadResult.getData();
String url = nameAndPath.getUrl();
HttpClient httpClient = HttpClients.createDefault();
HttpResponse response;
HttpPut put = new HttpPut(url);
// byte[] fileBytes:為準備要上傳的圖片文件
HttpEntity reqEntity = EntityBuilder.create().setBinary(fileByte).build();
put.setEntity(reqEntity);
response = httpClient.execute(put);
4 服務依賴方應用開發指導
服務依賴方,例如云端SaaS應用,需要進行服務調用和訂閱數據。這里也是列出需要特別關注的點。詳細內容請參考:附錄1 參考鏈接:1:邊緣應用服務總線對接;3:服務總線。
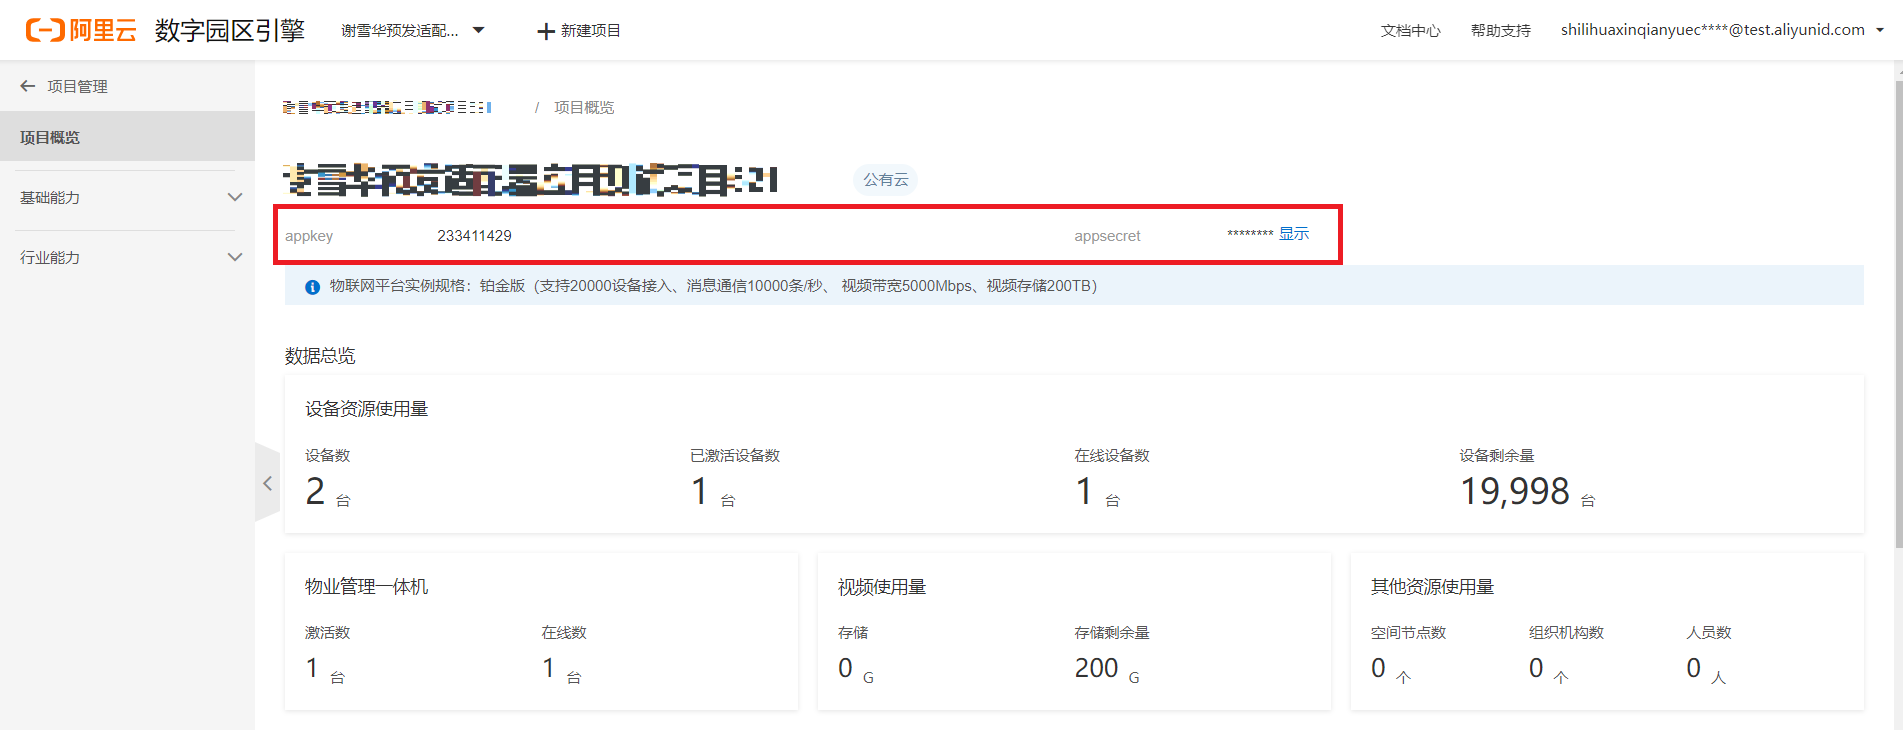
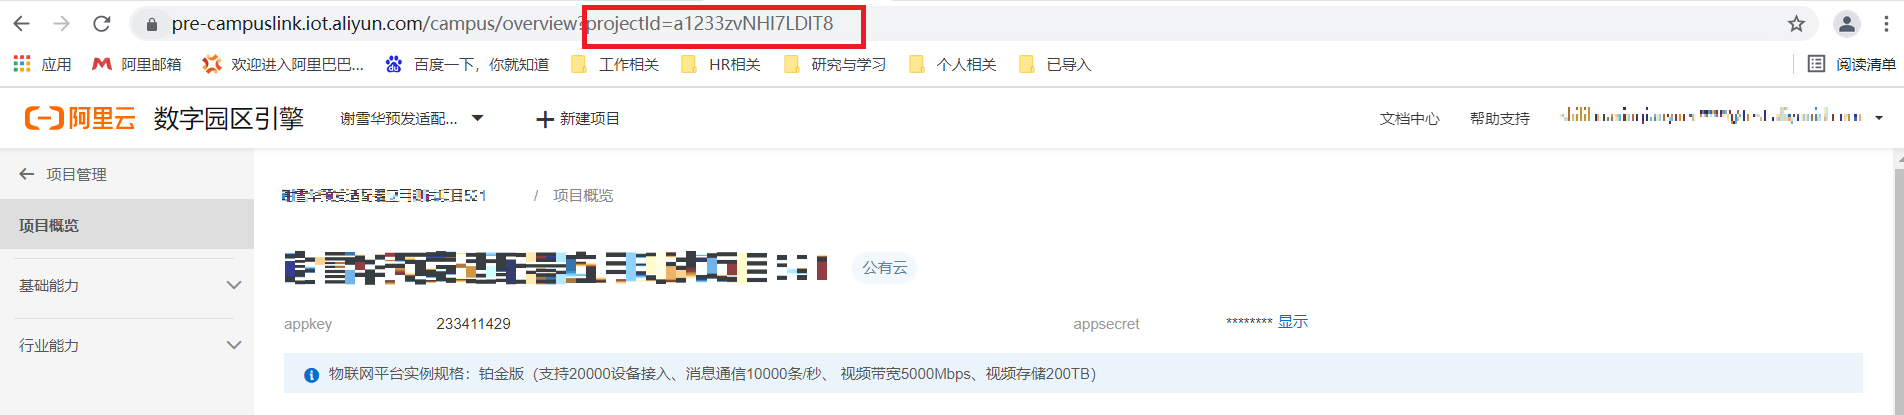
4.1 APPkey and AppSecrect
云端SaaS應用訪問服務模型時,請求參數里的Appkey and AppSecrect, 可以從IoT平臺的數字園區引擎的項目里查看得到,如下圖所示:
4.2 下載文件數據模型接口
可以參考邊緣應用數據總線對接的下載文件數據模型接口:
需要注意下面幾點:
a: Appkey and Appsecrect:
請參考4.1 里的說明獲取
b: filename:
入參列表里缺失了filename,實際上是需要的:
request.putParam("fileName","value1");
filename是從訂閱的數據模型消息里獲取到的
c: scopeid:
scopeid就是項目id。在數字園區引擎里選擇打開某個實例后,瀏覽器地址欄里projectId就是scopeid,如下圖所示:
下載文件數據模型接口返回參數里,提供了需下載的文件URL:
{
   "id": "6fr2c332-c1db-417c-aa15-8c5trg3r5d92",
    "code": 200,
    "message": null,
    "localizedMsg": null,
    "data": {
        "URL": "https://xxxxx.xxx.xx.com/xxx/file/5269712352e5.jpg?Expires=1557902379&OSSAccessKeyId=uyedjYLHD****&Signature=sotMFFIq4RP%2BWJSDScE8SxvOlvo%3D"
    }
}
開發者還需要根據這個URL,進行文件下載操作。
4.3 數據查詢/數據訂閱
前面提到過,云端應用可以通過IoT平臺提供的查詢數據模型的API接口獲取數據,也可以通過數據變更消息訂閱方式獲取數據。
可以分別參考下面內容實現,只是注意Appkey and Appsecrect需要參考4.1 里的說明得到
5 邊緣端應用自測
5.1 模擬本地系統事件上報:Postman
前置條件:
PC機安裝了Postman軟件
物業管理一體機部署了適配器應用
PC機需要與物業管理一體機在相同的局域網內
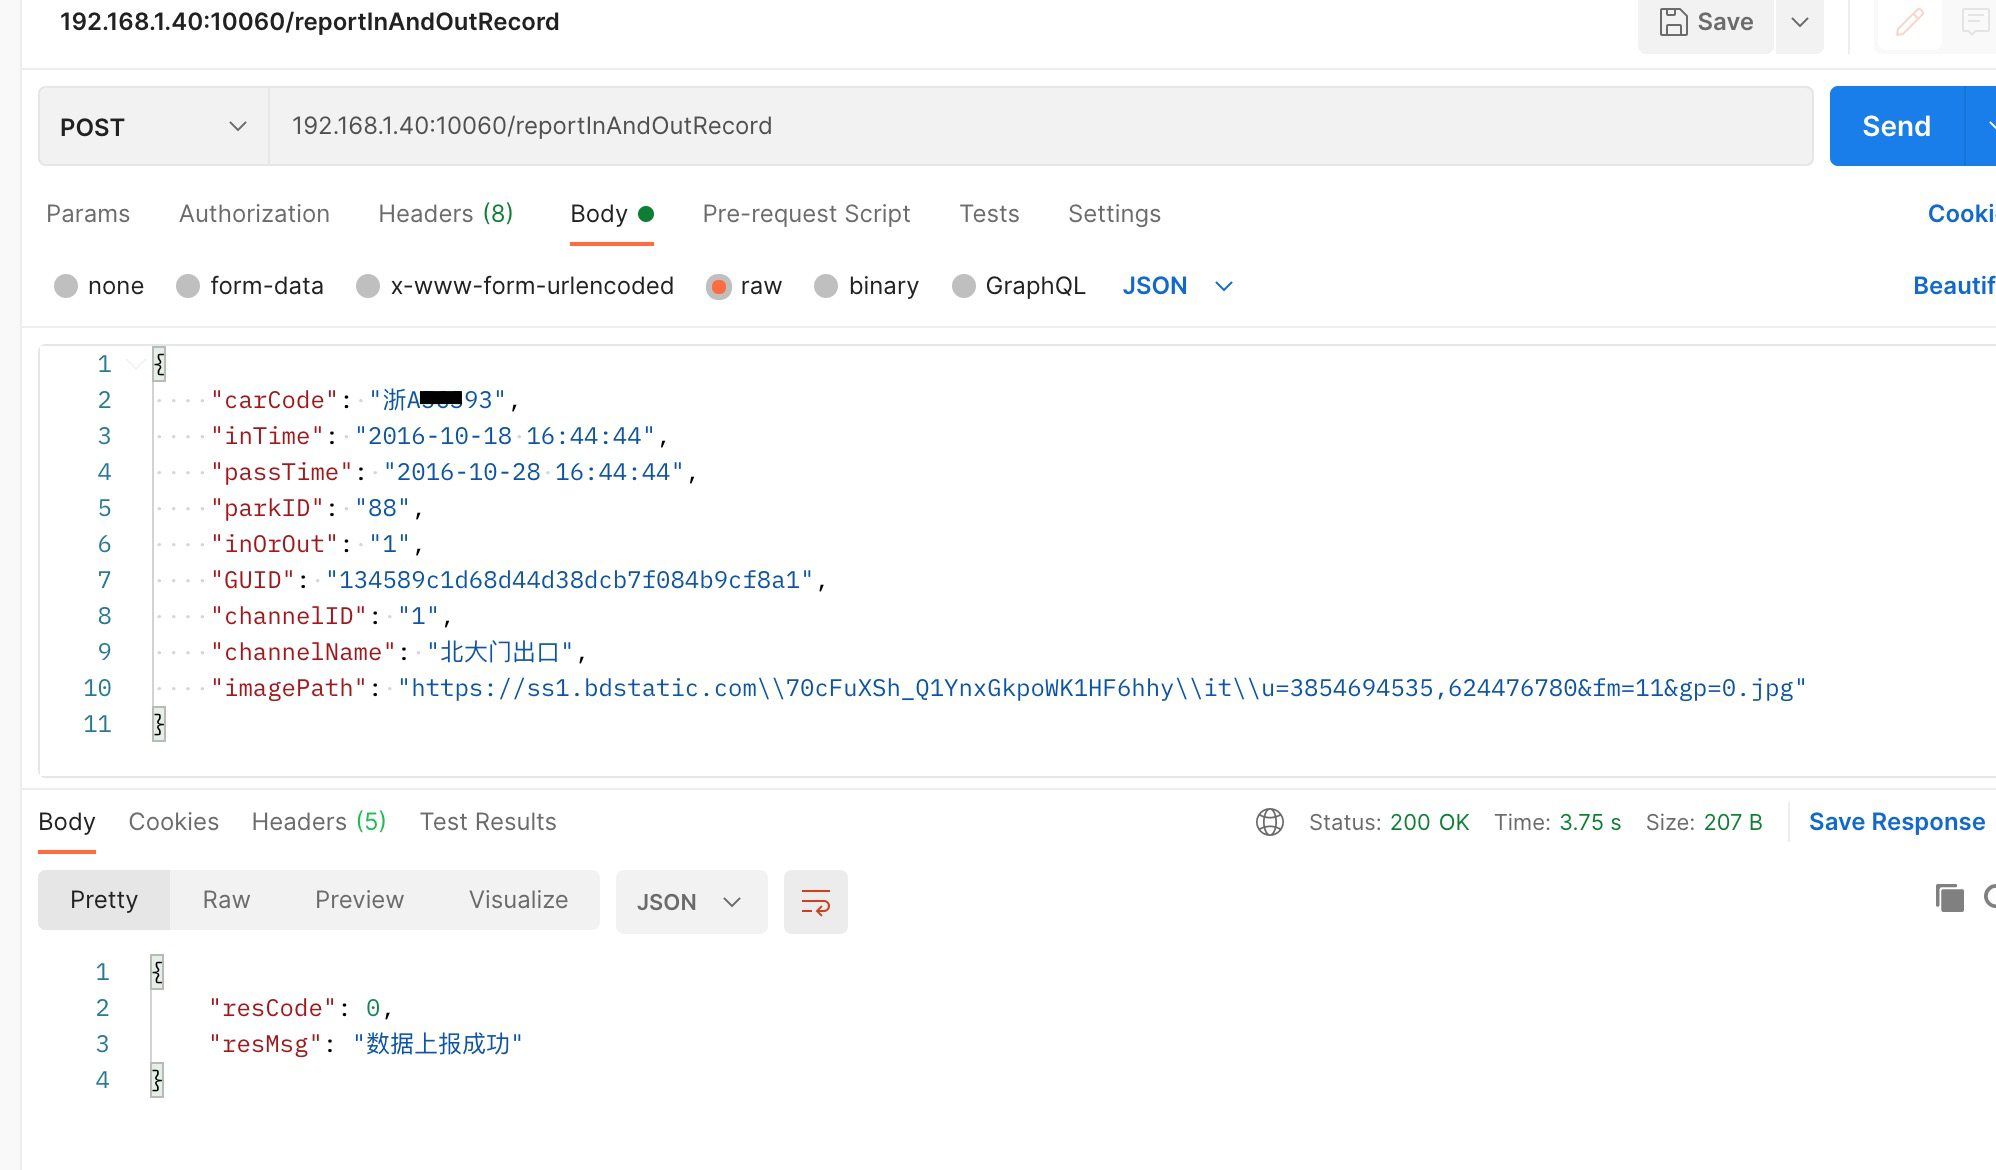
模擬事件上報:
下面示例,以《停車場系統領域模型V3.1-數據模型定義》-車輛通行為例
路徑:物業一體機ip:port/具體路徑
請求Body內容示例如下:
{
    "carCode": "浙A5****",
    "inTime": "2016-10-18 16:44:44",
    "passTime": "2016-10-28 16:44:44",
    "parkID": "88",
    "inOrOut": "1",
    "GUID": "134589c1d68d44d38dcb7f084b9cf8a1",
    "channelID": "1",
    "channelName": "北大門出口",
    "imagePath": "https://ss1.bdstatic.com\\70cFuXSh_Q1YnxGkpoWK1HF6hhy\\it\\u=3854694535,624476780&fm=11&gp=0.jpg"
}
Postman示例截圖如下:
5.2 模擬本地服務調用:Postman
前置條件:
PC機安裝了Postman軟件
物業管理一體機部署了適配器應用
PC機需要與物業管理一體機在相同的局域網內
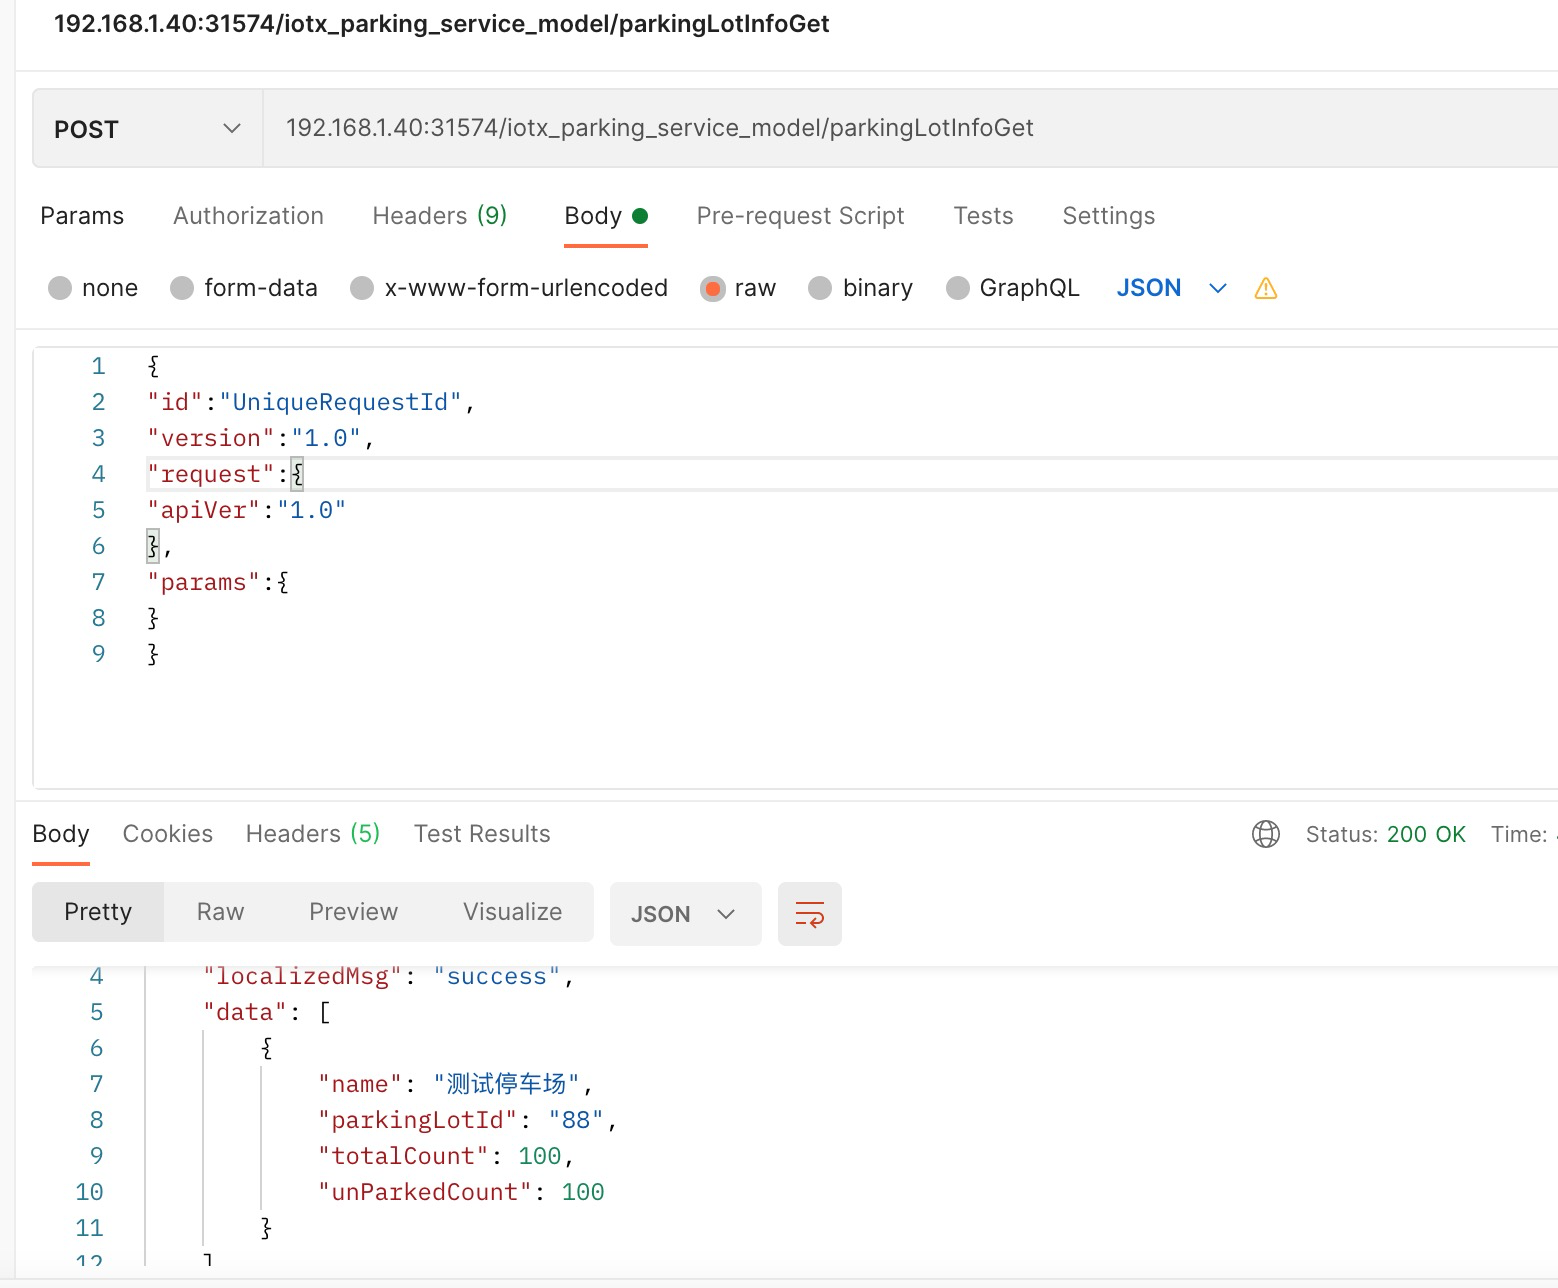
模擬服務調用:
下面示例,以《停車場系統領域服務V3.1-服務模型定義》-1.1 查詢停車場信息為例
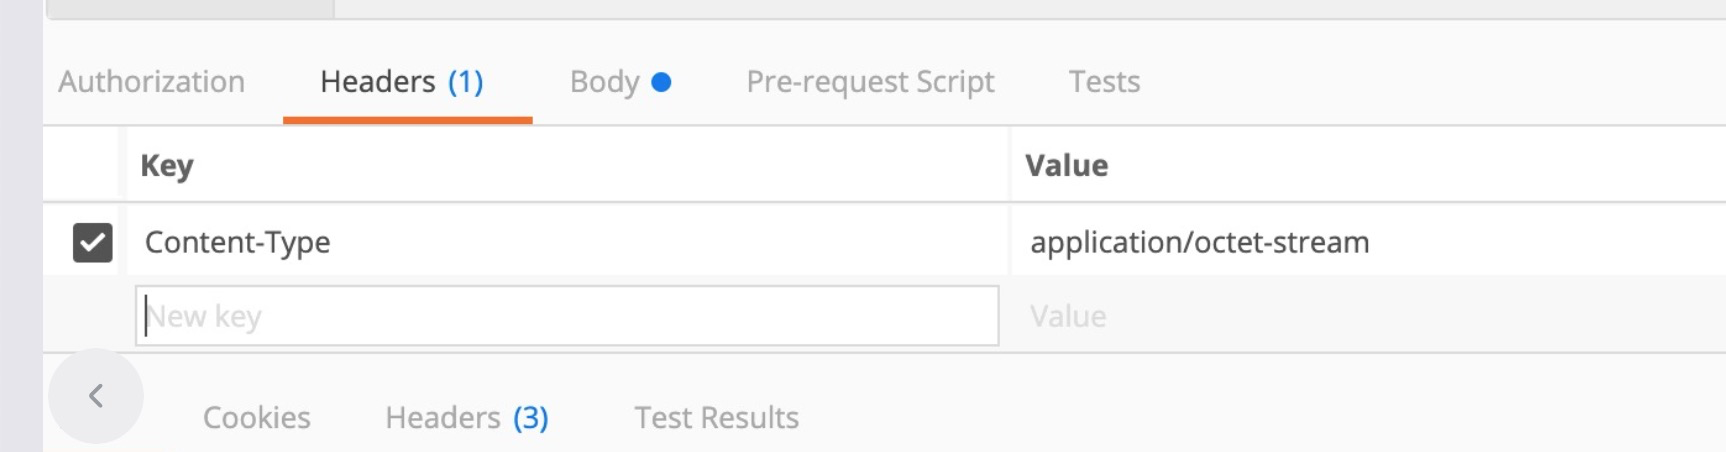
路徑: 物業一體機IP:port/服務模型ID/服務接口path
特別注意Header內容:定義 Content-Type 為 application/octet-stream
請求Body內容示例如下:
{
"id":"UniqueRequestId",
"version":"1.0",
"request":{
"apiVer":"1.0"
},
"params":{
}
}
Postman示例截圖:
6 示例代碼
6.1 邊緣端適配器應用對接服務模型
以車輛加入安全黑/白名單服務為例
1、入口層
package com.aliyun.iotx.parkinglot.adapter.web.servicemodelcontroller;

import com.alibaba.fastjson.JSON;
import com.aliyun.iotx.common.base.service.IoTxResult;
import com.aliyun.iotx.parkinglot.adapter.enums.ParkingLotAdapterEnum;
import com.aliyun.iotx.parkinglot.adapter.service.BlackWhiteListService;
import com.aliyun.iotx.parkinglot.adapter.service.dto.VehiclePermissionalDTO;
import com.aliyun.iotx.parkinglot.adapter.service.serviceImpl.logicjudge.LogicJudge;
import com.aliyun.iotx.parkinglot.adapter.utils.IoTxResultUtils;
import com.aliyun.iotx.parkinglot.adapter.vo.*;
import lombok.extern.slf4j.Slf4j;
import org.springframework.beans.factory.annotation.Autowired;
import org.springframework.http.MediaType;
import org.springframework.web.bind.annotation.RequestBody;
import org.springframework.web.bind.annotation.RequestMapping;
import org.springframework.web.bind.annotation.RequestMethod;
import org.springframework.web.bind.annotation.RestController;

import javax.servlet.http.HttpServletRequest;
import java.io.ByteArrayOutputStream;
import java.io.IOException;
import java.io.InputStream;

/**
 * 黑白名單
 */
@Slf4j
@RestController
@RequestMapping(value = "/iotx_parking_service_model", method = RequestMethod.POST)
public class BlackWhiteListController {

    @Autowired
    private BlackWhiteListService blackWhiteListService;

    /**
     * 7.1車輛加入安全黑/白名單
     * @param request
     * @return
     */
    @RequestMapping(value = "/parkingLotVehicleListAdd")
    public IoTxResult vehicleAddList(HttpServletRequest request) throws Exception {

        String json="";
        json= new String(readInputStream(request.getInputStream()),"UTF-8");

        //將json數據解析成vo對象接收
        BWListVo bwListVo = JSON.parseObject(json, BWListVo.class);
        BlackWhiteListVo blackWhiteList = bwListVo.getParams();

        //自己業務的處理邏輯
        blackWhiteListService.vehicleAddList(blackWhiteList);

        IoTxResult<Object> ioTxResult = new IoTxResult<>();
        ioTxResult.setData(null);
        IoTxResultUtils.ioTxResultSet(ParkingLotAdapterEnum.SUCCDESS_VEHICLEADDLIST, ioTxResult);
        return ioTxResult;
    }
}

/**
依賴類:
*/

@NoArgsConstructor
@AllArgsConstructor
@Data
class BWListVo implements Serializable {

    private static final long serialVersionUID = -8067179280515471493L;

    /**
     * request里的全局唯一id透傳
     */
    private String id;

    /**
     * 請求協議版本
     */
    private String version;

    private Map<String, Object> request;

    private BlackWhiteListVo params;

}


/**
 * 車輛加入安全
 * 黑白名單入參
 */
@NoArgsConstructor
@AllArgsConstructor
@Data
@ValidateBean
class BlackWhiteListVo implements Serializable {

    private static final long serialVersionUID = 831783475630914****L;

    @NotBlank(message = "parkingLotId不能為空")
    private String parkingLotId;

    @JsonFormat(with = ACCEPT_SINGLE_VALUE_AS_ARRAY)
    @EachValidate(constraint = NotBlank.class,message = "車牌號不能為空,不能有空字符串")
    private List<String> plateNumber;

    @JsonFormat(with = ACCEPT_SINGLE_VALUE_AS_ARRAY)
    private List<String> areaId;

    @NotBlank(message = "type不能為空")
    private String type;

    private String effectiveDate;
    private String expiryDate;
}
6.2 邊緣端適配器應用對接數據模型
以車輛通行數據模型為例:
車輛通行接口入口
package com.aliyun.iotx.parkinglot.adapter.web.datamodelcontroller;

import com.alibaba.cloudapi.sdk.model.ApiResponse;
import com.alibaba.fastjson.JSON;
import com.aliyun.iotx.parkinglot.adapter.service.datamodelservice.IoTParkPassRecordService;
import com.aliyun.iotx.parkinglot.adapter.utils.UrlFormatUtil;
import com.aliyun.iotx.parkinglot.adapter.vo.InOutRecordVo;
import com.aliyun.iotx.parkinglot.adapter.vo.LFResultVo;
import lombok.extern.slf4j.Slf4j;
import org.springframework.beans.factory.annotation.Autowired;
import org.springframework.web.bind.annotation.RequestBody;
import org.springframework.web.bind.annotation.RequestMapping;
import org.springframework.web.bind.annotation.RequestMethod;
import org.springframework.web.bind.annotation.RestController;

/**
 * 數據模型
 * 車輛通行
 */
@Slf4j
@RestController
public class IoTParkPassRecordController {

    @Autowired
    private IoTParkPassRecordService parkPassRecordService;

    /**
     * 上傳進出記錄
     * 當代項目的圖片地址格式是
     * @param inOutRecordVo
     * @return
     */
    @RequestMapping(value = "/reportInAndOutRecord", method = RequestMethod.POST)
    public LFResultVo inOutRecordReport(@RequestBody InOutRecordVo inOutRecordVo) {

        String newUrl = UrlFormatUtil.change(inOutRecordVo.getImagePath());
        inOutRecordVo.setImagePath(newUrl);

        //把記錄轉換為標準數據模型后上傳,需要引用后一段通用的DOP上傳代碼片段。參考下面的邊緣應用數據總線參考使用:
        ApiResponse apiResponse = parkPassRecordService.inOutRecordReport(inOutRecordVo);

        LFResultVo lfResultVo = new LFResultVo();
        if (apiResponse.getCode() == 200) {
            lfResultVo.setResCode(0);
            lfResultVo.setResMsg("數據上報成功");
        } else {
            //立方上報數據失敗返回數字1
            lfResultVo.setResCode(1);
            lfResultVo.setResMsg("數據上報失敗");
        }
        return lfResultVo;
    }
}邊緣應用數據總線參考使用:
public class BlackWhiteList {
    /**
     * 車輛通行上傳
     * @param request
     * @return
     */
    public static void main(String[] args) {
        IoTApiRequest ioTApiRequest = new IoTApiRequest();
        String uuid = UUID.randomUUID().toString();
        String uuidOne = uuid.replace("-", "");

        ioTApiRequest.setId(uuidOne);
        ioTApiRequest.setApiVer("1.0");
        ioTApiRequest.putParam("modelId", "iot_park_pass_record");

        JSONObject properties = new JSONObject();
        properties.put("direction", "獲取入參的對應的值");
        properties.put("openType", "獲取入參的對應的值");
        properties.put("plateNumber","獲取入參的對應的值");

        //首先獲取到要上傳的文件名和上傳的路徑
        ApiResponse response = getUploadFileNameAndPath();
        String result = null;
        try {
            result = new String(response.getBody(), "UTF-8");
        } catch (UnsupportedEncodingException e) {
            e.printStackTrace();
        }

        //將JSON字符串轉化成對象
        UploadResult uploadResult = JSON.parseObject(result, UploadResult.class);
        data nameAndPath = uploadResult.getData();

        properties.put("plateNumberImage", nameAndPath.getFileName());

        //根據底層停車系統上報的文件路徑下載文件
        String lfFileUrl = inOutRecordVo.getImagePath();
        //下載后文件的名字
        String name = nameAndPath.getFileName();
        //文件保存路徑
        String savePath = fsp.getSavePathOne();

        if(!StringUtil.isEmpty(lfFileUrl)){
            String url = FileUtil.getURL(lfFileUrl);
            FileUtil.downLoadFromUrl(url,name,savePath);
        }

        //根據dop接口獲取到的path將文件上傳
        //上傳文件的路徑
        String url = nameAndPath.getUrl();
        //要上傳的文件
        File file = new File(savePath + name);
        //判斷上傳是否成功
        //首先判斷文件是否存在,存在才上傳文件
        if(file.exists()){
            byte[] fileBytes = FileUtil.getFileBytes(file);
            boolean b1 = FileUtil.uploadFile(url, fileBytes);
            if (!b1) {
                log.info("文件上傳失敗");
                throw new ParkingLotAdapterException(502, "文件上傳失敗", "File upload failed");
            }
        }
        //文件上傳成功后,清除本地緩存的文件
        FileUtil.deleteFile(savePath, name);

        properties.put("typePermission", "獲取入參的對應的值");
        properties.put("plateColor", "獲取入參的對應的值");
        properties.put("plateType", "獲取入參的對應的值");
        properties.put("vehicleColor", "獲取入參的對應的值");
        properties.put("vehicleType", "獲取入參的對應的值");
        properties.put("barrierId", "獲取入參的對應的值");

        if (StringUtils.isNotBlank(inOutRecordVo.getChannelName())) {
            properties.put("barrierName", "獲取入參的對應的值");
        }

        properties.put("parkingLotId","獲取入參的對應的值");
        properties.put("areaId", "未知");
        properties.put("orderNumber", "獲取入參的對應的值");
        properties.put("recordId", "未知");

        //數據上報的時間
        Date date = new Date();
        SimpleDateFormat dateFormat = new SimpleDateFormat("yyyy-MM-dd HH:mm:ss");
        String eventTime = dateFormat.format(date);
        properties.put("eventTime",eventTime);  //應該產生一個時間上報

        ioTApiRequest.putParam("properties", properties);
        ApiResponse apiResponse = syncApiClient.postBody(host, path, ioTApiRequest, "https".equalsIgnoreCase(schema));

    }

    public static ApiResponse getUploadFileNameAndPath() {

        IoTApiRequest request = new IoTApiRequest();

        //設置api的版本
        request.setApiVer("0.0.1");

        // 接口參數
        String uuid = UUID.randomUUID().toString();
        request.setId(uuid.replace("-", ""));

        JSONObject param = new JSONObject();
        param.put("appId",  "應用id");
        param.put("version", "應用版本");

        request.putParam("properties", param);

        //這個參數對應于數據模型中需要上傳文件的字段
        request.putParam("attrName", "plateNumberImage");

        //這個參數對應于數據模型的模型id
        request.putParam("modelId", "iot_park_pass_record");

        request.putParam("fileType", "文件類型");
        request.putParam("version", "版本");
        request.putParam("fileSize", "文件大小");

        try {
            ApiResponse apiResponse = syncApiClient.postBody(DATA_EDGE_PATH,
                    "/data/model/data/upload", request, false);
            return apiResponse;
        } catch (IOException e) {
            log.info("上傳文件獲取文件名和上傳路徑接口出現異常:{}", e.getMessage());
        }
        return null;
    }

}
pom依賴:
<dependency>
            <groupId>com.aliyun.iotx</groupId>
            <artifactId>iotx-api-gateway-client</artifactId>
        </dependency>

    <dependency>
            <groupId>com.aliyun.iotx</groupId>
            <artifactId>common-base</artifactId>
        </dependency>
6.3 云端應用
服務模型調用示例代碼:
* Copyright 2017 Alibaba Group
*
* Licensed under the Apache License, Version 2.0 (the "License");
* you may not use this file except in compliance with the License.
* You may obtain a copy of the License at
*
*     http://www.apache.org/licenses/LICENSE-2.0
*
* Unless required by applicable law or agreed to in writing, software
* distributed under the License is distributed on an "AS IS" BASIS,
* WITHOUT WARRANTIES OR CONDITIONS OF ANY KIND, either express or implied.
* See the License for the specific language governing permissions and
* limitations under the License.
*/

package com.test.demo;/*

import java.io.UnsupportedEncodingException;
import java.util.HashMap;
import java.util.Map;
import java.util.UUID;

import com.alibaba.cloudapi.sdk.model.ApiResponse;

*/
public class RequestDemo {

    public static void main(String[] args) throws UnsupportedEncodingException {
        postRequestDemo();
    }

    public static void postRequestDemo() throws UnsupportedEncodingException {

        IoTApiClientBuilderParams builderParams = new IoTApiClientBuilderParams();

        builderParams.setAppKey("32570812"); //appKey
        builderParams.setAppSecret("9c991848cd11f932bcddae23cc8a25d3"); //appSecret

        SyncApiClient syncClient = new SyncApiClient(builderParams);

        IoTApiRequest request = new IoTApiRequest();

        //設置api的版本
        request.setApiVer("1.0");
        request.setId("42423423");

        //如果需要登錄,設置當前的會話的token
        //request.setIotToken("xxxxxxxxxxxxxxx");

        //設置參數 --看具體路徑下是否需要參數
        //request.putParam("", "");

        //請求參數域名、path、request
        String host = "service-mesh.api-iot.cn-shanghai.aliyuncs.com"; //阿里云服務器域名
        String path = "/iotx_parking_service_model/parkingLotInfoGet"; //適配器具體路徑

        ApiResponse response = syncClient.postBody(host, path, request);
        System.out.println(
            "response code = " + response.getCode() + " response content = " + new String(response.getBody(),
                "utf-8"));
    }
}
數據模型訂閱消費示例代碼:
package com.test.demo;


import com.alibaba.cloudapi.sdk.model.ApiResponse;
import com.alibaba.fastjson.JSON;
import com.alibaba.fastjson.JSONObject;
import com.aliyun.openservices.iot.api.Profile;
import com.aliyun.openservices.iot.api.message.MessageClientFactory;
import com.aliyun.openservices.iot.api.message.api.MessageClient;
import com.aliyun.openservices.iot.api.message.callback.MessageCallback;
import com.aliyun.openservices.iot.api.message.entity.Message;
import com.aliyun.openservices.iot.api.message.entity.MessageToken;
import lombok.extern.slf4j.Slf4j;
import org.apache.commons.lang3.StringUtils;

import java.io.IOException;
import java.io.UnsupportedEncodingException;
import java.util.concurrent.TimeoutException;
@Slf4j
public class Subscribe {

    public static void main(String[] args) throws InterruptedException {

        String appKey = "32393627";
        String appSecret = "f578d197746f9857d3b4e937f0817375";
        String endpoint = String.format("https://%s.iot-as-http2.cn-shanghai.aliyuncs.com:443", appKey);

        // 連接配置
        Profile profile = Profile.getAppKeyProfile(endpoint, appKey, appSecret);

        // 構造客戶端
        MessageClient client = MessageClientFactory.messageClient(profile);

        // 數據接收
        MessageCallback messageCallback = new MessageCallback() {
            @Override
            public Action consume(MessageToken messageToken) {
                Message m = messageToken.getMessage();
                System.out.println("receive : " + new String(messageToken.getMessage().getPayload()));

                // 你的處理消息邏輯
                //監聽后會傳入
                try {
                   getData("補充id信息");
                } catch (UnsupportedEncodingException e) {
                    e.printStackTrace();
                }

                // 處理完一定要發送CommitSuccess
                return MessageCallback.Action.CommitSuccess;
            }
        };

        String topic = String.format("/sys/appkey/%s/dop/model/data/change", appKey);
        client.setMessageListener(topic,messageCallback);

        client.connect(messageToken -> {
            System.out.println(messageToken.getMessage());
            return MessageCallback.Action.CommitSuccess;
        });


    }


    public static void getData() throws UnsupportedEncodingException {

        IoTApiClientBuilderParams ioTApiClientBuilderParams =
                new IoTApiClientBuilderParams();
        ioTApiClientBuilderParams.setAppKey("32393627");
        ioTApiClientBuilderParams.setAppSecret("f578d197746f9857d3b4e937f0817375");
        SyncApiClient syncClient = new SyncApiClient(ioTApiClientBuilderParams);
        IoTApiRequest request = new IoTApiRequest();
        //設置api的版本
        request.setApiVer("0.0.3");

        // 接口參數
        request.putParam("modelId","iot_park_pass_record");

        //需要的數據模型的字段
        List<String> returnFields = Lists.newArrayList("plateNumber");
        request.putParam("returnFields", returnFields);

        //監聽后會返回dataids,里面的值作為查詢條件
        request.putParam("conditions", JSON.parseArray("[{\"fieldName\": \"id\",\"operate\": \"eq\",\"value\": 49649}]"));
        //49649,49656
        //請求參數域名、path、request
        ApiResponse response = syncClient.postBody("api.link.aliyun.com",
                "/data/model/data/query", request, true);
        System.out.println( "response code = " + response.getCode()
                + " response = " + new String(response.getBody(), "UTF-8"));

    }

}
pom依賴:
<dependency>
            <groupId>com.aliyun.openservices</groupId>
            <artifactId>iot-client-message</artifactId>
            <version>1.1.3</version>
        </dependency>

        <dependency>
            <groupId>com.aliyun</groupId>
            <artifactId>aliyun-java-sdk-core</artifactId>
            <version>3.7.1</version>
        </dependency>

        <dependency>
            <groupId>commons-codec</groupId>
            <artifactId>commons-codec</artifactId>
            <version>1.11</version>
        </dependency>
監聽后的返回結果示例:

getData方法返回的結果:就可以得到剛剛上傳的數據了

重復消費的問題:
本地客戶端的業務代碼處理消息的時間過長,大于等于30s。服務端認為你消費失敗了,就會向客戶端重復推送數據。
附錄 1 參考鏈接
1:邊緣應用服務總線對接:
http://m.bestwisewords.com/document_detail/145527.html?spm=a2c4g.11186623.6.596.7fed5ee4ubEs4R
2:邊緣應用數據總線對接:
http://m.bestwisewords.com/document_detail/145523.html?spm=a2c4g.11186623.6.595.1b1e610aWUV5Bv
3:服務總線
4:數據總線
http://m.bestwisewords.com/document_detail/114862.html?spm=a2c4g.11186623.6.642.60a7a463DkcwKm
5:API調用對接指引:
http://m.bestwisewords.com/document_detail/144661.html?spm=a2c4g.11174283.6.674.3eb152d0w6QxBu
6:數據模型對接指引:
附錄 2 如何查看邊緣應用日志
應用開發完成并部署到物業一體機進行調試,可以登錄到物業一體機,查看對應的應用日志:
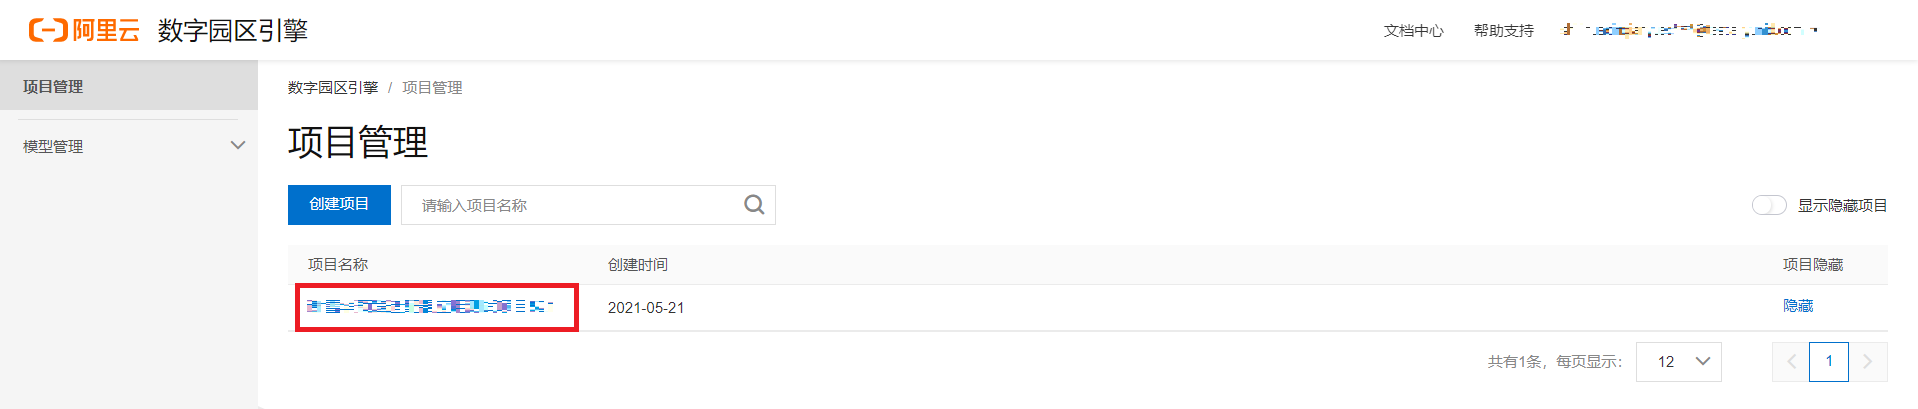
1:選擇項目
點擊數字園區引擎項目列表,選擇一個項目,如下圖所示:
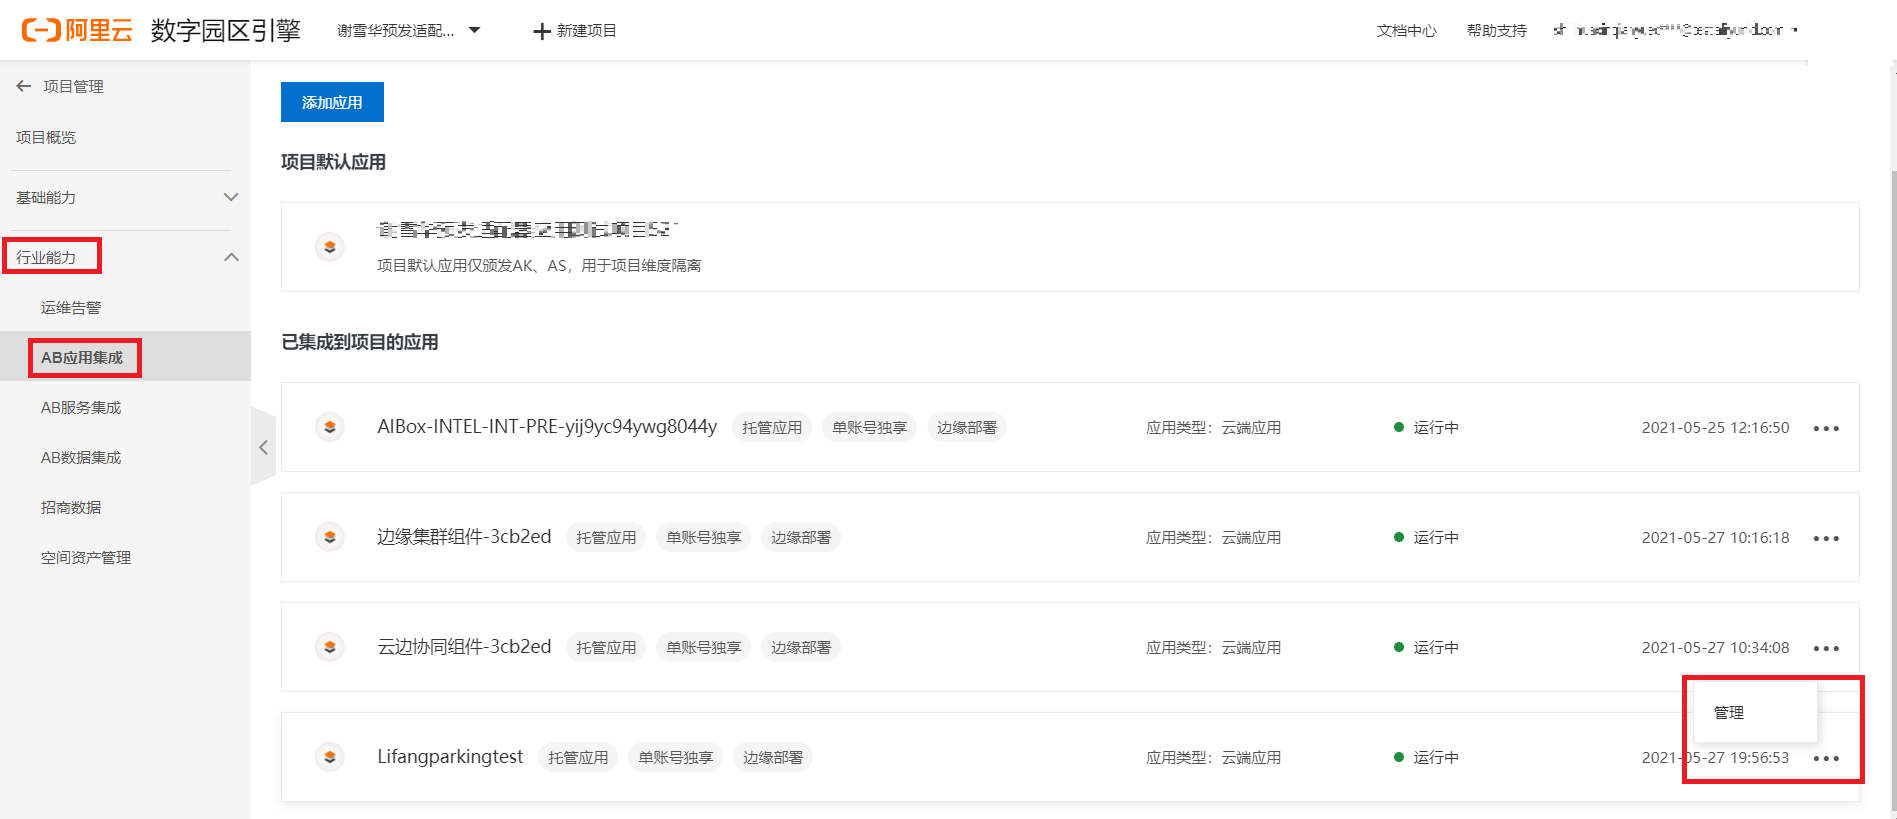
2:應用管理
行業能力-AB應用集成,找到要查看的應用,點擊右側的三個點,點擊管理。如下圖所示:
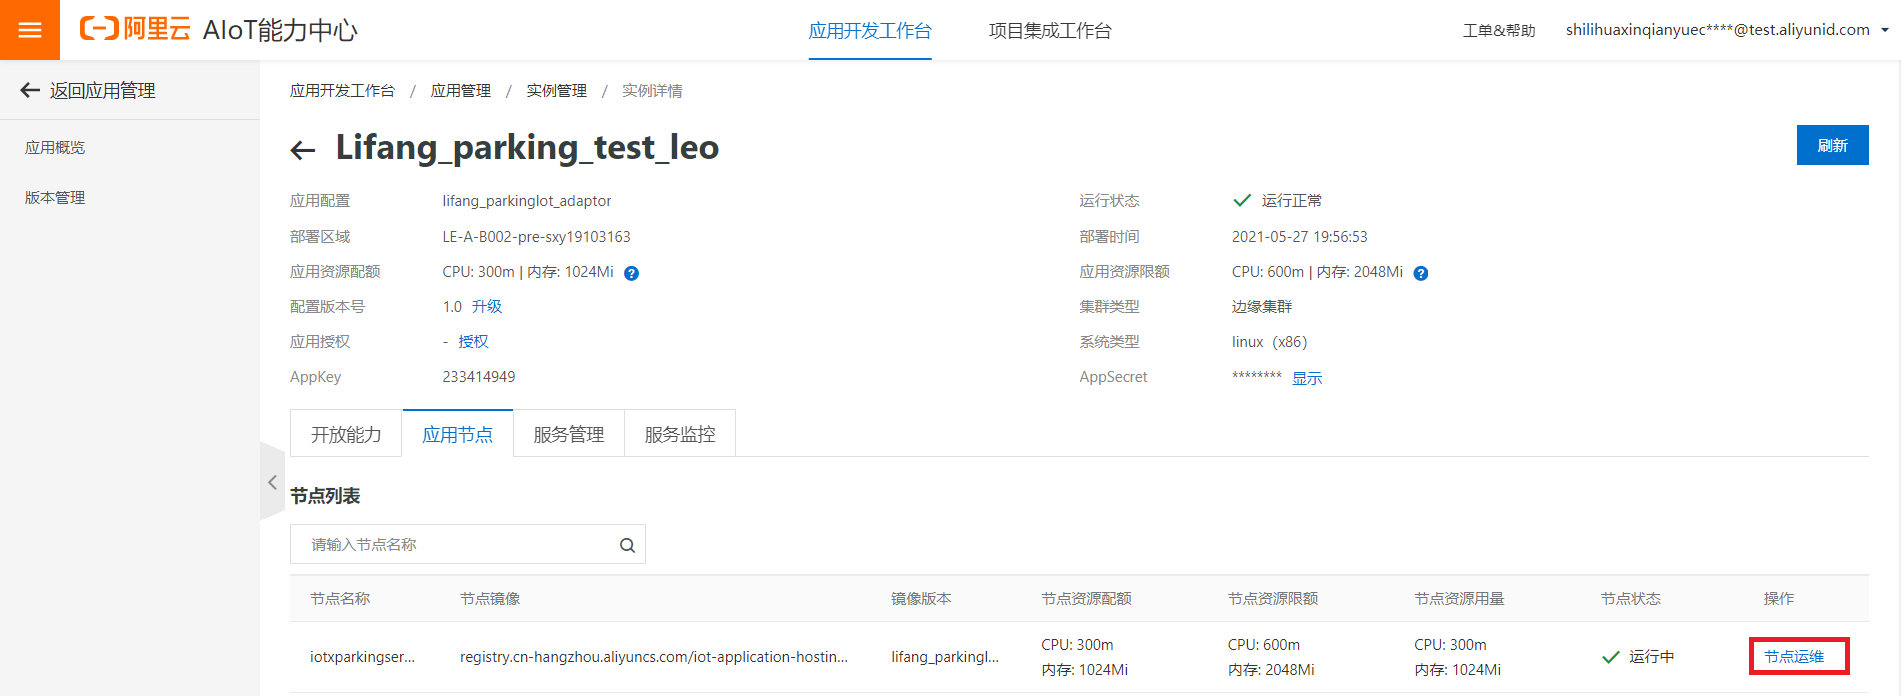
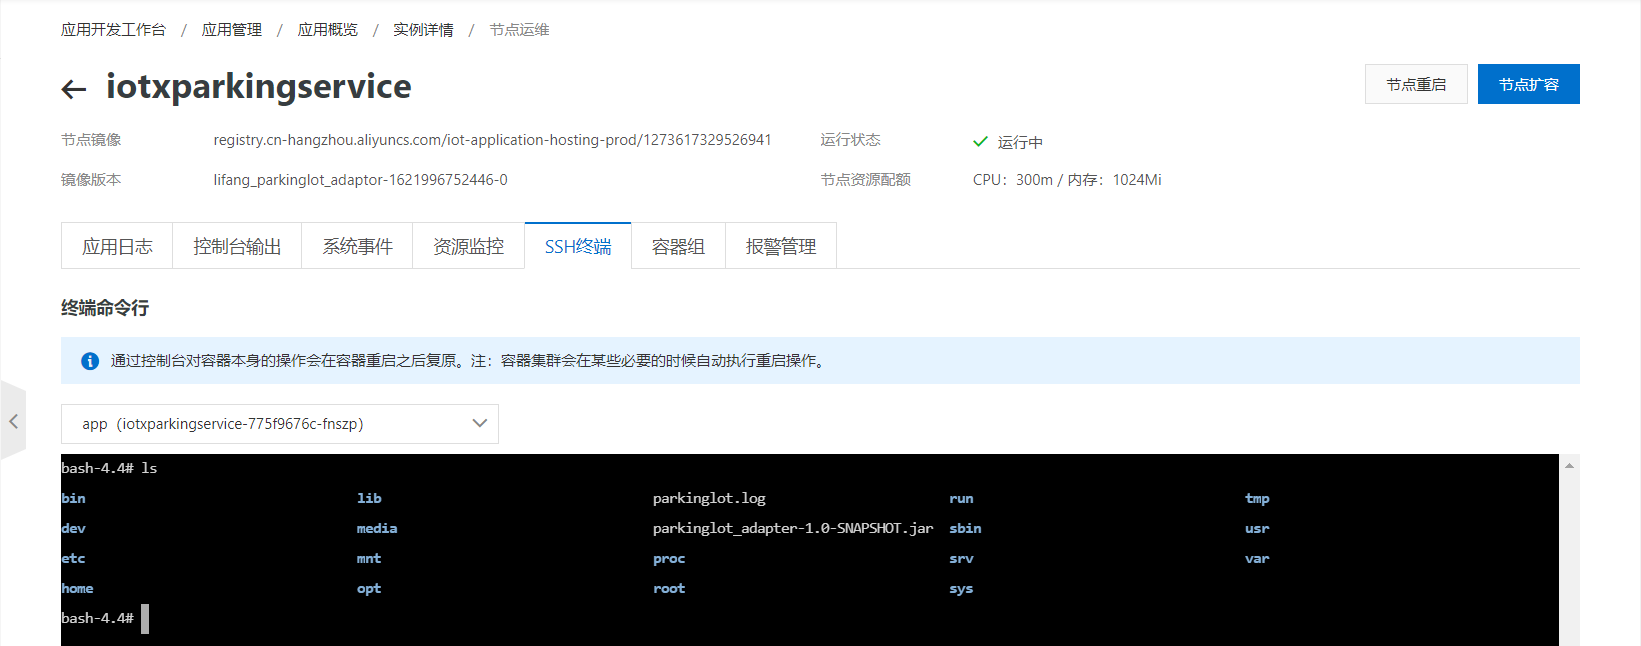
選擇節點運維
點擊SSH終端,選擇容器(一般只有一個,點擊選擇即可):
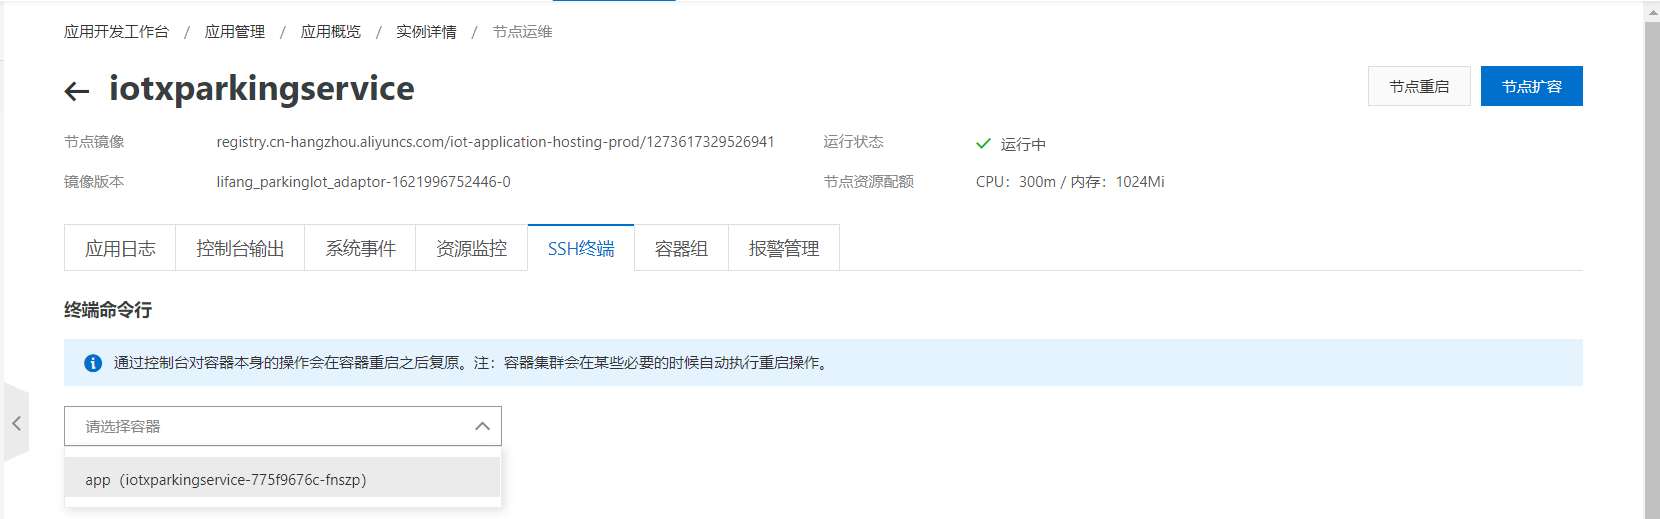
選擇完容器,將自動登錄到物業一體機。當前目錄即保持有該應用的日志
附錄 3 邊緣應用部署手冊
修改記錄及版本信息
序號 | 版本號 | 修改內容 | 修改時間 |
1 | Rev1.0 | 文檔創建 | 2021-06-01 |
1 適配器應用接入操作
1.1 創建鏡像倉庫
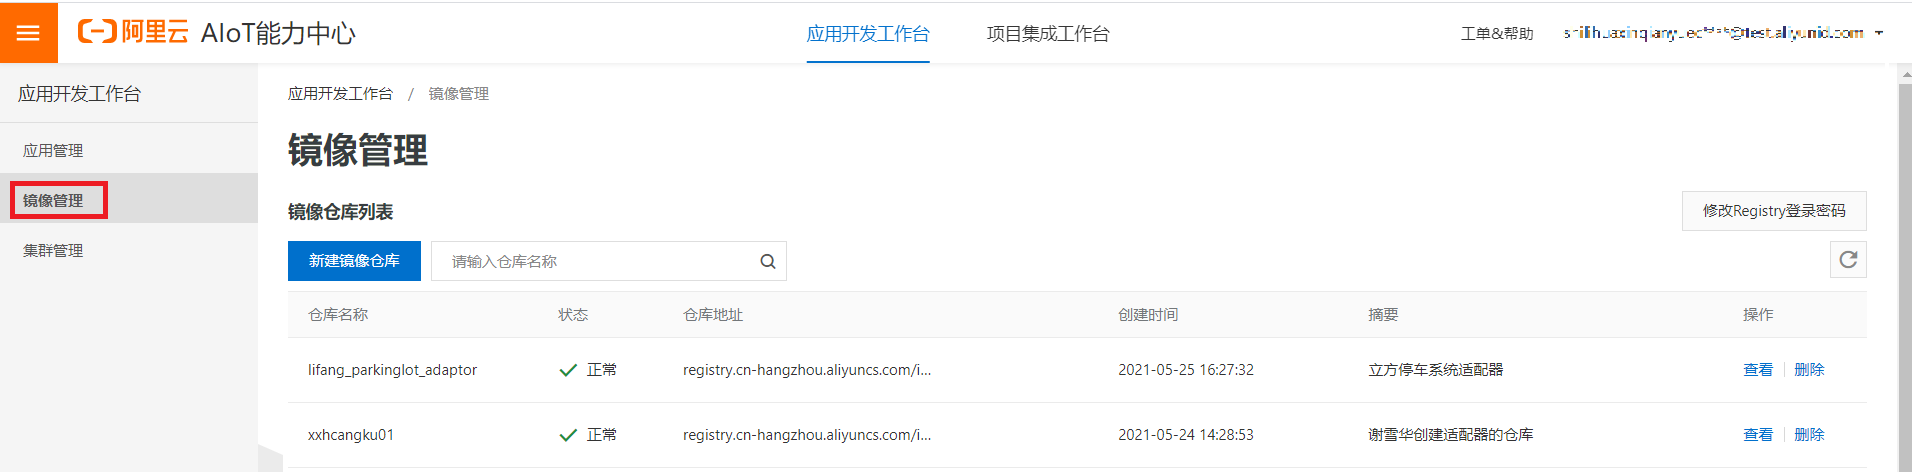
使用阿里云賬號登錄AIoT能力中心的鏡像管理頁面,如下圖所示:
選擇新建鏡像倉庫,這個倉庫用于存放制作好的鏡像,每次往倉庫推送一次鏡像都是一個新的版本。
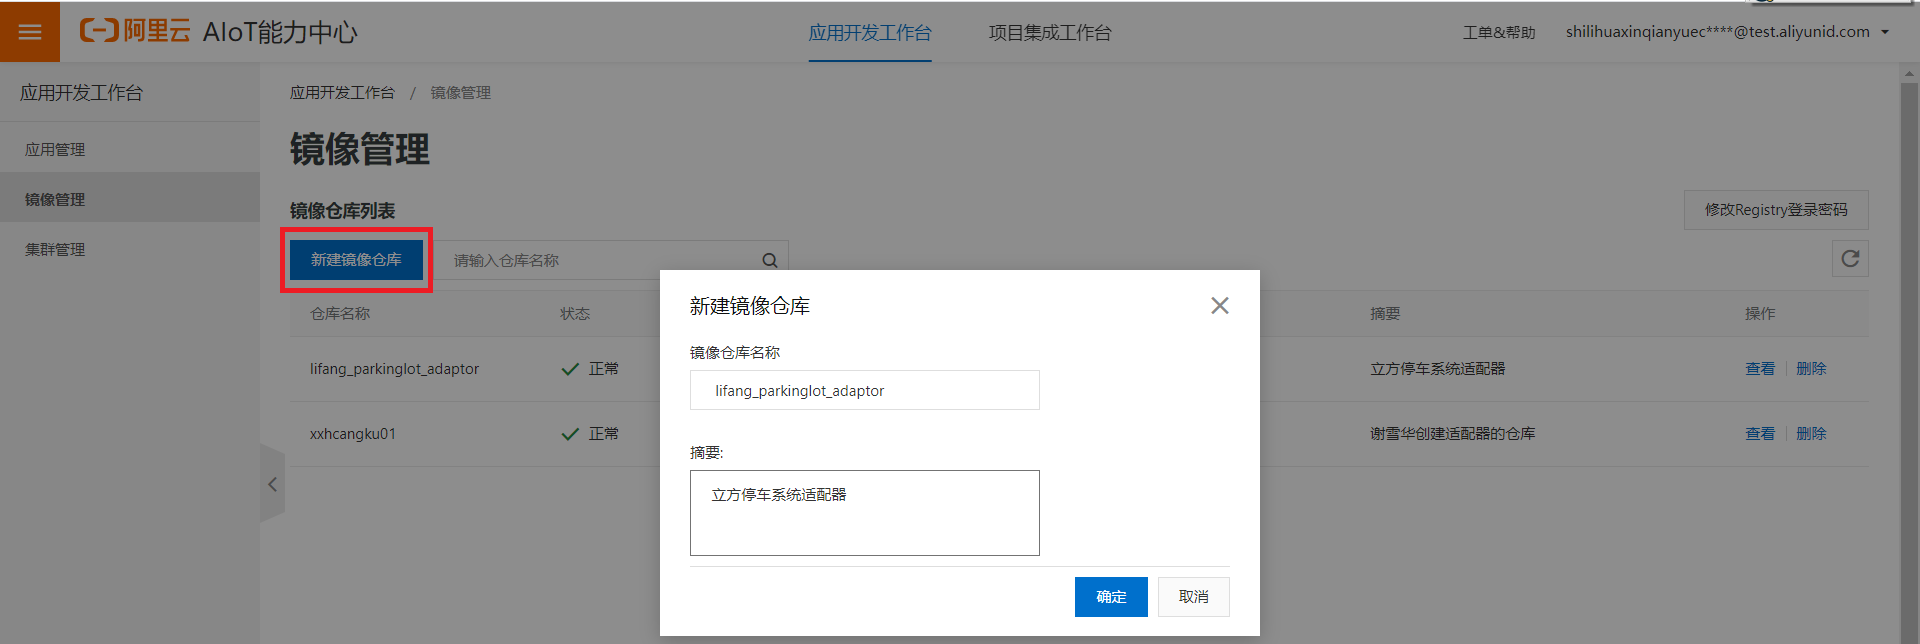
鏡像倉庫名稱:填寫: lifang_parkinglot_adaptor
摘要:填寫:立方停車系統適配器
創建好鏡像倉庫之后,需要制作鏡像并推送到這個鏡像倉庫。
首先在列表中找到剛新建完成的鏡像倉庫 lifang_parkinglot_adaptor,然后選擇查看,如下圖所示:
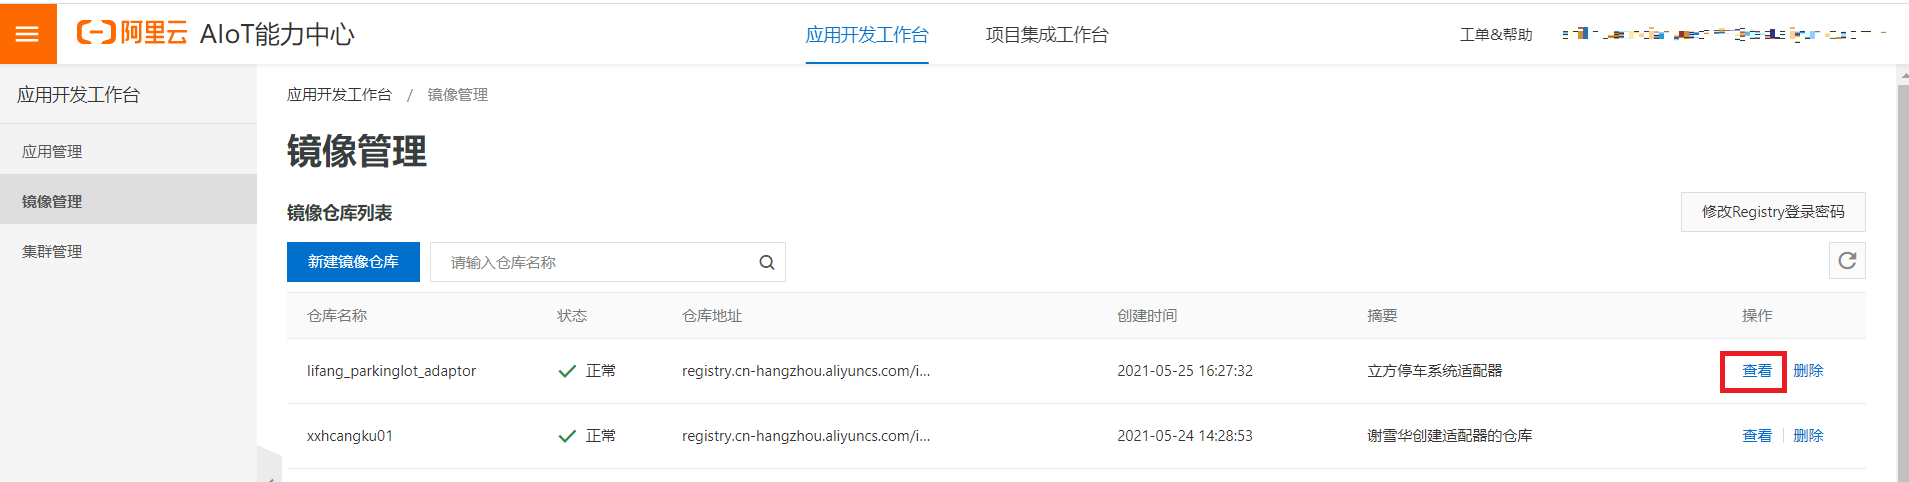
其中操作指南指示上傳鏡像的步驟,鏡像版本管理列出了倉庫中推送上來的所有鏡像。

下面操作以Linux操作環境為例
前置條件1:Linux環境下安裝了Docker工具
前置條件2:在Linux環境下將要操作的目錄下,將下面兩個文件拷貝到該目錄。這兩個文件在項目交付時,請聯系項目組中阿里云技術負責人獲取。
(1) parkinglot_adapter-1.0-SNAPSHOT.jar
(2) Dockerfile
在Linux目錄下執行下面命令:
sudo docker build -f Dockerfile -t lifang_adaptor_image:v1.0.
其中:v1.0是版本號; lifang_adaptor_imag是鏡像名稱
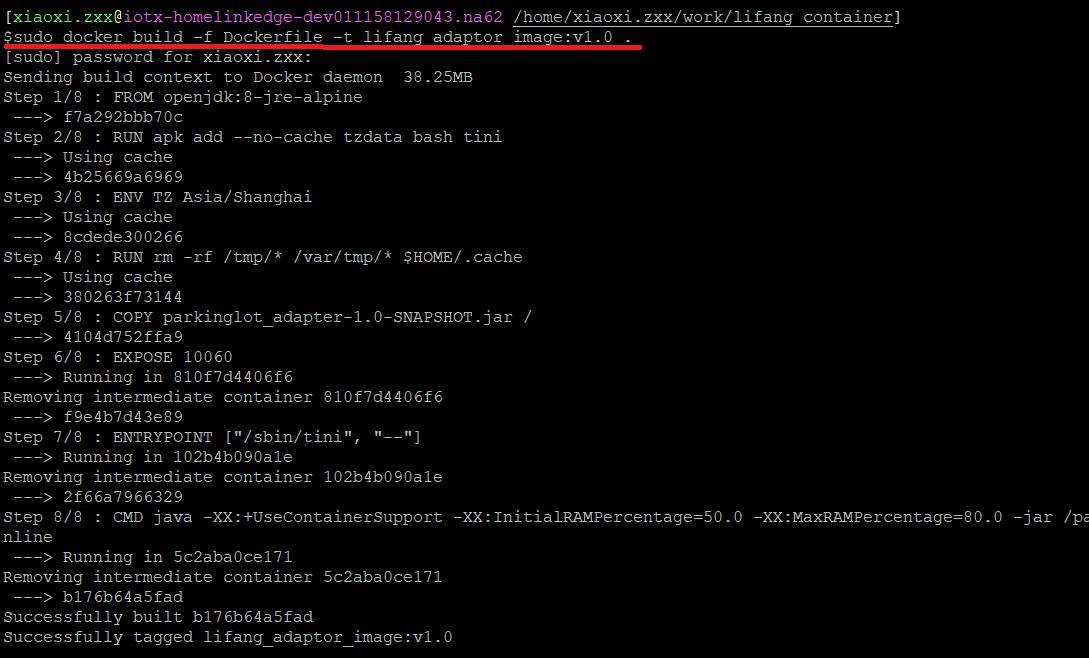
sudo docker images

找到lifang_adaptor_image對應的image id:b176b64a5fad
說明:下面命令,必須是本文1.1節開始找到的鏡像倉庫lifang_parkinglot_adaptor 頁面里找到拷貝出的命令,如下圖所示:
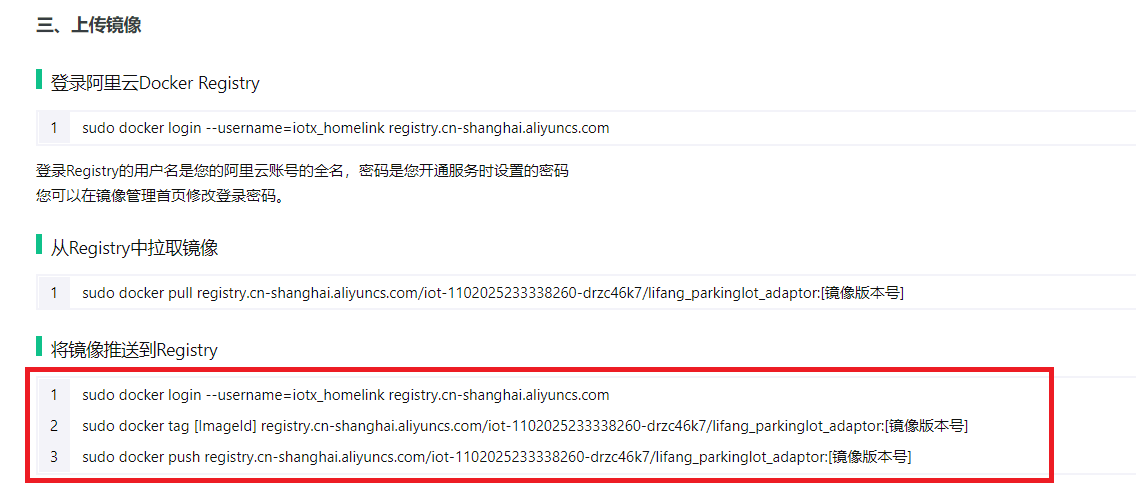
1:登錄registry
從上面紅框里拷貝1對應的命令,最后添加鏡像登錄密碼
sudo docker login --username=iotx_homelink registry.cn-hangzhou.aliyuncs.com -p鏡像登錄密碼

鏡像登錄密碼是從鏡像管理右側修改Registry登錄密碼設置并獲取

2: 打標簽:
從上面紅框里拷貝2對應的命令,修改image id 和版本號。其中image id在2.1.3.2提供,版本號在2.1.3.1指定
sudo docker tagb176b64a5fadregistry.cn-shanghai.aliyuncs.com/iot-1102025233338260-drzc46k7/lifang_parkinglot_adaptor:1.0
如下圖所示:

3:將鏡像推送到Registry
從上面紅框里拷貝3對應的命令,修改鏡像版本號:
sudo docker push registry.cn-shanghai.aliyuncs.com/iot-1102025233338260-drzc46k7/lifang_parkinglot_adaptor:1.0

推送成功后,點擊該鏡像倉庫的鏡像版本管理,可以看見剛才推送成功的1.0版本

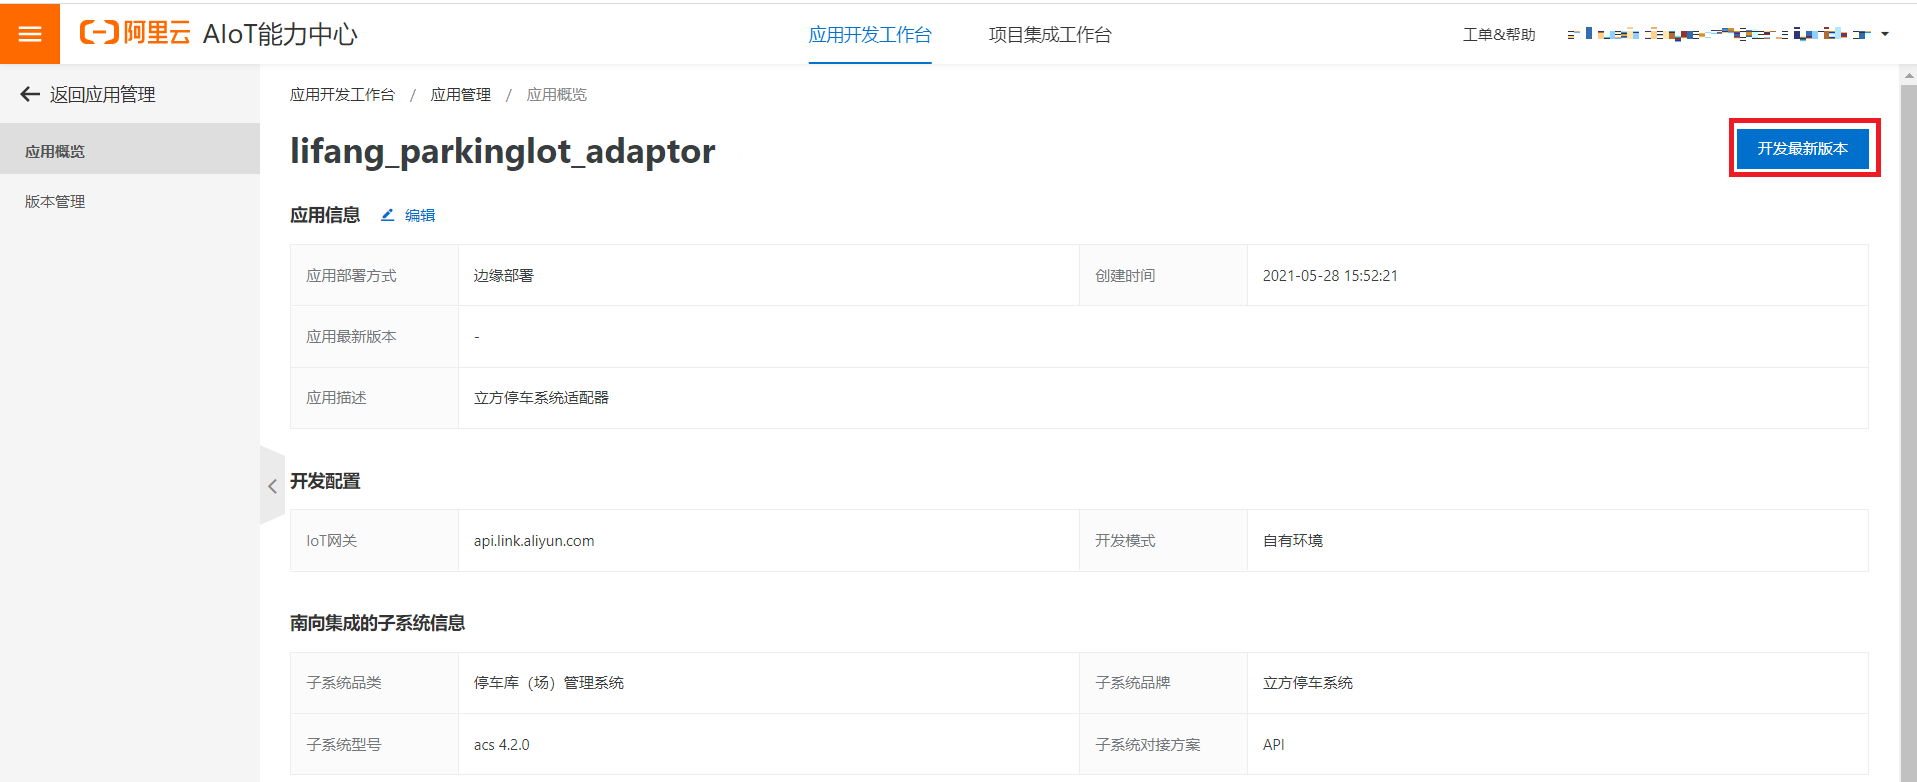
1.2 應用創建與發布
在左邊菜單欄選擇應用管理,然后選擇創建應用,如下圖所示:

彈出頁面如下圖所示:
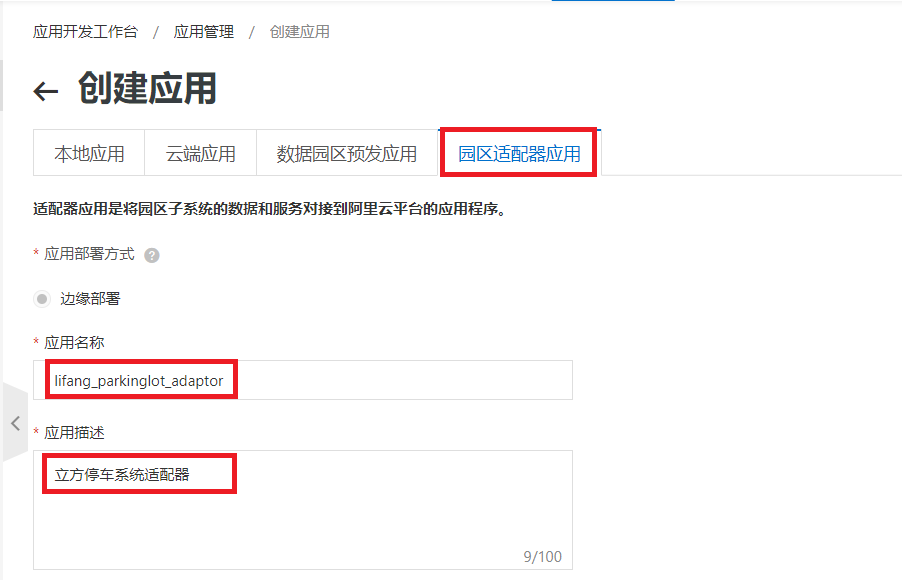
選擇園區適配器應用:
應用名稱:填寫:lifang_parkinglot_adaptor
應用描述:填寫:立方停車系統適配器
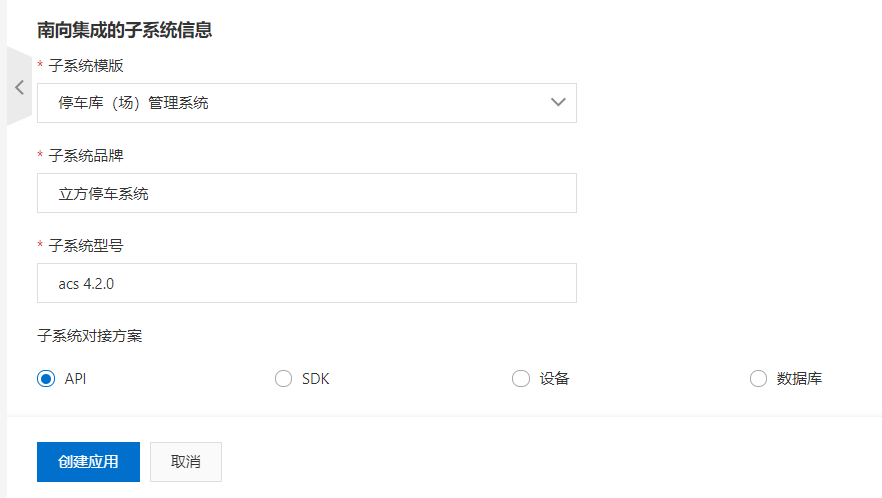
子系統模板:固定選擇停車庫(場)管理系統
子系統品牌:填寫:立方停車系統。這里要求至少輸入4個字符
子系統型號:填寫立方提供的系統版本信息:acs 4.2.0
點擊創建應用,彈出下面頁面,點擊開發新版本,如下圖所示:
版本說明:初始版本
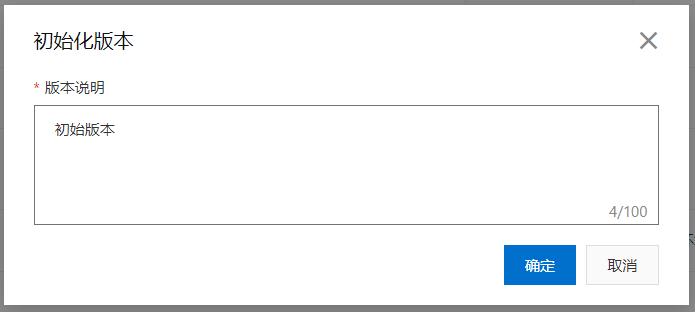
點擊確定,完成應用創建
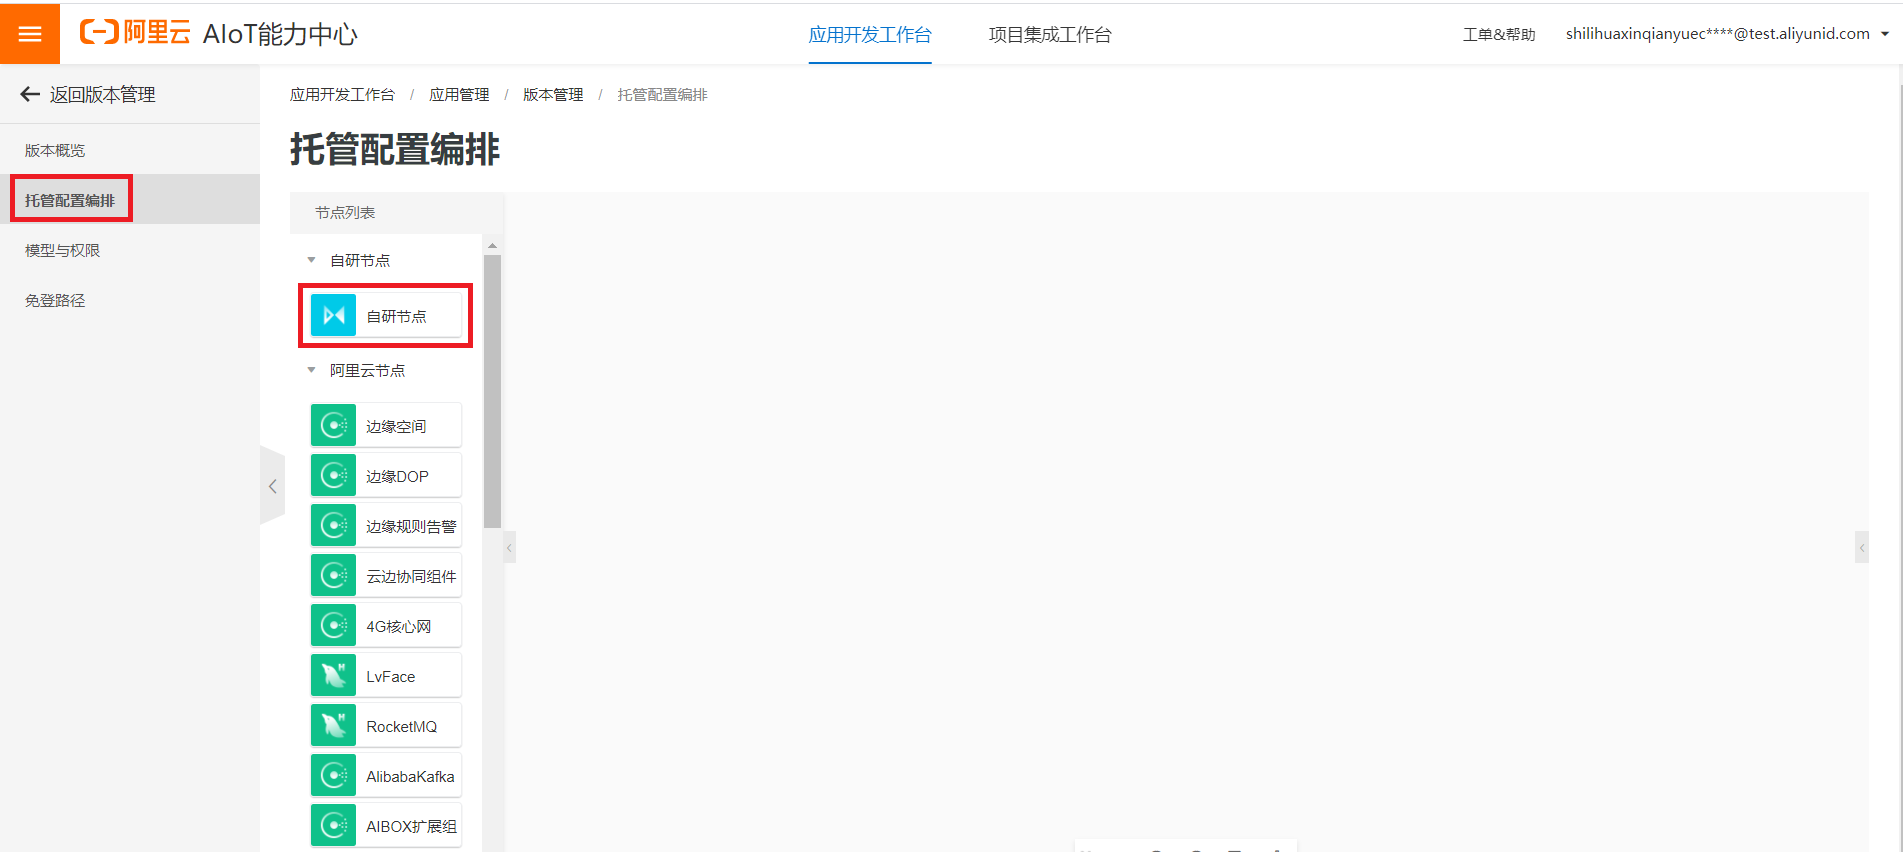
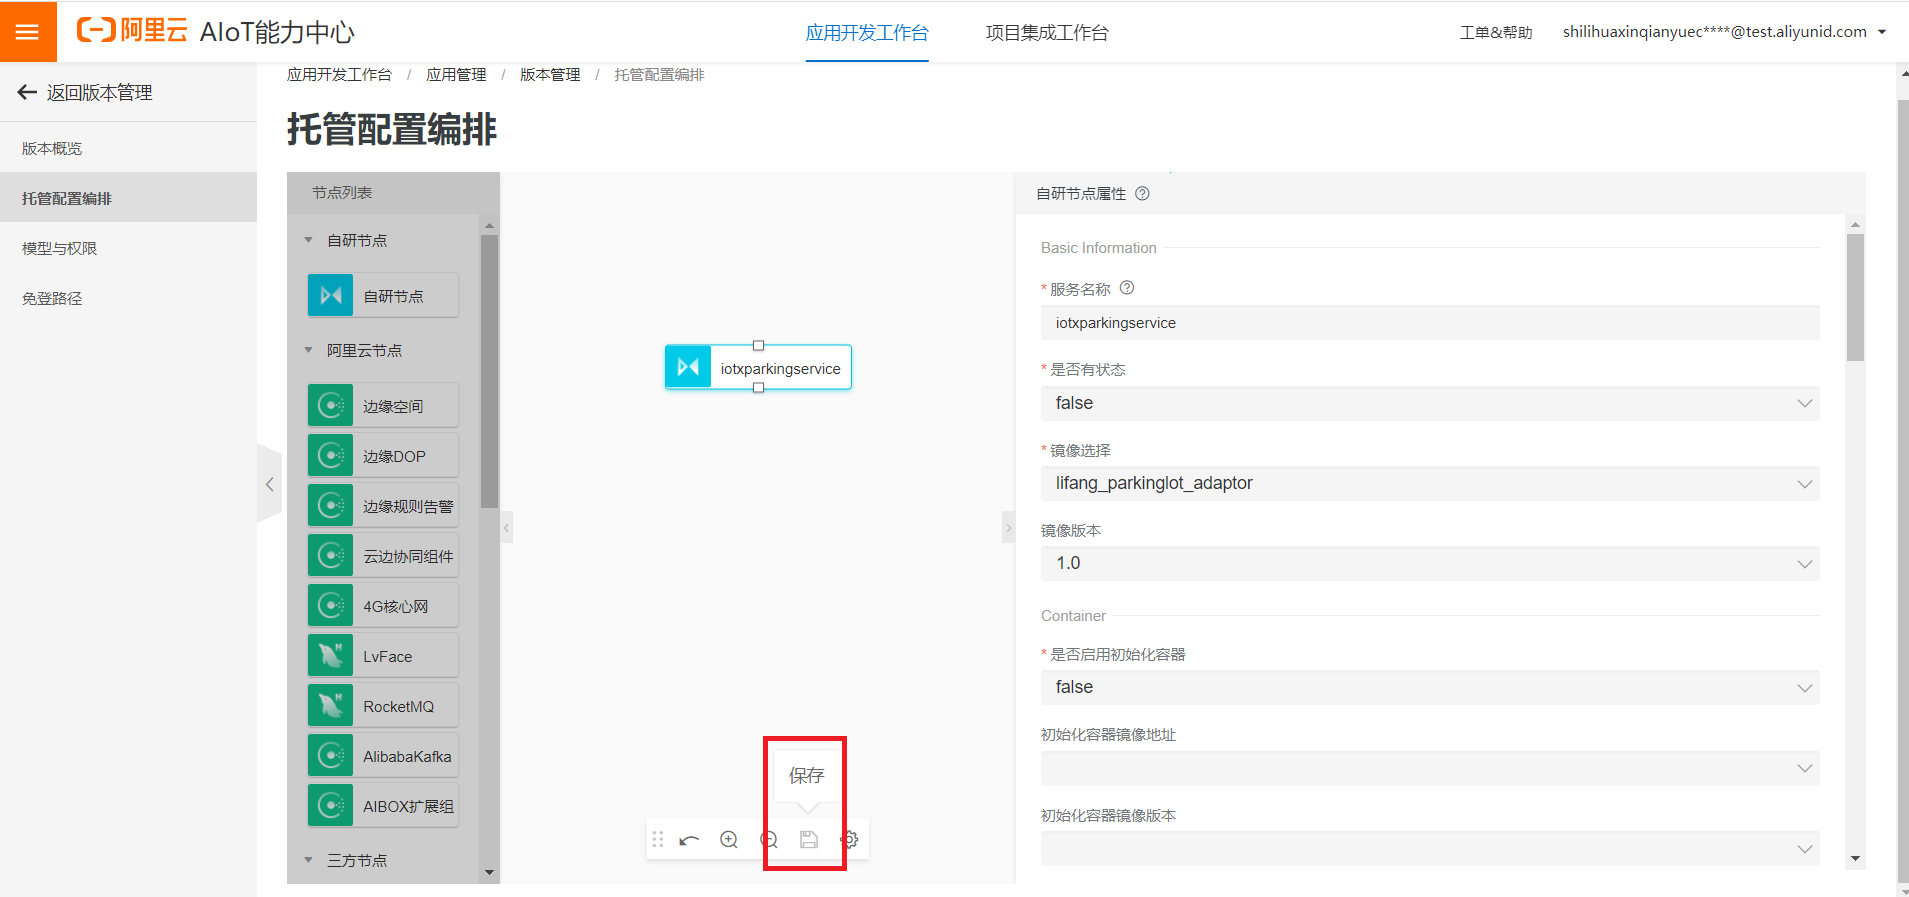
點擊托管配置編排。鼠標左鍵點中自研節點,拖拽到右側,如下圖所示:
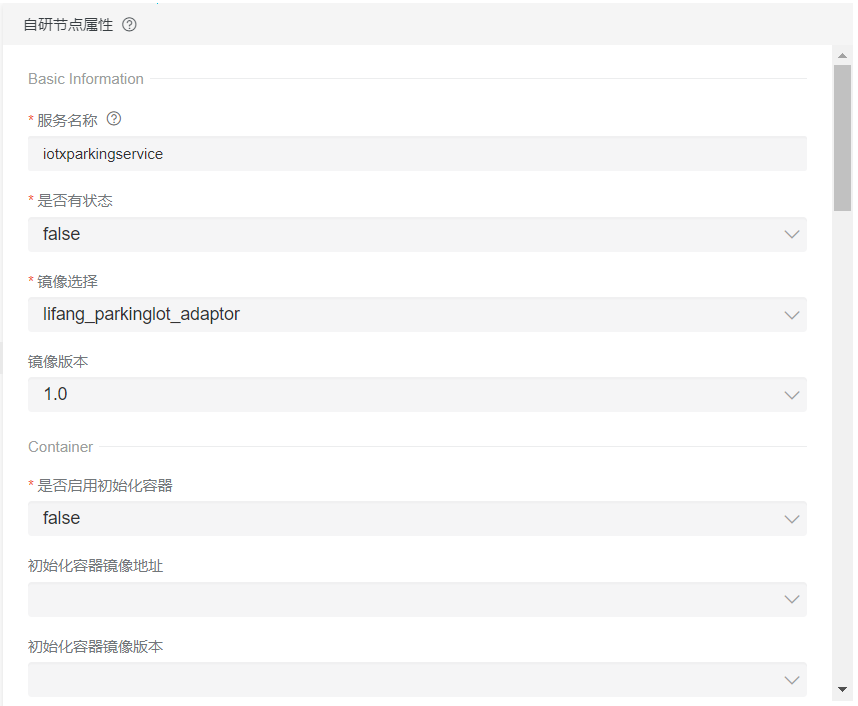
下面將填寫配置信息:
服務名稱:iotxparkingservice
是否有狀態:不用更改,使用缺省:false
鏡像選擇:選擇1.1.2創建的鏡像:lifang_parkinglog_adaptor
鏡像版本:可以選擇最新版本:1.0
是否啟用初始化容器:不用更改,使用缺省:false
如下圖所示:
下面進行環境變量配置,點擊環境變量右側的導入,如下圖所示
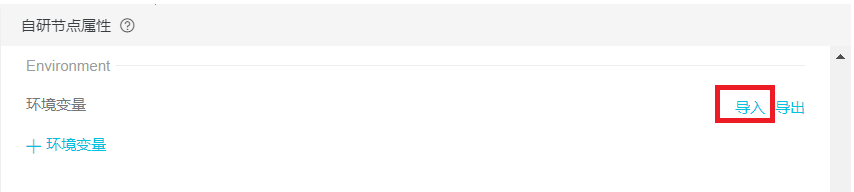
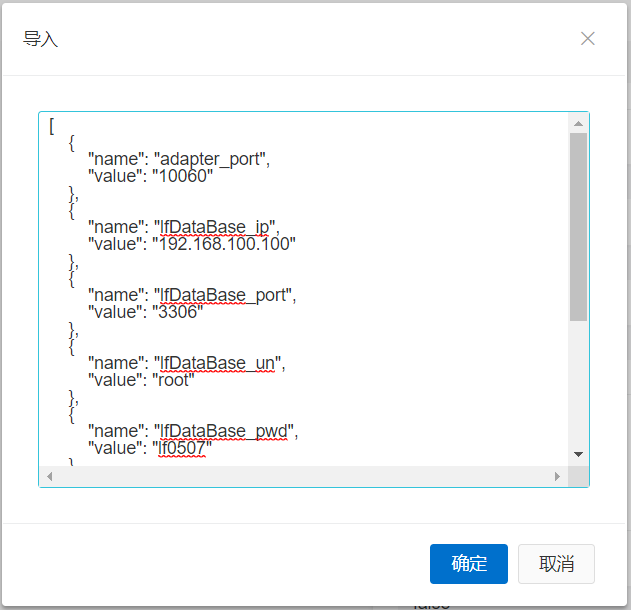
請將下面內容填寫到導入框里:其中IP地址192.168.100.100是立方停車系統的IP地址,要根據實際情況填寫:
[
    {
        "name": "adapter_port",
        "value": "10060"
    },
    {
        "name": "lfDataBase_ip",
        "value": "192.168.100.100"
    },
    {
        "name": "lfDataBase_port",
        "value": "3306"
    },
    {
        "name": "lfDataBase_un",
        "value": "root"
    },
    {
        "name": "lfDataBase_pwd",
        "value": "lf0507"
    },
    {
        "name": "lf_ip",
        "value": "192.168.100.100"
    },
    {
        "name": "lf_port",
        "value": "9988"
    },
    {
        "name": "lf_subPath",
        "value": "/Parking/Handheld/"
    }
]
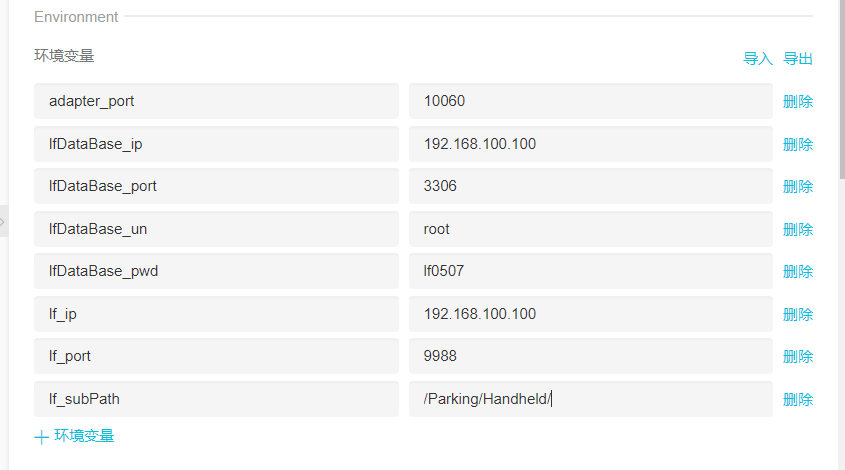
確定后內容如下圖所示:
點擊Network下面的自研節點邊緣端口對,如下圖所示
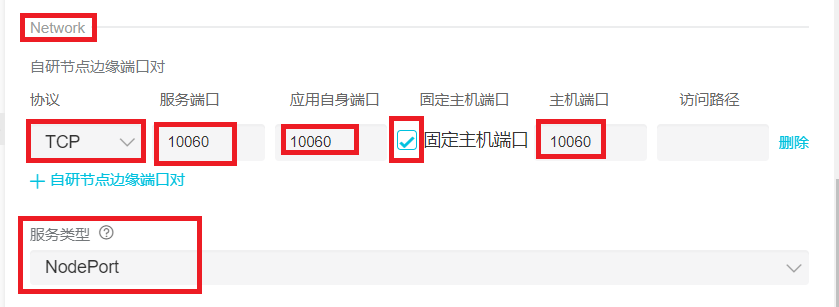
協議:選擇TCP
服務端口:固定填寫 10060
應用自身端口:固定填寫 10060
勾選固定主機端口,如上圖所示。主機端口:固定填寫 10060
服務類型:從下拉列表選擇NodePort
其他直接使用默認參數。點擊左下角保存:
可視化編排完成之后,點擊右側的模型與權限,如下圖所示:
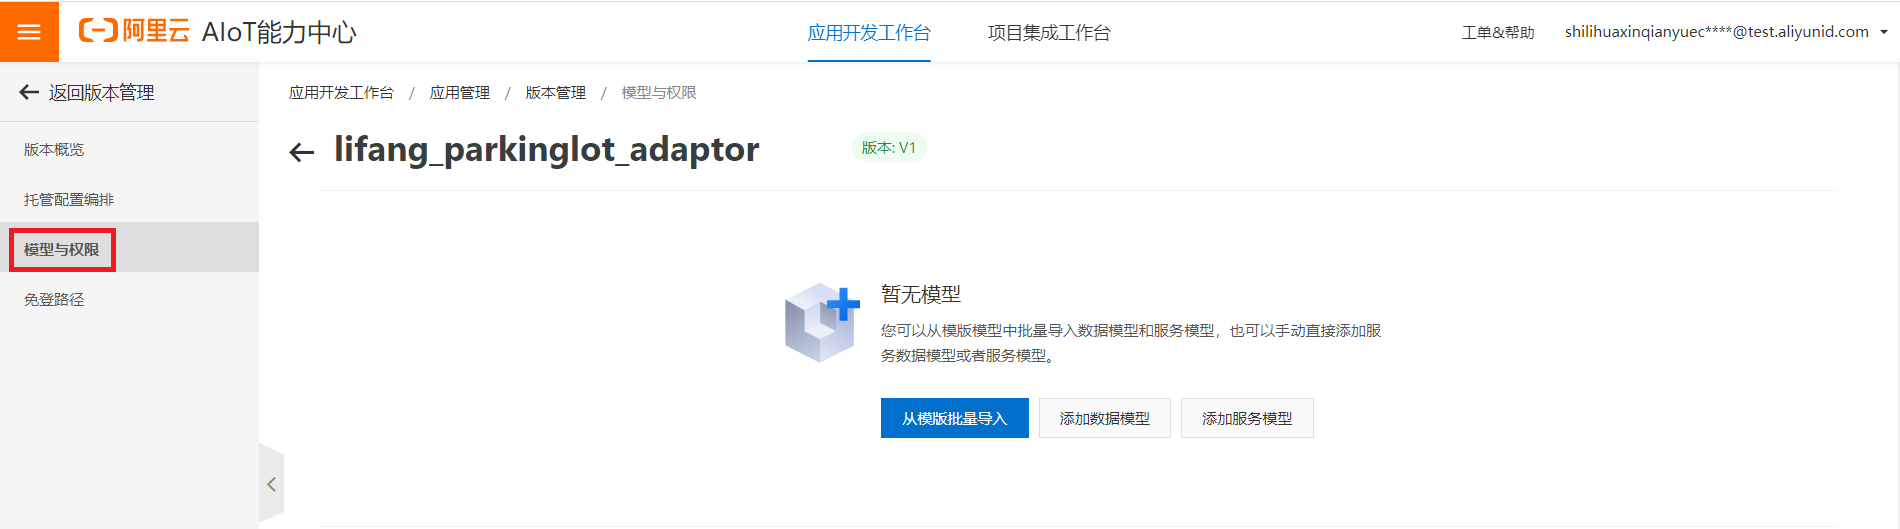
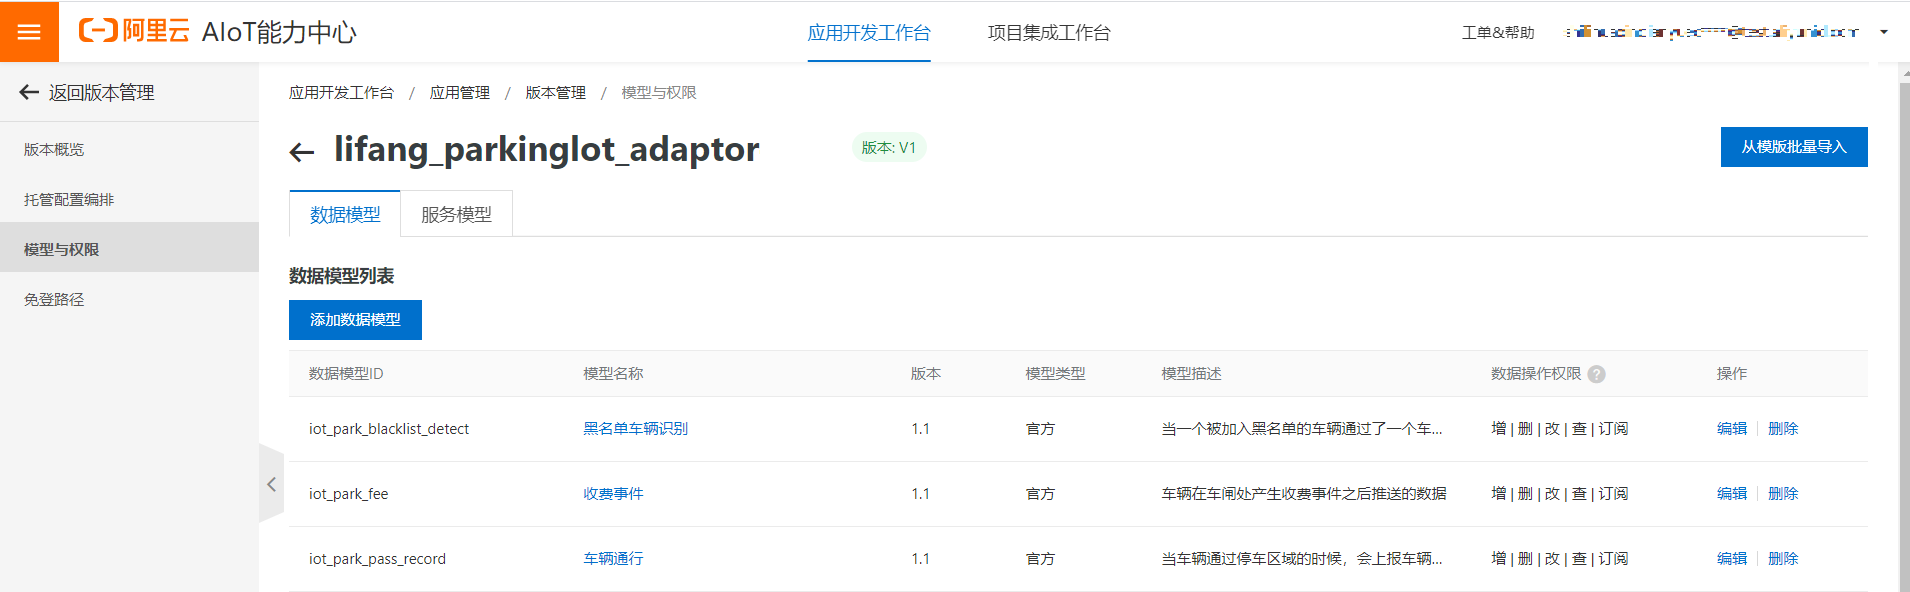
點擊添加數據模型,如下圖所示:
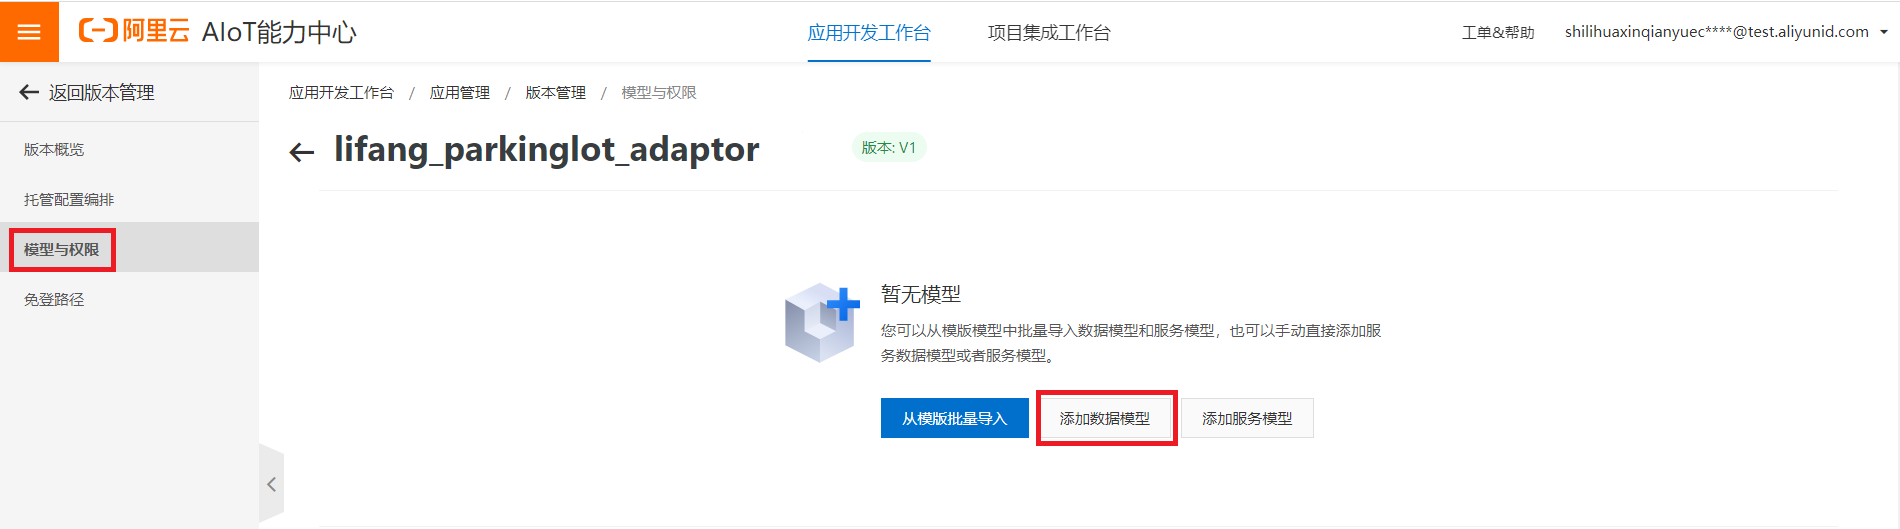
立方停車系統的適配器目前支持下面三種數據模型,需分別添加:
1車輛通行: iot_park_pass_record
2收費事件:iot_park_fee
4黑名單車輛識別:iot_park_blacklist_detect
添加車輛通行數據模型:在數據模型名稱搜索框里輸入iot_park_pass_record,點擊搜索
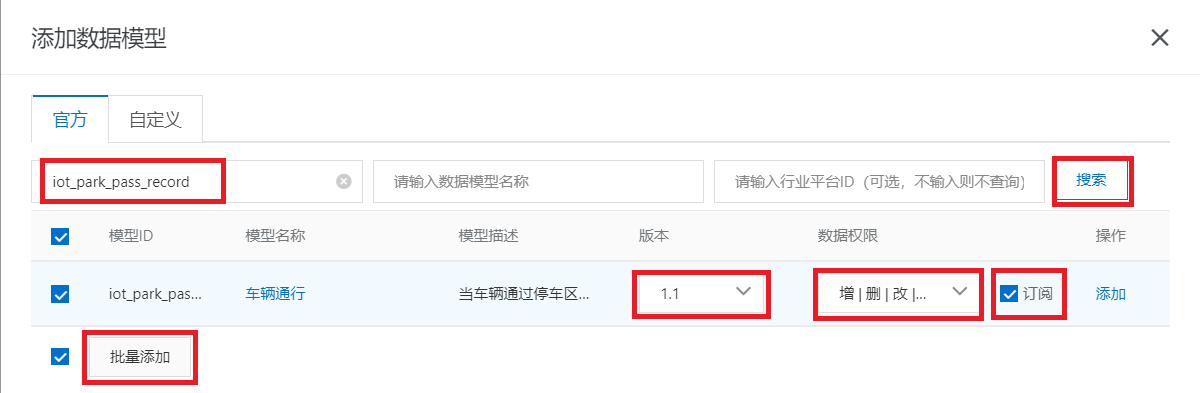
在搜索出對應數據模型,版本選擇最新版本,數據權限選擇增刪改查,特別注意勾選訂閱。最后點擊批量添加
然后依次添加收費事件/黑名單車輛識別數據模型,操作與上面類似。最后結果如下:
點擊服務模型,添加服務模型,如下圖所示
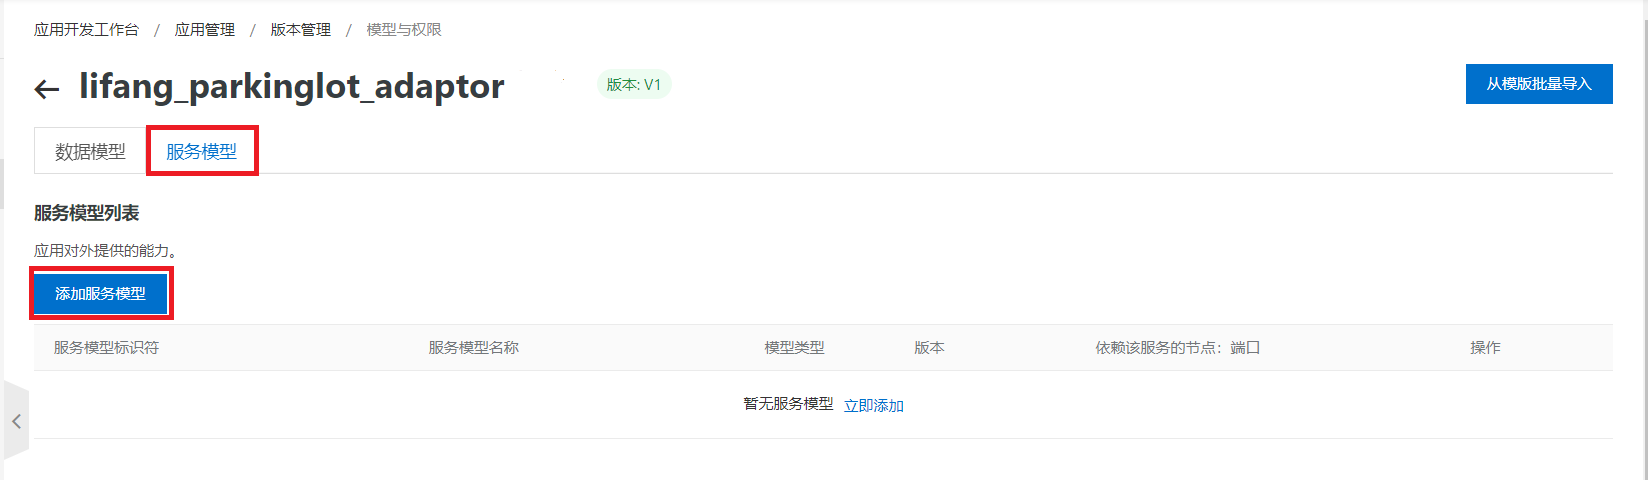
在服務模型標識符搜索框里輸入iotx_parking_service_model,這個是立方停車適配器支持的停車服務模型標識符,點擊搜索,如下圖所示
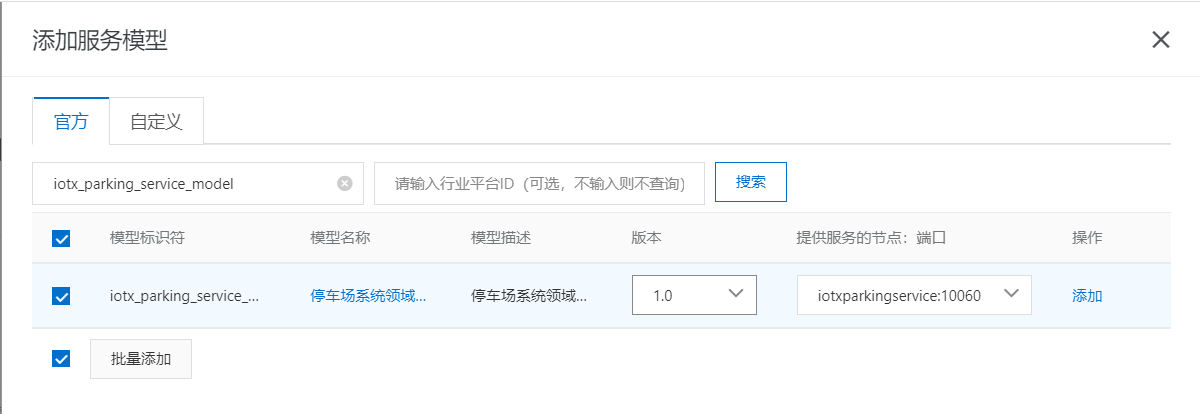
搜索出停車系統領域服務,版本選擇最新的,“提供服務的節點:端口”直接使用自動填充內容,不用修改。最后點擊左下角批量添加。添加完成后如下圖所示:
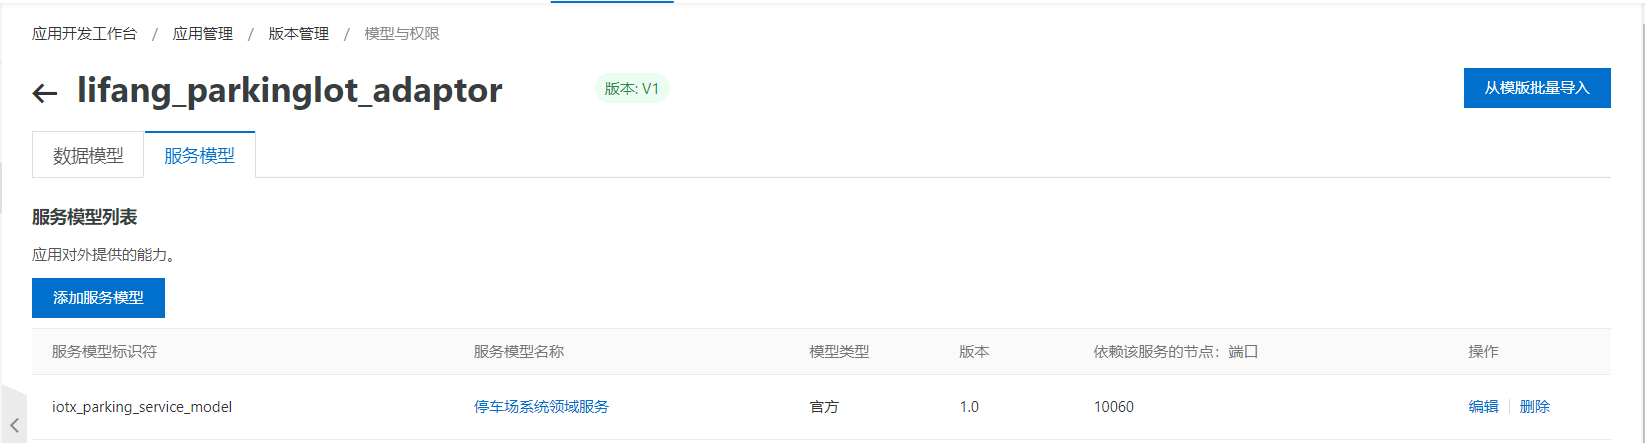
服務模型添加完成以后,云端可以通過服務模型調用應用的接口,從而應用向云端提供服務。
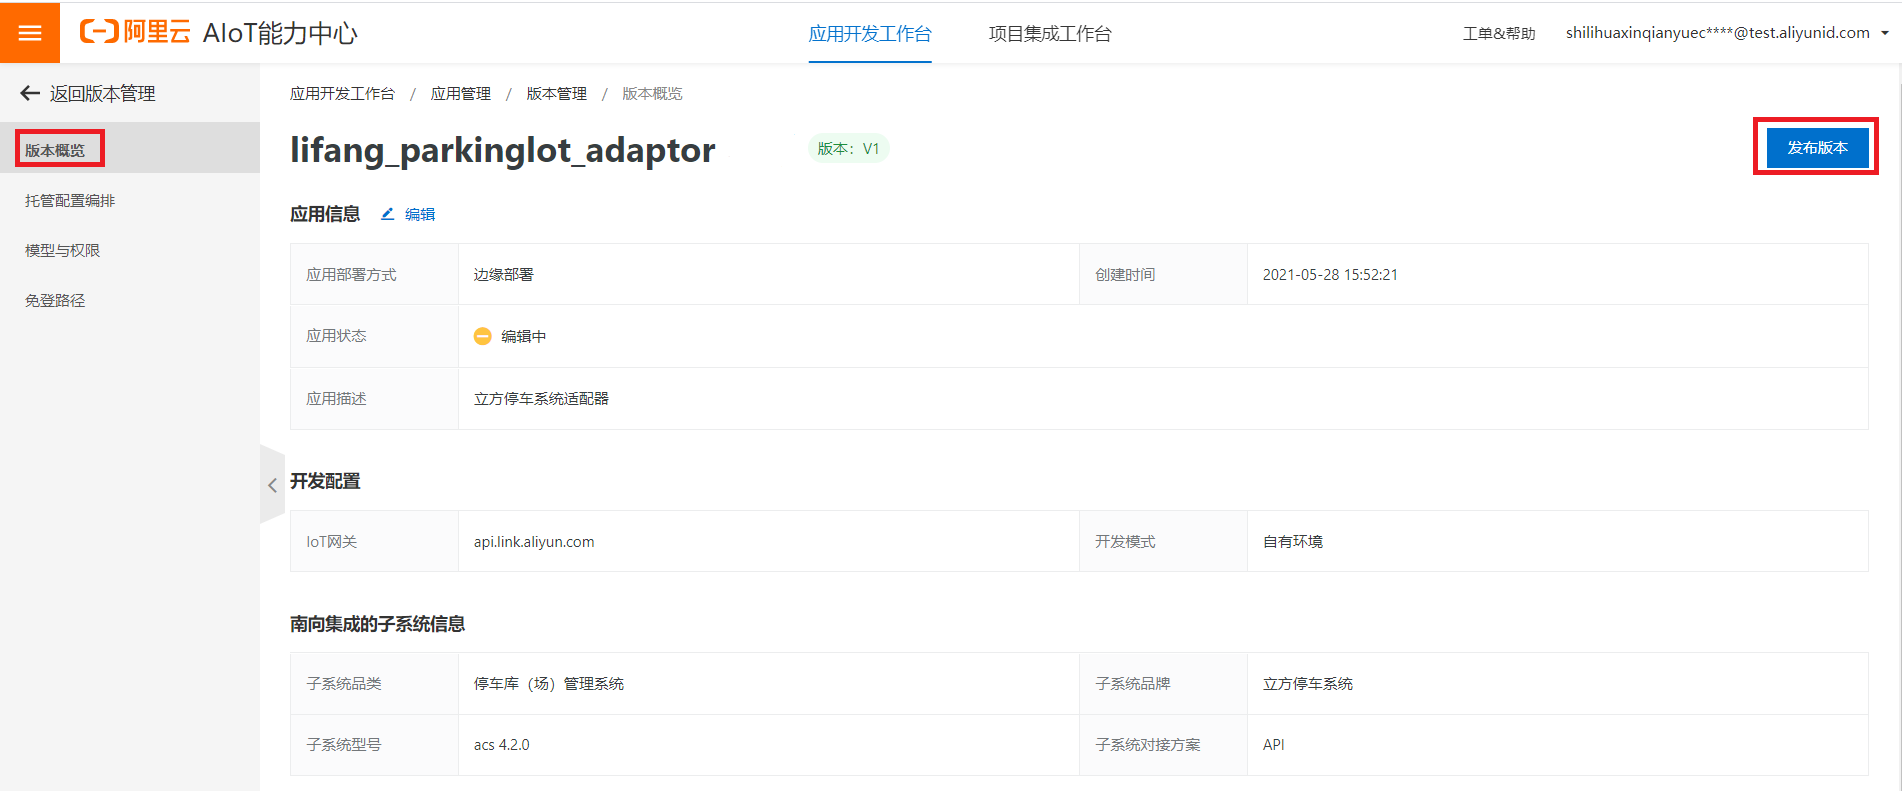
點擊版本概覽,點擊右上角發布版本,如下圖所示
1.3 應用部署
應用創建和發布是在AIoT能力中心平臺。應用部署是在數字園區引擎平臺。
特別提醒,部署適配器應用的前提條件:
物業管理一體機已激活
邊緣集群組件和云邊協同組件都已部署到了物業管理一體機
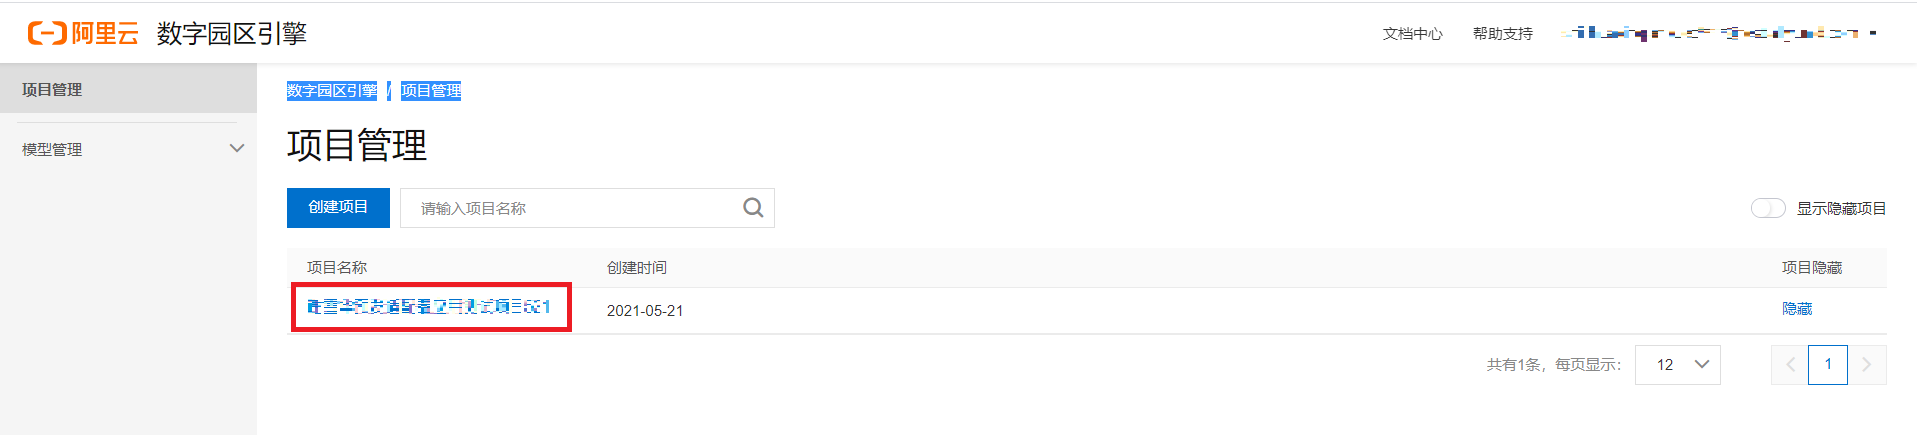
登錄數字園區引擎項目管理頁面,選擇適配器應用需要部署的項目,如下圖所示:
找到基礎能力-物業管理一體機-主機管理,找到對應主機右側的主機詳情,如下圖所示:

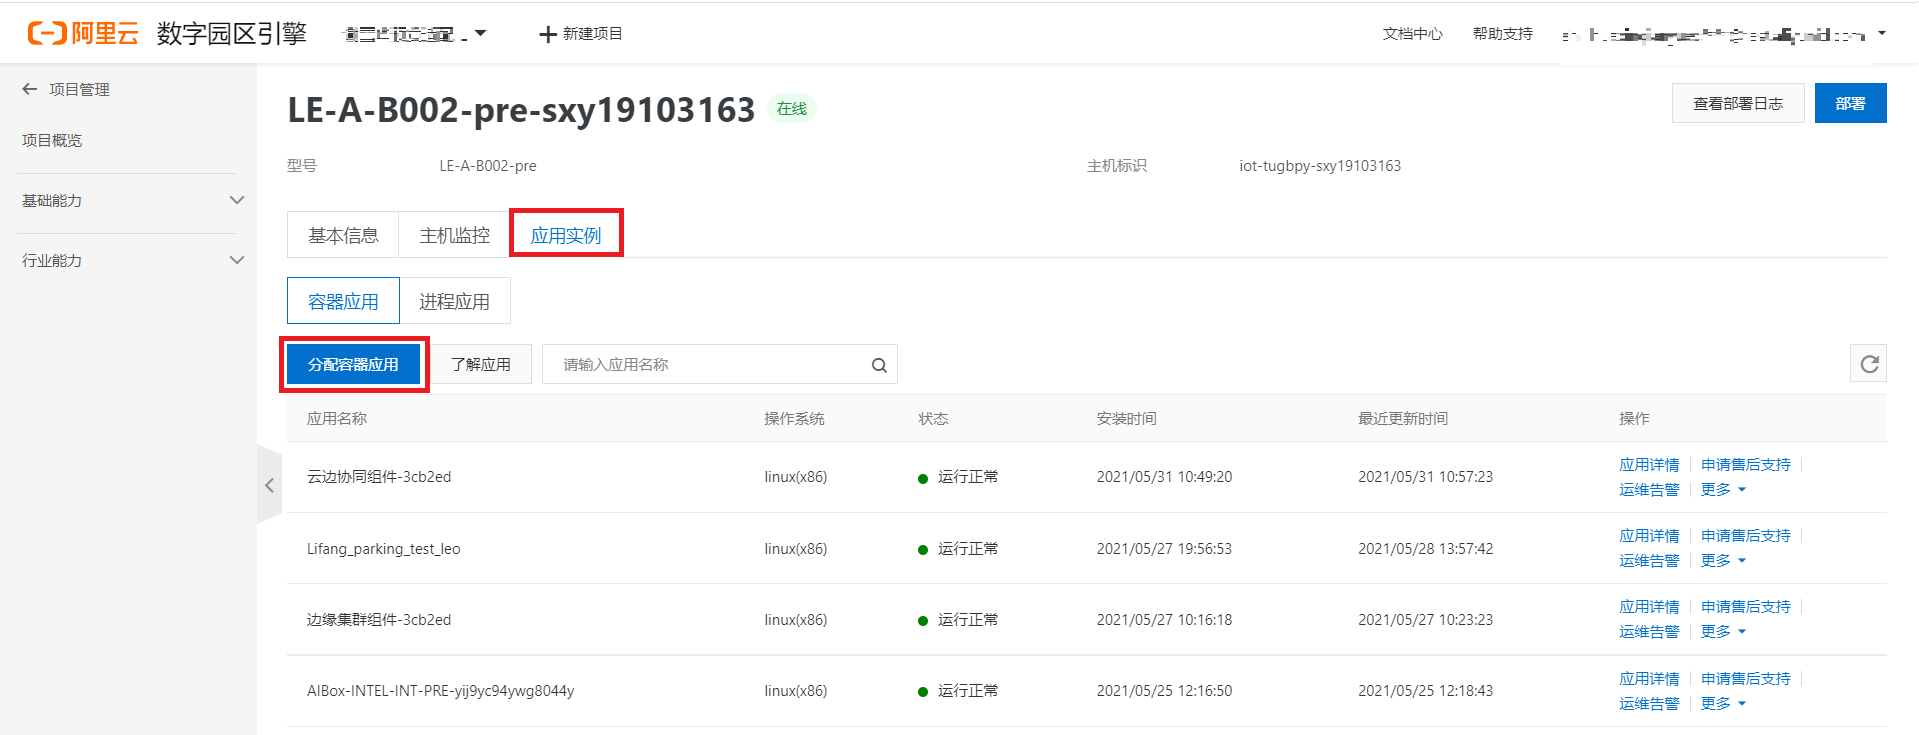
進入主機詳情頁面后,點擊應用實例,分配容器應用,如下圖所示:
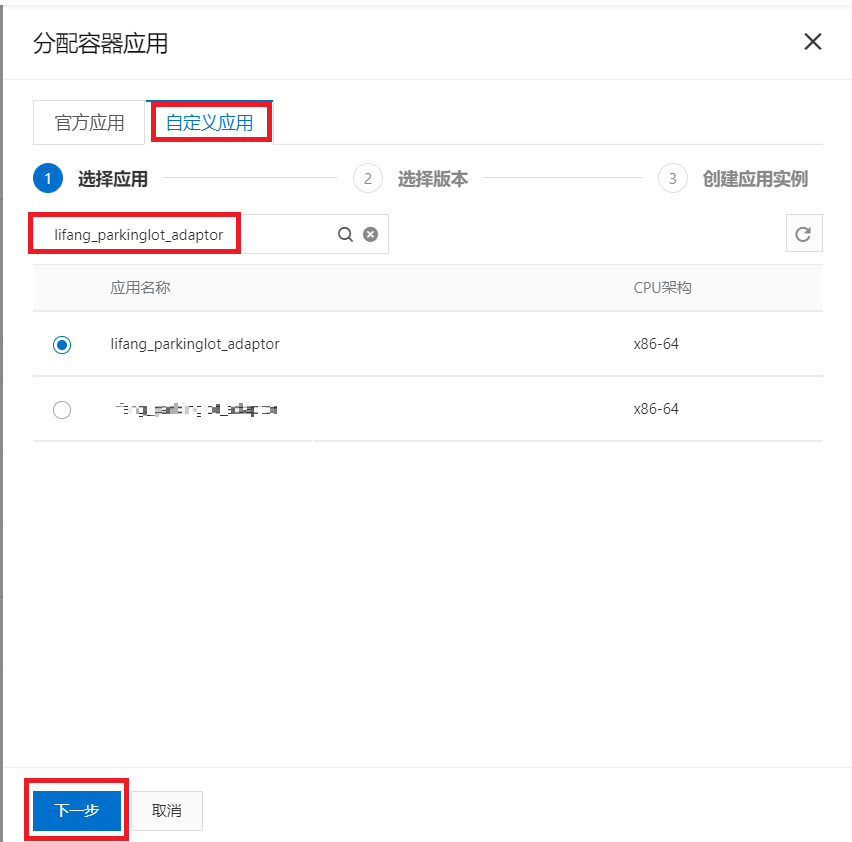
選擇自定義應用,搜索框里輸入在1.1節里創建的應用名稱 lifang_parkinglot_adaptor。選擇搜查出的應用,點擊下一步,如下圖所示:
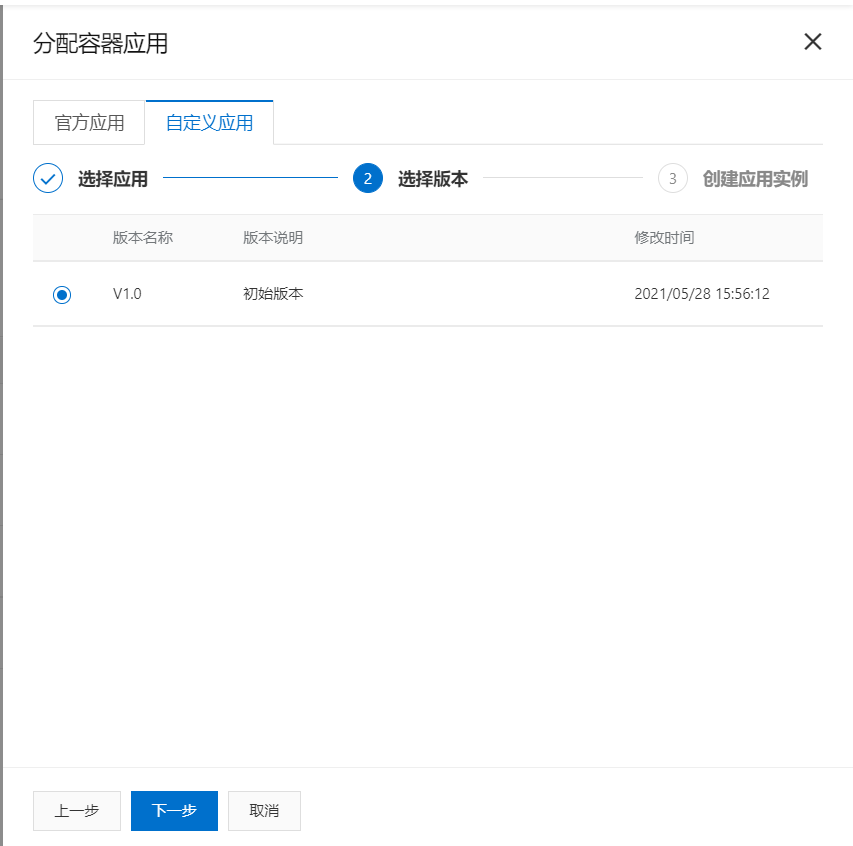
選擇版本名稱,點擊下一步,如下圖所示:
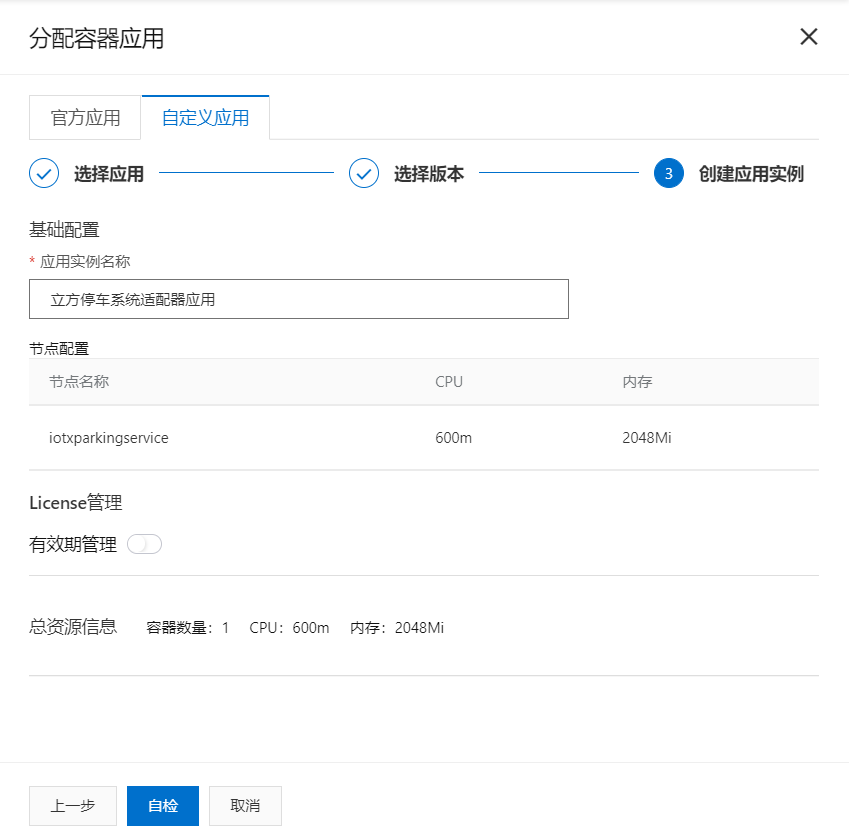
應用實例名稱:可以輸入:立方停車系統適配器應用。點擊自檢,如下圖所示:
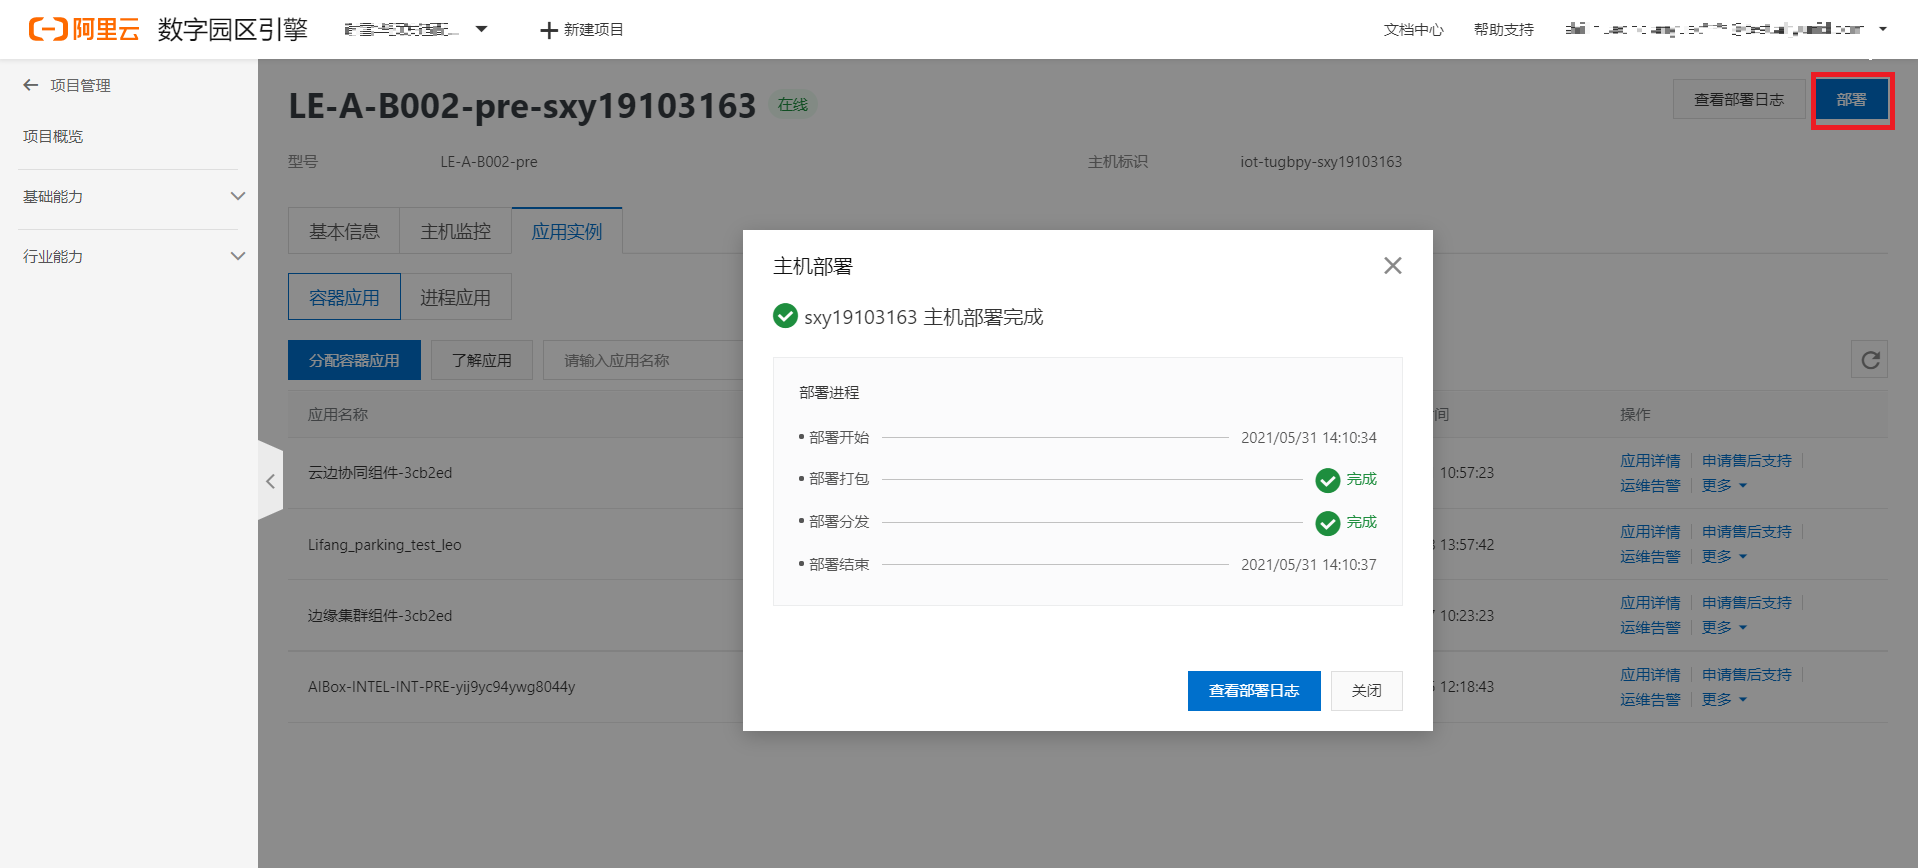
自檢通過后,點擊開始部署,應用部署大概需要1~2分鐘,可以刷新查看狀態,如下圖所示
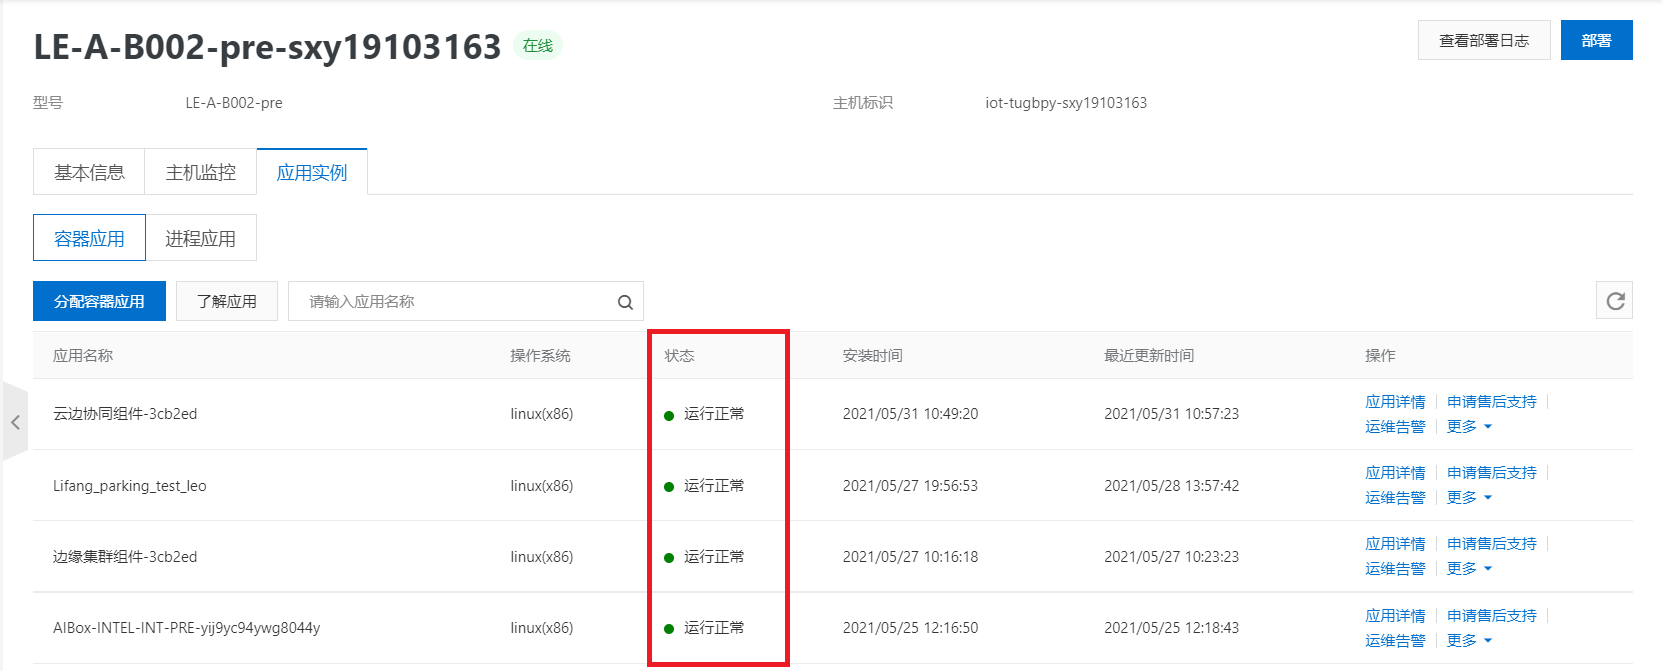
所有容器應用都安裝完成,點擊右上角部署,這個是將云端的應用真正部署到物業管理一體機,如下圖所示。