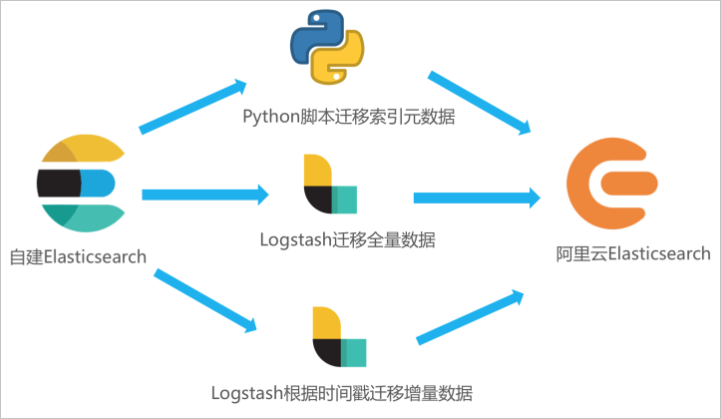
如果您需要將自建Elasticsearch中的全量或增量數據遷移至阿里云Elasticsearch,可通過在ECS中自建Logstash,并通過Logstash的管道配置功能實現。本文在ECS上部署自建Elasticsearch和自建Logstash,并通過Logstash將自建Elasticsearch中的數據全量遷移至阿里云Elasticsearch。
注意事項
自建Logstash所在的ECS需要與阿里云Elasticsearch集群在同一專有網絡下,同時該Logstash需要能夠同時訪問源Elasticsearch集群(自建)和目標Elasticsearch集群(阿里云)。
數據遷移可以全量遷移或增量遷移。如果業務側時刻存在寫入更新,首次遷移時,需先全量遷移,再通過時間標識字段(或其他可標識增量的字段)進行增量遷移,否則遷移后新數據極易被舊數據覆蓋。如果已有全量數據,可以只通過標識字段實現增量數據遷移。
操作流程
開通阿里云Elasticsearch服務,在ECS服務器部署自建Elasticsearch、準備待遷移數據和部署自建Logstash。
在ECS服務器運行Python腳本遷移索引元數據。
通過Logstash管道配置功能,將自建Elasticsearch中的全量數據遷移至阿里云Elasticsearch中。
步驟一:準備環境與實例
創建阿里云Elasticsearch實例。
具體操作請參見創建阿里云Elasticsearch實例。本文使用的測試環境如下。
環境項
環境信息
地域
華東1(杭州)。
版本
通用商業版7.10.0。
實例規格配置
3個可用區、3個數據節點、單節點4核CPU、16 GB內存、100 GB ESSD云盤。
創建ECS實例,用于部署自建Elasticsearch、自建Kibana和自建Logstash。
具體操作請參見自定義購買實例。本文使用的測試環境如下。
環境項
環境信息
地域
華東1(杭州)。
實例規格
4 vCPU 16 GiB內存。
鏡像
公共鏡像、CentOS 7.9 64位。
存儲
系統盤、ESSD云盤、100 GiB。
網絡
與阿里云Elasticsearch相同的專有網絡,選中分配公網IPv4地址,并按使用流量計費,帶寬峰值為100 Mbps。
安全組
入方向添加5601端口(即Kibana端口),在授權對象中添加您客戶端的IP地址。
重要如果您的客戶端處在家庭網絡或公司局域網中,您需要在授權對象中添加局域網的公網出口IP地址,而非客戶端機器的IP地址。建議您通過瀏覽器訪問cip.cc查詢。
您也可以在授權對象中添加0.0.0.0/0,表示允許所有IPv4地址訪問ECS實例。此配置會導致ECS實例完全暴露在公網中,增加安全風險,生產環境盡量避免。
部署自建Elasticsearch。
本文使用的自建Elasticsearch版本為7.6.2,1個數據節點,具體操作步驟如下:
連接ECS服務器。
具體操作,請參見通過密碼或密鑰認證登錄Linux實例。
使用root用戶權限創建elastic用戶。
useradd elastic設置elastic用戶的密碼。
passwd elastic系統將提示您輸入和確認elastic用戶的密碼。
將root用戶切換為elastic用戶。
su -l elastic下載Elasticsearch軟件安裝包并解壓縮。
wget https://artifacts.elastic.co/downloads/elasticsearch/elasticsearch-7.6.2-linux-x86_64.tar.gz
tar -zvxf elasticsearch-7.6.2-linux-x86_64.tar.gz
啟動Elasticsearch。
進入Elasticsearch的安裝目錄下,啟動服務。
cd elasticsearch-7.6.2
./bin/elasticsearch -d
驗證Elasticsearch服務是否正常運行。
cd ~
curl localhost:9200
正常情況下,返回結果中會顯示Elasticsearch版本號和
"You Know, for Search"。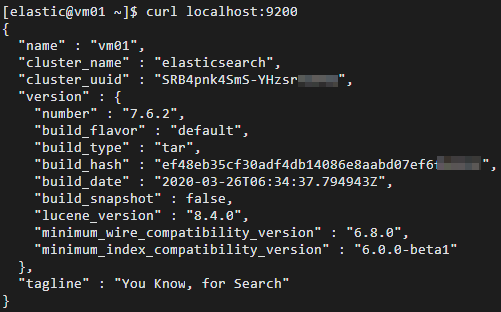
部署自建Kibana,并準備測試數據。
本文使用的自建Kibana版本為7.6.2,1個數據節點,具體操作步驟如下:
連接ECS服務器。
具體操作請參見通過密碼或密鑰認證登錄Linux實例。
說明本文檔以普通用戶權限為例。
下載Kibana軟件安裝包并解壓縮。
wget https://artifacts.elastic.co/downloads/kibana/kibana-7.6.2-linux-x86_64.tar.gz tar -zvxf kibana-7.6.2-linux-x86_64.tar.gz修改Kibana配置文件config/kibana.yml,增加
server.host: "0.0.0.0"配置,允許通過公網IP訪問Kibana。進入Kibana安裝目錄,修改kibana.yml。
cd kibana-7.6.2-linux-x86_64
vi config/kibana.yml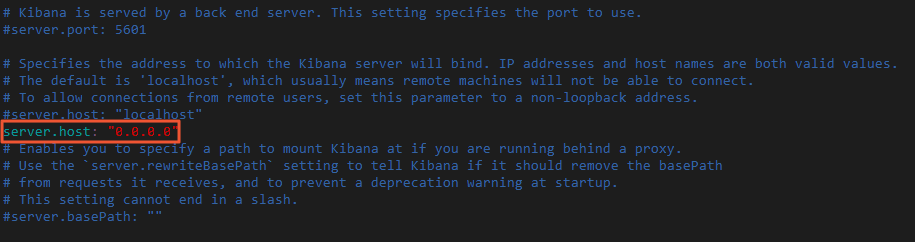
使用非root用戶啟用Kibana。
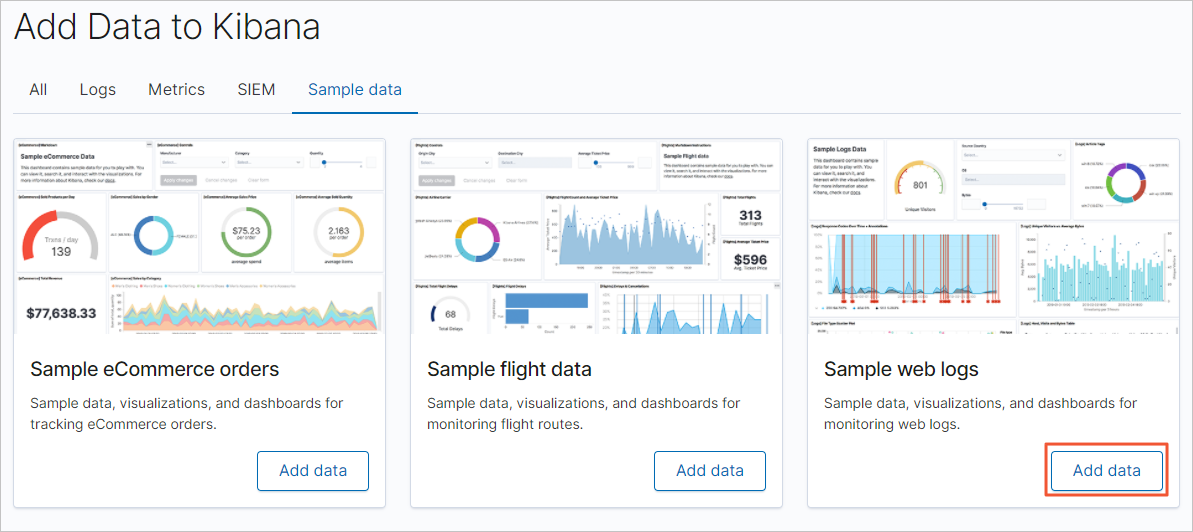
sudo nohup ./bin/kibana &登錄Kibana控制臺,添加示例數據。
通過公網IP地址登錄Kibana控制臺。
公網IP地址為:http://<ECS服務器的公網IP地址>:5601/app/kibana#/home。
在Kibana控制臺首頁,單擊Try our sample data。
在Sample data頁簽,單擊日志示例數據模塊下的Add data,添加對應數據。
部署自建Logstash。
本文使用的Logstash版本為7.10.0,1個節點,具體操作步驟如下:
連接ECS服務器。
具體操作請參見通過密碼或密鑰認證登錄Linux實例。
說明本文檔以普通用戶權限為例。
回到根目錄,下載Logstash軟件安裝包并解壓縮。
cd ~
wget https://artifacts.elastic.co/downloads/logstash/logstash-7.10.0-linux-x86_64.tar.gz
tar -zvxf logstash-7.10.0-linux-x86_64.tar.gz
修改Logstash的堆內存使用。
Logstash默認的堆內存為1 GB,您需要根據ECS規格配置合適的內存大小,加快集群數據的遷移效率。
進入Logstash的安裝目錄下,修改Logstash配置文件config/jvm.options,增加-Xms8g和-Xmx8g。
cd logstash-7.10.0
sudo vi config/jvm.options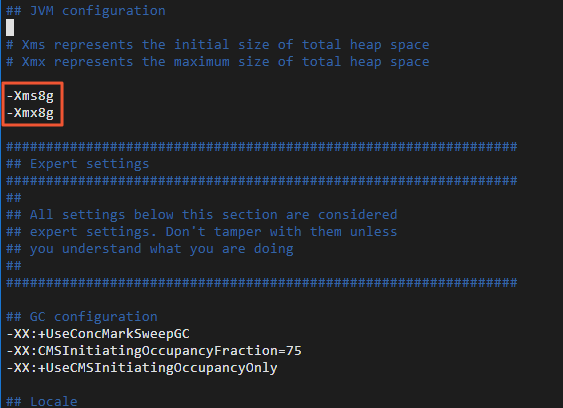
修改Logstash批量寫入記錄條數。
每批量寫入5~15 MB數據,可以加快集群數據的遷移效率。
修改Logstash配置文件config/pipelines.yml,將每批量寫入記錄條數pipeline.batch.size從125改為5000。
vi config/pipelines.yml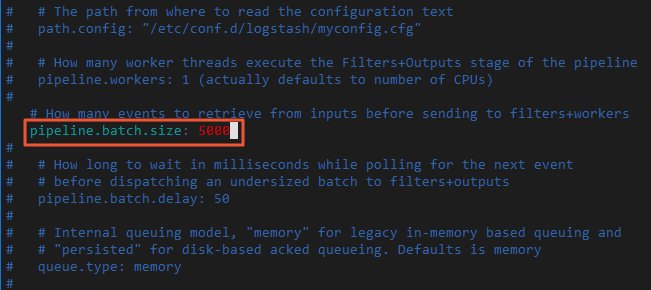
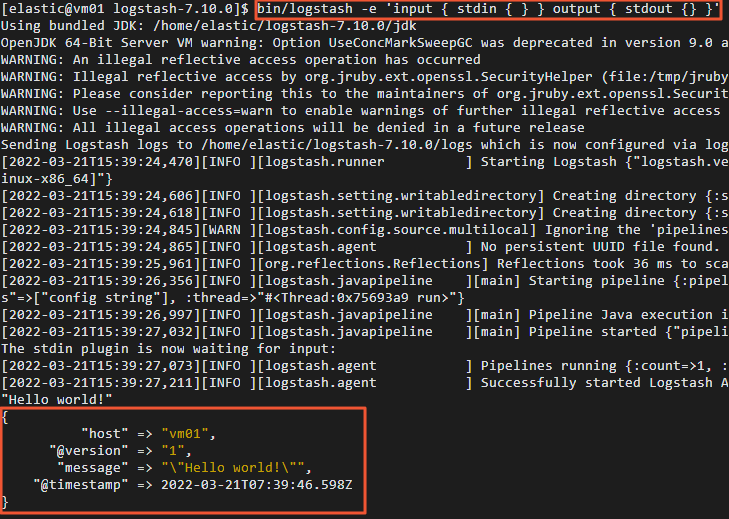
驗證Logstash功能。
通過控制臺輸入輸出收集數據。
bin/logstash -e 'input { stdin { } } output { stdout {} }'在控制臺中輸入"Hello world!"。
正常情況下,控制臺會輸出"Hello world!"。
(可選)步驟二:遷移索引元數據(設置和映射)
在進行數據遷移時,Logstash會幫助您自動創建索引,但是自動創建的索引可能與您待遷移的索引存在差異,導致遷移前后數據的格式不一致。因此建議您在數據遷移前,在阿里云Elasticsearch中手動創建目標索引,確保遷移前后索引數據完全一致。
您可以通過Python腳本創建目標索引,具體操作步驟如下:
連接ECS服務器。
具體操作請參見通過密碼或密鑰認證登錄Linux實例。
說明本文檔以普通用戶權限為例。
創建并打開Python腳本文件(本文以indiceCreate.py為例)。
sudo vi indiceCreate.py修改Python腳本文件,拷貝以下代碼(注意修改集群的連接地址、用戶名和密碼)。
#!/usr/bin/python
# -*- coding: UTF-8 -*-
# 文件名:indiceCreate.py
import sys
import base64
import time
import httplib
import json
## 源集群host。
oldClusterHost = "localhost:9200"
## 源集群用戶名,可為空。
oldClusterUserName = "elastic"
## 源集群密碼,可為空。
oldClusterPassword = "xxxxxx"
## 目標集群host,可在阿里云Elasticsearch實例的基本信息頁面獲取。
newClusterHost = "es-cn-zvp2m4bko0009****.elasticsearch.aliyuncs.com:9200"
## 目標集群用戶名。
newClusterUser = "elastic"
## 目標集群密碼。
newClusterPassword = "xxxxxx"
DEFAULT_REPLICAS = 0
def httpRequest(method, host, endpoint, params="", username="", password=""):
    conn = httplib.HTTPConnection(host)
    headers = {}
    if (username != "") :
        'Hello {name}, your age is {age} !'.format(name = 'Tom', age = '20')
        base64string = base64.encodestring('{username}:{password}'.format(username = username, password = password)).replace('\n', '')
        headers["Authorization"] = "Basic %s" % base64string;
    if "GET" == method:
        headers["Content-Type"] = "application/x-www-form-urlencoded"
        conn.request(method=method, url=endpoint, headers=headers)
    else :
        headers["Content-Type"] = "application/json"
        conn.request(method=method, url=endpoint, body=params, headers=headers)
    response = conn.getresponse()
    res = response.read()
    return res
def httpGet(host, endpoint, username="", password=""):
    return httpRequest("GET", host, endpoint, "", username, password)
def httpPost(host, endpoint, params, username="", password=""):
    return httpRequest("POST", host, endpoint, params, username, password)
def httpPut(host, endpoint, params, username="", password=""):
    return httpRequest("PUT", host, endpoint, params, username, password)
def getIndices(host, username="", password=""):
    endpoint = "/_cat/indices"
    indicesResult = httpGet(oldClusterHost, endpoint, oldClusterUserName, oldClusterPassword)
    indicesList = indicesResult.split("\n")
    indexList = []
    for indices in indicesList:
        if (indices.find("open") > 0):
            indexList.append(indices.split()[2])
    return indexList
def getSettings(index, host, username="", password=""):
    endpoint = "/" + index + "/_settings"
    indexSettings = httpGet(host, endpoint, username, password)
    print (index + "  原始settings如下:\n" + indexSettings)
    settingsDict = json.loads(indexSettings)
    ## 分片數默認和源集群索引保持一致。
    number_of_shards = settingsDict[index]["settings"]["index"]["number_of_shards"]
    ## 副本數默認為0。
    number_of_replicas = DEFAULT_REPLICAS
    newSetting = "\"settings\": {\"number_of_shards\": %s, \"number_of_replicas\": %s}" % (number_of_shards, number_of_replicas)
    return newSetting
def getMapping(index, host, username="", password=""):
    endpoint = "/" + index + "/_mapping"
    indexMapping = httpGet(host, endpoint, username, password)
    print (index + " 原始mapping如下:\n" + indexMapping)
    mappingDict = json.loads(indexMapping)
    mappings = json.dumps(mappingDict[index]["mappings"])
    newMapping = "\"mappings\" : " + mappings
    return newMapping
def createIndexStatement(oldIndexName):
    settingStr = getSettings(oldIndexName, oldClusterHost, oldClusterUserName, oldClusterPassword)
    mappingStr = getMapping(oldIndexName, oldClusterHost, oldClusterUserName, oldClusterPassword)
    createstatement = "{\n" + str(settingStr) + ",\n" + str(mappingStr) + "\n}"
    return createstatement
def createIndex(oldIndexName, newIndexName=""):
    if (newIndexName == "") :
        newIndexName = oldIndexName
    createstatement = createIndexStatement(oldIndexName)
    print ("新索引 " + newIndexName + " 的setting和mapping如下:\n" + createstatement)
    endpoint = "/" + newIndexName
    createResult = httpPut(newClusterHost, endpoint, createstatement, newClusterUser, newClusterPassword)
    print ("新索引 " + newIndexName + " 創建結果:" + createResult)
## main
indexList = getIndices(oldClusterHost, oldClusterUserName, oldClusterPassword)
systemIndex = []
for index in indexList:
    if (index.startswith(".")):
        systemIndex.append(index)
    else :
        createIndex(index, index)
if (len(systemIndex) > 0) :
    for index in systemIndex:
        print (index + " 或許是系統索引,不會重新創建,如有需要,請單獨處理~")
執行Python腳本,創建目標索引。
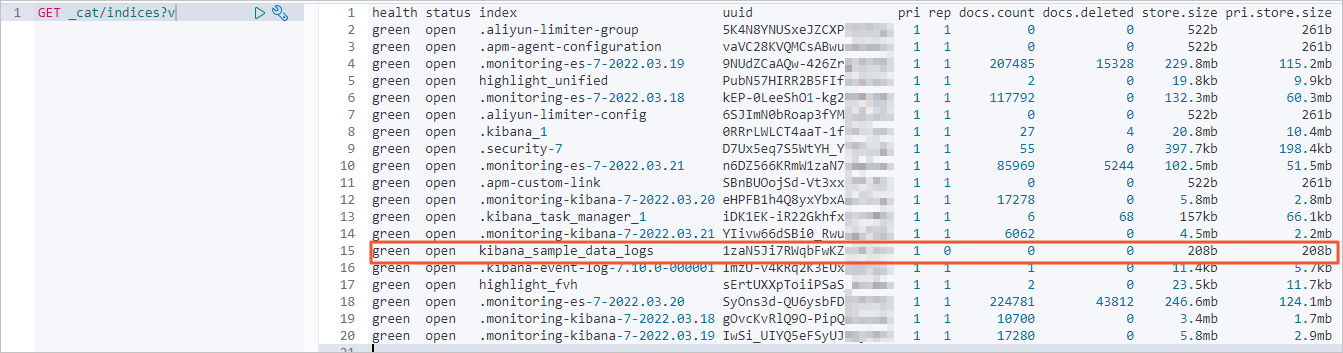
sudo /usr/bin/python indiceCreate.py參見登錄Kibana控制臺,登錄目標集群的Kibana控制臺,查看已創建的索引。
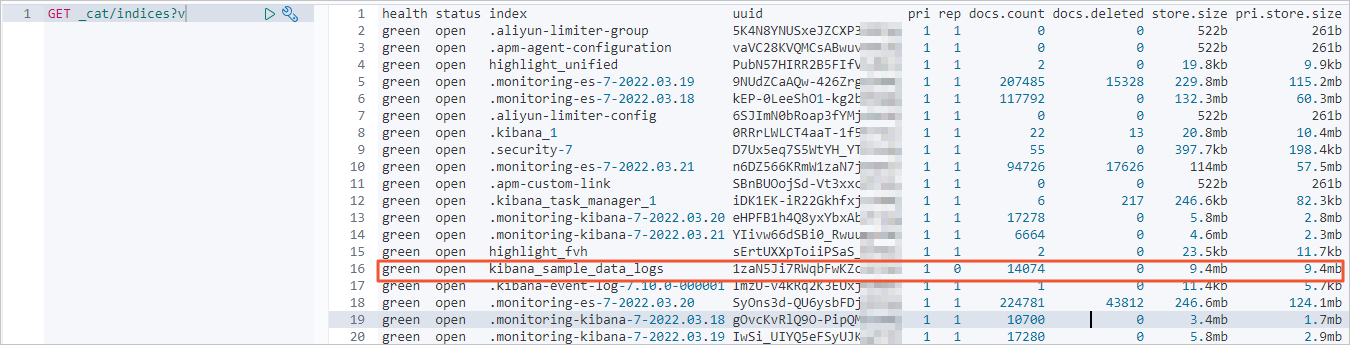
GET /_cat/indices?v
步驟三:遷移全量數據
連接ECS服務器。
具體操作請參見通過密碼或密鑰認證登錄Linux實例。
在config目錄下,創建并打開Logstash配置文件。
cd logstash-7.10.0/config
vi es2es_all.conf
參考以下配置,修改Logstash配置文件。
說明8.5版本Logstash的配置參數有所調整,本文同時列出了7.10.0版本和8.5.1版本Logstash的配置示例。
為了保證遷移數據的準確性,建議您創建多個Logstash管道配置文件,分批次遷移數據,每個Logstash遷移部分數據。
7.10.0版本
input{
    elasticsearch{
        # 源端ES地址。
        hosts =>  ["http://localhost:9200"]
        # 安全集群配置登錄用戶名密碼。
        user => "xxxxxx"
        password => "xxxxxx"
        # 需要遷移的索引列表,多個索引以英文以逗號(,)分隔。
        index => "kibana_sample_data_*"
        # 以下三項保持默認即可,包含線程數和遷移數據大小和Logstash JVM配置相關。
        docinfo=>true
        slices => 5
        size => 5000
    }
}

filter {
  # 去掉一些Logstash自己加的字段。
  mutate {
    remove_field => ["@timestamp", "@version"]
  }
}

output{
    elasticsearch{
        # 目標端ES地址,可在阿里云Elasticsearch實例的基本信息頁面獲取。
        hosts => ["http://es-cn-zvp2m4bko0009****.elasticsearch.aliyuncs.com:9200"]
        # 安全集群配置登錄用戶名密碼。
        user => "elastic"
        password => "xxxxxx"
        # 目標端索引名稱,以下配置表示索引與源端保持一致。
        index => "%{[@metadata][_index]}"
        # 目標端索引type,以下配置表示索引類型與源端保持一致。
        document_type => "%{[@metadata][_type]}"
        # 目標端數據的id,如果不需要保留原id,可以刪除以下這行,刪除后性能會更好。
        document_id => "%{[@metadata][_id]}"
        ilm_enabled => false
        manage_template => false
    }
}
8.5.1版本
input{
    elasticsearch{
        # 源端ES地址。
        hosts =>  ["http://es-cn-uqm3811160002***.elasticsearch.aliyuncs.com:9200"]
        # 安全集群配置登錄用戶名密碼。
        user => "elastic"
        password => ""
        # 需要遷移的索引列表,多個索引以英文以逗號(,)分隔。
        index => "test_ecommerce"
        # 以下三項保持默認即可,包含線程數和遷移數據大小和Logstash JVM配置相關。
        docinfo => true
        size => 10000
        docinfo_target => "[@metadata]"
    }
}

filter {
  # 去掉一些Logstash自己加的字段。
  mutate {
    remove_field => ["@timestamp","@version"]
  }
}

output{
    elasticsearch{
        # 目標端ES地址,可在阿里云Elasticsearch實例的基本信息頁面獲取。
        hosts => ["http://es-cn-nwy38aixp0001****.elasticsearch.aliyuncs.com:9200"]
        # 安全集群配置登錄用戶名密碼。
        user => "elastic"
        password => ""
        # 目標端索引名稱,以下配置表示索引與源端保持一致。
        index => "%{[@metadata][_index]}"
        # 目標端數據的id,如果不需要保留原id,可以刪除以下這行,刪除后性能會更好。
        document_id => "%{[@metadata][_id]}"
        ilm_enabled => false
        manage_template => false
    }
}
Elasticsearch input插件可以根據配置的查詢語句,從Elasticsearch集群讀取文檔數據,適用于批量導入測試日志等操作。默認讀取完數據后,同步動作會自動關閉,而阿里云Logstash需保證進程一直運行,關閉后將會重新啟動進程,導致某些單一任務場景(如logstash input es)存在重復寫數據的情況。設置長時間范圍的定時任務可繞過寫重復的情況,如每年3月5日13點20分觸發任務執行,執行完第一次任務后停止管道運行,可避免重復寫情況。可以通過cron語法配合schedule參數實現,詳情請參見Logstash官網Scheduling介紹。
例如,設置3月5日13點20分執行任務:
schedule => "20 13 5 3 *"進入Logstash目錄。
cd ~/logstash-7.10.0啟動Logstash全量遷移任務。
nohup bin/logstash -f config/es2es_all.conf >/dev/null 2>&1 &
步驟四:遷移增量數據
連接ECS服務器,在config目錄下,創建并打開Logstash增量配置文件。
cd config vi es2es_kibana_sample_data_logs.conf說明本文檔以普通用戶權限為例。
參考以下配置,修改Logstash配置文件。
7.10.0版本配置示例如下。
說明8.5版本Logstash的配置參數有所調整,需要去掉
document_type => "%{[@metadata][_type]}"。按如下腳本修改Logstash配置文件后,開啟Logstash定時任務即可觸發增量遷移。
input{ elasticsearch{ # 源端ES地址。 hosts => ["http://localhost:9200"] # 安全集群配置登錄用戶名密碼。 user => "xxxxxx" password => "xxxxxx" # 需要遷移的索引列表,多個索引使用英文逗號(,)分隔。 index => "kibana_sample_data_logs" # 按時間范圍查詢增量數據,以下配置表示查詢最近5分鐘的數據。 query => '{"query":{"range":{"@timestamp":{"gte":"now-5m","lte":"now/m"}}}}' # 定時任務,以下配置表示每分鐘執行一次。 schedule => "* * * * *" scroll => "5m" docinfo=>true size => 5000 } } filter { # 去掉一些Logstash自己加的字段. mutate { remove_field => ["@timestamp", "@version"] } } output{ elasticsearch{ # 目標端ES地址,可在阿里云Elasticsearch實例的基本信息頁面獲取。 hosts => ["http://es-cn-zvp2m4bko0009****.elasticsearch.aliyuncs.com:9200"] # 安全集群配置登錄用戶名密碼. user => "elastic" password => "xxxxxx" # 目標端索引名稱,以下配置表示索引與源端保持一致。 index => "%{[@metadata][_index]}" # 目標端索引type,以下配置表示索引類型與源端保持一致。 document_type => "%{[@metadata][_type]}" # 目標端數據的id,如果不需要保留原id,可以刪除以下這行,刪除后性能會更好。 document_id => "%{[@metadata][_id]}" ilm_enabled => false manage_template => false } }重要Logstash記錄的時間戳為UTC時間,如果您的本地時間為北京時間(東八區),那么兩者會存在8個小時的時區差,此時將UTC時間轉化為北京時間,可使用公式:UTC+時區差=北京時間。例如,以上示例中通過源端索引中的@timestamp字段進行range范圍過濾查詢獲取增量數據,并在對應的時間上+8h轉換為北京時間。
通過Logstash控制時間字段實現增量數據的同步,需確保原索引中有可控制的時間字段,如果原索引中沒有時間字段數據,可使用ingest pipeline指定_ingest.timestamp獲取元數據值,從而引入@timestamp時間字段。
進入Logstash目錄。
cd ~/logstash-7.10.0啟動Logstash增量遷移任務。
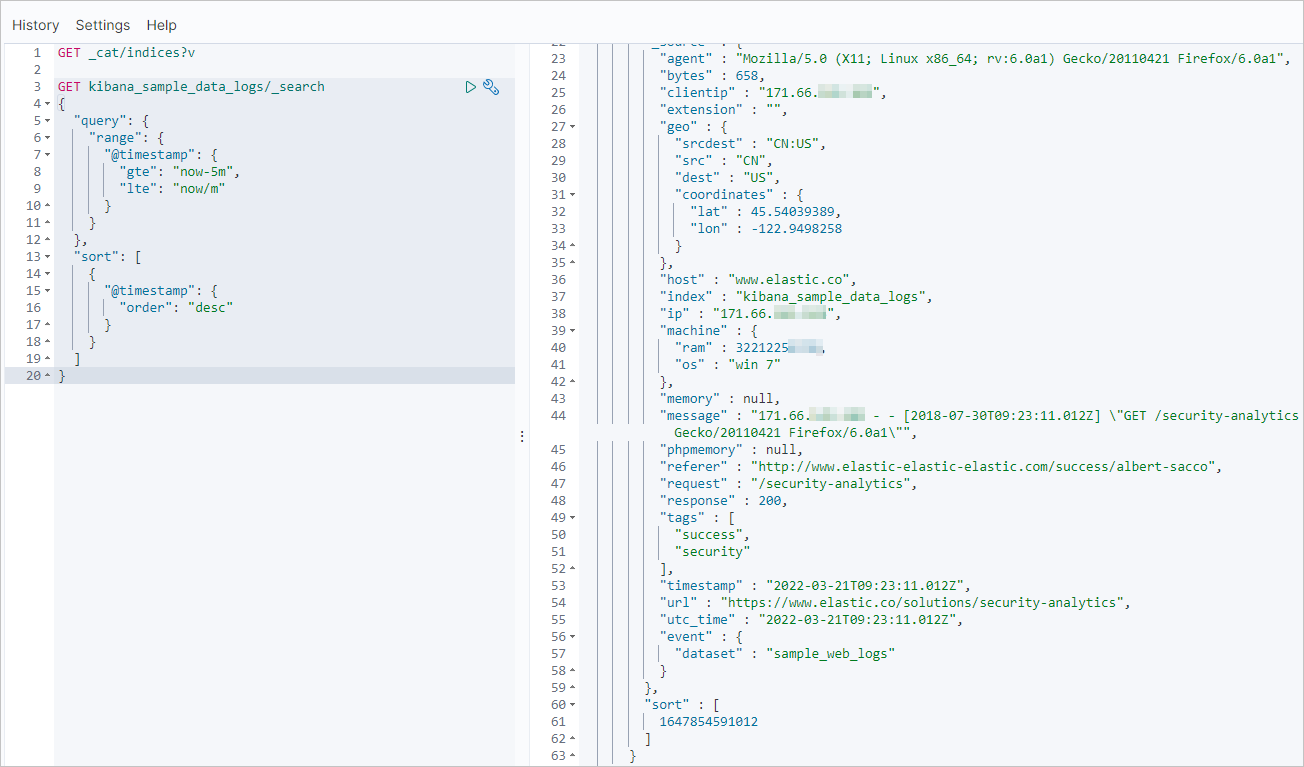
sudo nohup bin/logstash -f config/es2es_kibana_sample_data_logs.conf >/dev/null 2>&1 &在目標端Elasticsearch集群的Kibana中,查詢最近更新的記錄,驗證增量數據是否同步。
以下示例的查詢條件為:索引名稱為kibana_sample_data_logs、最近時間范圍為5分鐘。
GET kibana_sample_data_logs/_search
{
  "query": {
    "range": {
      "@timestamp": {
        "gte": "now-5m",
        "lte": "now/m"
      }
    }
  },
  "sort": [
    {
      "@timestamp": {
        "order": "desc"
      }
    }
  ]
}
步驟五:查看數據遷移結果
查看是否完成全量遷移。
查看自建Elasticsearch集群的索引和數據量信息。
GET _cat/indices?v結果如下。

全量遷移前,查看阿里云Elasticsearch集群的索引和數據量信息。
全量遷移后,查看阿里云Elasticsearch集群索引和數據量信息。
正常情況下,返回的記錄條數應該與自建Elasticsearch集群一致。
查看是否完成增量遷移。
查看自建Elasticsearch集群的最近更新記錄。
GET kibana_sample_data_logs/_search
{
  "query": {
    "range": {
      "@timestamp": {
        "gte": "now-5m",
        "lte": "now/m"
      }
    }
  },
  "sort": [
    {
      "@timestamp": {
        "order": "desc"
      }
    }
  ]
}
返回結果如下。
增量遷移完成后,使用同樣命令查看阿里云Elasticsearch集群最近的更新記錄。正常情況下,阿里云Elasticsearch集群的更新記錄會與自建集群一致。