利用傳統手段將文檔內容轉換為視頻,比如根據文檔內容錄制一個視頻,不僅需要投入大量的時間和精力,而且往往需要具備專業的視頻編輯技能。使用大模型技術可以更加有效且智能化地解決上述問題。本實踐方案旨在依托大語言模型(Large Language Models, LLMs)和多模態應用技術,向您展示如何將文檔自動轉換為視頻,并提供配套的完整代碼包,幫助您快速入門上手本實踐教程。
效果演示
通過本實踐教程及完整代碼,您可以借助大模型將文檔轉為視頻。所生成的視頻包含完整的圖文、語音、字幕等內容。下面是一個示例,輸入文檔為阿里云大模型工程師ACA認證課程第一章第一課時認識大模型,輸出的視頻效果演示如下:
阿里云大模型工程ACA認證課程第一章第一課時:認識大模型。
方案概覽
文檔切片:首先,我們運用大模型來總結文檔標題,將文檔劃分為不同段落。并為每個段落生成一個概括性的段落標題。
生成演示文稿:緊接著,我們整合各部分內容,包括標題、正文以及圖片等,利用這些素材生成演示文稿圖片。
生成講解語音與字幕:接下來,我們采用多模態大模型技術,將文字材料轉換成音頻文件,并依據音頻的播放時長自動生成配套的文字字幕。
生成視頻:最后我們將所有演示文稿圖片剪輯為視頻,并將音頻與字幕文件嵌入視頻。

準備工作
獲取API Key,用于調用阿里云百煉提供的大模型。
百煉為新用戶提供了免費額度,額度消耗完后按 token 計費。您可以查看計費說明獲取計費詳情。
配置環境變量,以降低API-KEY的泄露風險。您可以參考配置API Key到環境變量,根據您的操作系統選擇適合的環境變量配置方法。
本實踐教程依賴音視頻處理工具FFmpeg和演示文稿制作工具Marp,請您使用如下示例代碼安裝這兩個工具:
MacOS
# 您需要在終端運行如下代碼
# 請您配置國內鏡像源下載
# 安裝FFmpeg
brew install ffmpeg
# 安裝Marp
# 如安裝出現網絡問題,請配置國內鏡像源或使用cnpm替代npm
brew install node
npm install -g cnpm --registry=https://registry.npmmirror.com
cnpm install -g @marp-team/marp-cli
Windows
# 請您在Powershell中運行如下代碼
Set-ExecutionPolicy RemoteSigned -Scope CurrentUser
# 若您已安裝scoop可以跳過下面一行命令
iex "& {$(irm scoop.201704.xyz)} -RunAsAdmin"
scoop install git
scoop bucket add scoop-cn https://mirror.ghproxy.com/https://github.com/duzyn/scoop-cn
# 請您將所有庫添加到環境變量中
scoop install scoop-cn/marp
scoop install scoop-cn/ffmpeg
本實踐教程中的圖片生成依賴于瀏覽器引擎渲染,請您確保您的工作環境中安裝了瀏覽器應用,如Chromium,Google Chrome,Microsoft Edge等。
本實踐教程基于Python代碼,請您確認您的工作環境中已經安裝Python,并安裝本實踐教程所需的Python庫,代碼示例如下:
MacOS
# 您需要在終端運行如下代碼
# 為了提高下載速度,推薦您配置國內鏡像源
pip install --upgrade pip
pip install pyppeteer
pip install dashscope
pip install --upgrade dashscope
pip install pydub
pip install natsort
pip install moviepy
pip install ffmpeg-python
pip install --upgrade urllib3 requests
Windows
# 您需要在Powershell中運行如下代碼
# 為了提高下載速度,推薦您配置國內鏡像源
pip install --upgrade pip
pip install pyppeteer
pip install dashscope
pip install --upgrade dashscope
pip install pydub
pip install natsort
pip install moviepy
pip install ffmpeg-python
pip install --upgrade urllib3 requests
快速體驗
如果您希望快速嘗試,可以直接下載本教程中提供的完整代碼到您的本地工作環境中,并在本地執行如下命令:
MacOS
# 解壓縮
unzip doc2video.zip
# 進入文件目錄
cd doc2video
# 更改權限
chmod +x run.sh
# 運行腳本
./run.sh
Windows
下面Linux命令可以在Windows中通過WSL運行:
關于安裝WSL,請參見:安裝 WSL | Microsoft Learn。
關于在WSL使用Linux命令,請參見:通過 WSL 開始使用 Linux | Microsoft Learn。
也可以通過Git運行:
關于安裝Git,請參見:Git - 安裝 Git (git-scm.com)。
關于在Git使用Linux命令,請參見:Windows系統下如何運行.sh腳本文件。
# 解壓縮,進入文件目錄
cd doc2video
# 運行腳本,您可以在result.log中查看代碼運行日志
bash run.sh
為了幫助您理解方案流程,并能夠根據實際需要進行個性化定制,下面我們將為您介紹如何從 0 開始,逐步構建一個文檔生成視頻的工程。
步驟一:準備素材
請您將文檔中的文字、Markdown格式的圖片鏈接等內容寫到Markdown文件中,并以section_1.md的格式命名,保存到input文件夾中。我們將下面提供的section_1.md文件作為示例輸入文檔。
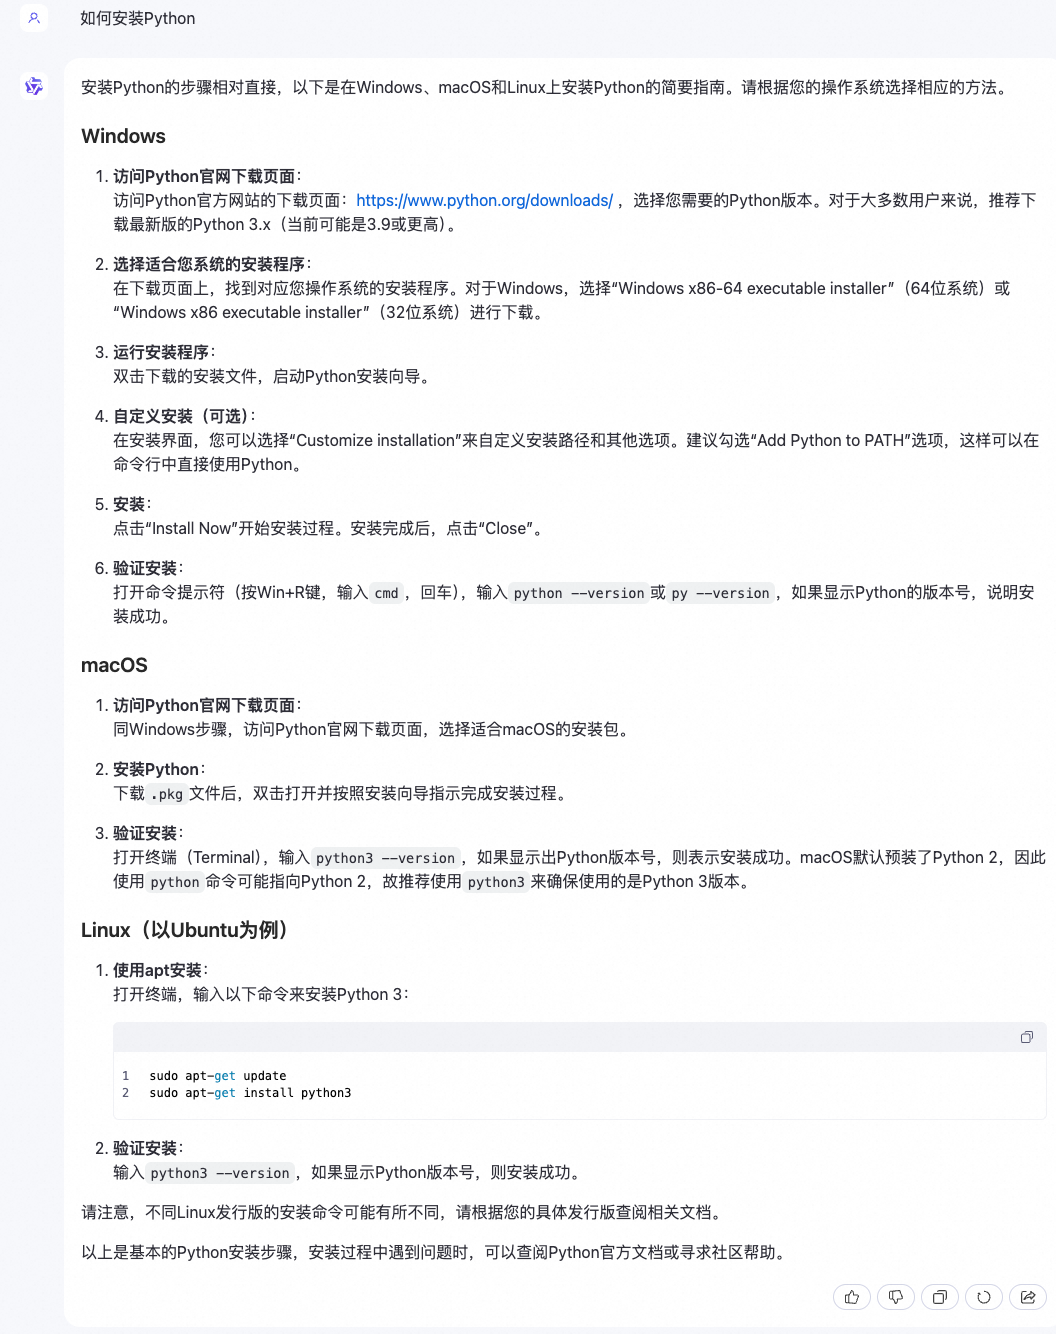
你有過使用搜索引擎搜索問題卻怎么也找不到有效信息的時候嗎?
擁有大模型之前
我們使用搜索引擎去搜索問題,然而由于網頁內容質量參差不齊,你有可能看了五個網頁也找不到自己的答案。

擁有大模型之后
直接將輸入搜索引擎的問題輸入大模型,比如“如何安裝Python”,由于大模型有非常龐大且高質量的知識,因此它會輸出正確答案,而且會包含不同系統的Python安裝方法,比我們直接使用搜索引擎尋找答案方便多了。
大模型的影響力已經逐漸散播到我們生活的方方面面。從2022年底ChatGPT的一鳴驚人,再到持續進行的“百模大戰”,“大模
型”已經逐漸成為了技術和公眾領域的熱點。
大模型是人工智能領域的一個重要里程碑,它推動了人工智能技術的發展,并為人類的未來帶來新的可能性。
有人曾經類比,大模型的發明相當于人類文明的哪個節點?一個浪漫的答案可能是:人類學會使用火的時刻。

學完本課程后,你將能夠:
掌握大模型的特點、重要概念以及工作方式;
了解阿里云大模型的基本概況和產品矩陣;
了解大模型,尤其是大語言模型的應用場景和示例。。您可以直接使用完整代碼中我們提供的圖片、風格文件等素材,并將其全部保存到style文件夾中。
您需要在您的工作環境目錄下創建一個Python文件main.py,以便于設置參數以及函數調用,示例代碼如下:
import argparse
import datetime
import os
import shutil

# 在此處導入各函數


def main(args):
    # 記錄開始時間
    start_time = datetime.datetime.now()
    # 創建輸出保存路徑,將渲染素材復制到指定路徑下
    input_base_name = os.path.splitext(os.path.basename(args.input_txt_path))[0]

    if not os.path.exists(args.markdown_path):
        os.makedirs(args.markdown_path)
    for filename in os.listdir(args.input_style_path):
        full_path = os.path.join(args.input_style_path, filename)
        if os.path.isfile(full_path):
            shutil.copy2(full_path, args.markdown_path)


    # 在此處調用各函數

    # 記錄結束時間
    end_time = datetime.datetime.now()

    # 計算總時間
    elapsed_time = end_time - start_time
    elapsed_hours, remainder = divmod(elapsed_time.total_seconds(), 3600)
    elapsed_minutes, elapsed_seconds = divmod(remainder, 60)

    start_time_str = start_time.strftime("%Y年%m月%d日 %H時%M分%S秒")
    end_time_str = end_time.strftime("%Y年%m月%d日 %H時%M分%S秒")
    elapsed_time_str = f"{int(elapsed_hours)}時{int(elapsed_minutes)}分{int(elapsed_seconds)}秒"

    print(f"開始時間: {start_time_str}")
    print(f"結束時間: {end_time_str}")
    print(f"總時間: {elapsed_time_str}")


if __name__ == "__main__":

    parser = argparse.ArgumentParser(description="文檔生成視頻")

    # 添加命令行參數 --input_txt_path,默認值為 './input/section_1.md',表示輸入文本的路徑
    parser.add_argument('--input_txt_path', type=str, default='./input/section_1.md', help='輸入文本的路徑')

    # 添加命令行參數 --input_style_path,默認值為 './style',表示輸入樣式文件夾的路徑
    parser.add_argument('--input_style_path', type=str, default='./style', help='輸入樣式文件夾的路徑')

    # 添加命令行參數 --markdown_style_path,默認值為 './style/style.md',表示 Markdown 樣式的路徑
    parser.add_argument('--markdown_style_path', type=str, default='./style/style.md', help='Markdown 樣式的路徑')

    # 添加命令行參數 --logo_path,默認值為 './style/logo.png',表示 Logo 圖片的路徑
    parser.add_argument('--logo_path', type=str, default='./style/logo.png', help='Logo 圖片的路徑')

    # 添加命令行參數 --theme_path,默認值為 './style/theme.png',表示主題圖片的路徑
    parser.add_argument('--theme_path', type=str, default='./style/theme.png', help='主題圖片的路徑')

    # 添加命令行參數 --title_path,默認值為 './style/title.png',表示標題圖片的路徑
    parser.add_argument('--title_path', type=str, default='./style/title.png', help='標題圖片的路徑')

    # 添加命令行參數 --json_path,默認值為 './material/json',表示 JSON 文件的路徑
    parser.add_argument('--json_path', type=str, default='./material/json', help='JSON 文件的路徑')

    # 添加命令行參數 --image_path,默認值為 './material/image',表示圖像文件夾的路徑
    parser.add_argument('--image_path', type=str, default='./material/image', help='圖像文件夾的路徑')

    # 添加命令行參數 --audio_path,默認值為 './material/audio',表示音頻文件夾的路徑
    parser.add_argument('--audio_path', type=str, default='./material/audio', help='音頻文件夾的路徑')

    # 添加命令行參數 --markdown_path,默認值為 './material/markdown',表示 Markdown 文件夾的路徑
    parser.add_argument('--markdown_path', type=str, default='./material/markdown', help='Markdown 文件夾的路徑')

    # 添加命令行參數 --srt_and_video_path,默認值為 './material/video',表示字幕和視頻文件夾的路徑
    parser.add_argument('--srt_and_video_path', type=str, default='./material/video', help='字幕和視頻文件夾的路徑')

    # 添加命令行參數 --fps,默認值為 30,表示幀率
    parser.add_argument('--fps', type=int, default=30, help='幀率')

    # 添加命令行參數 --title,默認值為 "認識大模型",表示視頻標題
    parser.add_argument('--title', type=str, default="認識大模型", help='文檔主題')

    args = parser.parse_args()

main(args)您需要將main.py保存到與input、style文件夾相同的路徑目錄下。在后續流程中,您需要在main.py中導入各模塊函數并且調用它們,我們已經在上述main.py文件中標注了引用或調用函數的位置。在調用各模塊函數后,如果您想測試輸出,您可以直接在終端運行以下代碼:
python main.py步驟二:文檔切片
在這一部分中,我們運用大模型為輸入文檔生成文檔標題并劃分段落,然后借助大模型對每個段落的內容進行歸納總結,同時為每個段落自動生成相應的段落標題。
劃分文本段落
我們借助API調用阿里云百煉提供的通義千問系列大模型通義千問-Plus,為輸入文檔生成一個文檔標題并劃分段落。
通義千問-Plus是通義千問超大規模語言模型的增強版,支持中文英文等不同語言輸入。能力均衡,推理效果和速度介于通義千問-Max和通義千問-Turbo之間,適合中等復雜任務。您也可以根據實際應用需求來選擇合適的大模型,詳見模型列表。
通義千問-Plus的輸入和輸出成本分別為0.004元/千Token和0.012元/千Token,新用戶在開通百煉服務后的30天內擁有100萬Token的免費額度。
新建一個名為theme_generate.py的Python文件,代碼示例如下:
from http import HTTPStatus
import dashscope
import re

def theme_generate_with_qwen_plus(input_filepath, title):
    """
    使用通義千問-Plus生成摘要標題。

    本函數讀取指定文件的內容,并基于該內容和給定的主題生成一個精確、概括性的摘要標題。

    參數:
    - input_filepath: 輸入文件的路徑。該文件的內容將用于生成摘要標題。
    - title: 生成摘要標題需圍繞的主題。確保生成的標題與該主題緊密相關。

    返回:
    - response_content: 生成的摘要標題。

    注意:
    - 該函數以流式傳輸的方式請求生成標題,僅當響應狀態碼為HTTPStatus.OK時,累加響應內容。
    - 如果發生錯誤,函數會打印請求的相關錯誤信息。
    """
    # 讀取輸入文件內容
    with open(input_filepath, 'r', encoding='utf-8') as file:
        content = file.read()

    # 構建提示信息,指導模型生成與主題緊密相關的標題
    prompt = f"""
                請為以下輸入文檔創建一個精確的、具備概括性的摘要標題,能夠反映文檔核心內容,忽略所有鏈接,僅聚焦文字信息。
                需要緊緊地圍繞主題“{title}”。
                直接呈現標題成果,勿附加其他文本,不超過10個漢字,用中文回答。
                以下是輸入文檔的內容:
              """

    # 構建消息格式
    messages = [{
        'role': 'user',
        'content': f"""
                    "{prompt}"
                    "{content}"
                   """
    }]

    # 初始化響應內容
    response_content = ''

    # 以流式傳輸的方式獲取生成的結果
    responses = dashscope.Generation.call("qwen-plus",
                                          messages=messages,
                                          result_format='message',
                                          stream=True,
                                          incremental_output=True)

    # 遍歷響應,累加生成的標題內容
    for response in responses:
        if response.status_code == HTTPStatus.OK:
            response_content += response.output.choices[0]['message']['content']
        else:
            # 打印錯誤信息
            print('Request id: %s, Status code: %s, error code: %s, error message: %s' % (
                response.request_id, response.status_code,
                response.code, response.message
            ))

    # 移除標題中的雙引號(如果存在)
    response_content = re.sub(r'^"|"$', '', response_content)

    # 返回生成的標題內容
return response_content在theme_generate.py中,我們定義了一個函數theme_generate_with_qwen_plus,通過API調用通義千問-Plus為文檔生成一個文檔標題。在main.py中導入并調用該函數,代碼示例如下:
# 導入
from theme_generate import theme_generate_with_qwen_plus

# 調用
# 通過API調用通義千問-Plus為輸入文檔生成文檔標題
theme = theme_generate_with_qwen_plus(args.input_txt_path, args.title)
# 打印文檔標題
print(theme)我們可以調用該函數來獲取示例文檔section_1.md的文檔標題:

示例文檔的標題:大模型:影響與應用。
接下來新建一個名為doc_split.py的Python文件,代碼示例如下:
from http import HTTPStatus
import dashscope
import json
import os
def doc_split_with_qwen_plus(input_filepath, output_filepath):

    if not os.path.exists(output_filepath):
        os.makedirs(output_filepath)

    with open(input_filepath, 'r', encoding='utf-8') as file:
        content = file.read()

    prompt = """
                    執行文檔處理任務,包括分段與自動生成段落標題,需遵循以下具體細則:

                    1. **分段邏輯**:仔細分析文檔內容,根據其內在語義邏輯合理劃分段落。

                    2. **標題創作**:為每一獨立段落設計一個精煉標題,確保該標題簡潔明了(不超過10個字),并能有效準確地概括該段落核心信息。

                    3. **輸出規格**:完成處理后,生成的文檔結構需符合JSON格式標準,每段落及對應的標題組成一個條目,具體格式示例如下:


                    [
                        {"title": " ", "content": " "},
                        {"title": " ", "content": " "},
                        ...
                    ]

                    輸出內容是以"["開頭,并以"]"收尾的JSON數據,請不要輸出其他內容。

                    4. **原文忠實性**:在輸出的JSON數據中,各段落的“content”字段必須精確匹配原始文檔的文字內容,不得有增刪改動。必須完整地處理原始文檔的全部內容,不能有遺漏。請嚴格保證文字和鏈接在原文檔中的相對位置保持不變。

                    5. **格式化鏈接**:對于文檔中的markdown格式的圖片鏈接,將他們單獨保存到JSON條目中。其"title"為"鏈接{index}","content"為鏈接地址,其中index為索引順序。

                    6. **內容限制**:輸出內容中不得包含任何多余的空格、換行符、制表符等空白字符,也不得包含任何HTML、XML、Markdown等格式的符號。始終保持中文。

                    請嚴格依據上述要求執行文檔處理任務。

                    文檔內容如下:
              """

    messages = [{
        'role': 'user',
        'content': f"""
                    "{prompt}"
                    "{content}"
                   """
    }]

    response_content = ''
    responses = dashscope.Generation.call("qwen-plus",
                                          messages=messages,
                                          result_format='message',
                                          stream=True,
                                          incremental_output=True)

    for response in responses:
        if response.status_code == HTTPStatus.OK:
            response_content += response.output.choices[0]['message']['content']
        else:
            print('Request id: %s, Status code: %s, error code: %s, error message: %s' % (
                response.request_id, response.status_code,
                response.code, response.message
            ))
    if response_content.startswith("```") and response_content.endswith("```"):
        response_content = response_content[8:-3].strip()

    input_base_name = os.path.splitext(os.path.basename(input_filepath))[0]
    output_file_path = os.path.join(output_filepath, f'{input_base_name}.json')
    with open(output_file_path, 'w', encoding='utf-8') as json_file:
        json.dump(json.loads(response_content), json_file, ensure_ascii=False, indent=4)

return response_content在doc_split.py中,我們定義了一個函數doc_split_with_qwen_plus,通過API調用通義千問-Plus將輸入文檔劃分為不同段落并為每個段落總結一個段落標題。在main.py中導入并調用該函數,代碼示例如下:
# 導入
from doc_split import doc_split_with_qwen_plus

# 調用
# 通過API調用通義千問-Plus為輸入文檔劃分段落,并為每一個段落生成一個段落標題
doc_split_with_qwen_plus(args.input_txt_path, os.path.join(args.json_path))調用該函數來為示例文檔section_1.md劃分段落并生成段落標題,輸出的JSON文件section_1.json會被保存到./material/json中:

輸出section_1.json。“title”字段為段落標題,“content”字段為段落內容,圖片鏈接單獨保存在字段中。
提煉內容
接著我們通過API調用百煉平臺大模型通義千問-Plus,總結提煉各個段落的內容。
新建一個名為qwen_plus_marp.py的Python文件,代碼示例如下:
import asyncio

import os
from http import HTTPStatus
import dashscope

def call_with_stream(content):
    prompt2 = """
                    請提取下列文字的主要要點,并將這些要點以Markdown格式輸出,請輸出中文。
                    如果文字內容為鏈接,請直接以Markdown格式輸出該鏈接。
                    請嚴格按照Markdown格式輸出代碼段,避免輸出其他內容,避免出現'''之類的符號。
                    但是Markdown文字內容簡潔。
                    Markdown代碼段中,每一個小標題下的內容行數禁止超過3行。
                    “- 內容”之后不要再分段落描述。

                    示例輸入:你有過使用搜索引擎搜索問題卻怎么也找不到有效信息的時候嗎?
                    示例輸出:- 使用搜索引擎遇到的問題:難以找到有效信息

                    示例輸入:https://alidocs.oss-cn-zhangjiakou.aliyuncs.com/res/54Lq3RNeD78gn7Ed/img/6f9f3049-78a2-46b3-a052-88792052890d.png
                    示例輸出:https://alidocs.oss-cn-zhangjiakou.aliyuncs.com/res/54Lq3RNeD78gn7Ed/img/6f9f3049-78a2-46b3-a052-88792052890d.png

                    以下是待提煉的文字內容:


              """


    messages = [{
        'role': 'user',
        'content': f"""
                    "{prompt2}"
                    "{content}"
                   """
    }]

    response_content = ''
    responses = dashscope.Generation.call("qwen-plus",
                                          messages=messages,
                                          result_format='message',
                                          stream=True,
                                          incremental_output=True)

    for response in responses:
        if response.status_code == HTTPStatus.OK:
            response_content += response.output.choices[0]['message']['content']
        else:
            print('Request id: %s, Status code: %s, error code: %s, error message: %s' % (
                response.request_id, response.status_code,
                response.code, response.message
            ))

    return response_content
在qwen_plus_marp.py中,我們定義了一個函數call_with_stream,通過API調用通義千問-Plus來處理各段落中的內容,具體如下:
文字內容:提煉關鍵要點,以Markdown格式輸出。
圖片鏈接:直接輸出該鏈接。
我們將在整合圖文素材時導入并調用call_with_stream函數。
步驟三:生成演示文稿
在這一部分中,我們將圖文素材整合到Markdown文件中,并生成演示文稿圖片。
在介紹詳細流程和代碼之前,我們首先簡單介紹一下這部分用到的工具:Marp。Marp是一款基于Markdown語法的開源演示文稿制作工具。您只需要通過編輯Markdown文本,即可生成精美的演示文稿。如果您是VS Code使用者,您還可以下載安裝Marp for VS Code插件來實時預覽。您也可以參考Marp官方文檔,打造出獨具個人風格特色的演示文稿。

在VS Code的擴展中搜索并安裝Marp for VS Code。
由于Marp在將Markdown轉換為演示文稿時采用了特定的格式規范和擴展語法,我們準備了一個Python腳本——markdown_gather.py,用于匯總一些優化和調整Markdown格式內容的函數,代碼示例如下:
import os
import re
from pathlib import Path
import os
def merge_style_with_md_files(md_file_path, style_file_path):
# 檢查樣式文件是否存在
if not os.path.isfile(style_file_path):
raise FileNotFoundError(f"樣式文件 {style_file_path} 不存在。")
# 讀取樣式文件內容
with open(style_file_path, 'r', encoding='utf-8') as f:
style_content = f.read()
# 遍歷指定目錄下的所有文件
for filename in os.listdir(md_file_path):
if filename.startswith('section') and filename.endswith('.md'):
file_path = os.path.join(md_file_path, filename)
# 合并樣式內容與 .md 文件內容
if os.path.exists(file_path):
with open(file_path, 'r+', encoding='utf-8') as f:
original_content = f.read()
# 將指針移動到文件開頭以覆蓋原有內容
f.seek(0)
f.write(style_content + '\n\n' + original_content)
# 清除輸出緩沖區以確保所有數據都已寫入文件
f.truncate()
def remove_trailing_dashes(directory):
"""
從 Markdown 文件中移除位于文件末尾且后面沒有其他內容(除了可能的換行符)的連續破折號(---)。
"""
for filename in os.listdir(directory):
# 檢查文件是否以 section 開頭且為 .md 文件
if filename.startswith('section') and filename.endswith('.md'):
filepath = os.path.join(directory, filename)
# 讀取文件內容
with open(filepath, 'r', encoding='utf-8') as file:
content = file.read()
# 檢查文件末尾是否有連續的破折號(---),并且之后沒有其他內容(除了可能的換行符)
if content.rstrip().endswith('---') and content.rstrip('---').endswith('\n'):
# 移除末尾的連續破折號(---)及其后面的換行符
content = content.rstrip('---\n')
# 替換文件中的所有 "------" 為空字符串
content = content.replace("------", "")
content = re.sub(r'\n{3,}', '\n\n', content)
# 寫入更新后的內容
with open(filepath, 'w', encoding='utf-8') as file:
file.write(content)
def remove_empty_lines(filename):
# 讀取文件內容
with open(filename, 'r', encoding='utf-8') as file:
content = file.read()
# 替換文件中的所有 "------" 為空字符串
content = content.replace("------", "")
with open(filename, 'w', encoding='utf-8') as file:
file.write(content)
def append_string_to_file(file_path):
# 讀取文件內容
with open(file_path, 'r', encoding='utf-8') as file:
content = file.read()
# 在文件末尾追加字符串 '---'
new_content = content + '---'
# 寫入新內容
with open(file_path, 'w', encoding='utf-8') as file:
file.write(new_content)
def insert_logo(file_path, logo_path):
# 讀取文件內容
with open(file_path, 'r', encoding='utf-8') as file:
content = file.read()
# 獲取 Logo 文件名
logo_filename = Path(logo_path).name
# 定義要插入的字符串
insert_str = f"""<!--\nbackgroundImage: url("./{logo_filename}");\nbackgroundSize: 10% ;\nbackgroundPosition: 98% 3% ;\n-->
"""
# 使用正則表達式替換
# 只替換獨立出現的 "---",不包括被其他破折號包圍的情況
new_content = re.sub(r'(?<!-)---(?!-)', f'\n{insert_str}\n---', content, flags=re.DOTALL)
# 寫入新內容
with open(file_path, 'w', encoding='utf-8') as file:
file.write(new_content)
def insert_bg_if_no_link(filename, theme_url):
# 用于存儲最終結果的列表
result = []
# 讀取文件內容
with open(filename, 'r', encoding='utf-8') as file:
content = file.read()
# 獲取 Logo 文件名
theme_filename = Path(theme_url).name
# 使用正則表達式分割文本
sections = re.split(r'---+', content)
# 遍歷每個部分
for i, section in enumerate(sections):
# 查找 "# {字符串內容}" 的模式
header_match = re.search(r'# \{(.+?)\}', section)
if header_match:
# 提取 "# {字符串內容}" 后面的內容
header_content = section[header_match.end():].strip()
# 檢查這部分內容是否包含  格式的鏈接
if not re.search(r'!\[[^\]]*\]\([^\)]*\)', header_content):
# 如果沒有鏈接也沒有背景圖片,在 "# {字符串內容}" 之后添加指定文本
section = f'{section[:header_match.end()]}\n{section[header_match.end():]}\n---'
# 將處理后的部分添加到結果列表中
result.append(section)
# 如果不是最后一個部分,保留原始的分隔符
if i < len(sections) - 1:
result.append('---')
# 將結果寫回文件
with open(filename, 'w', encoding='utf-8') as file:
file.write(''.join(result))
def title_to_md(file_path, content, title_url):
# 讀取原文件內容
title_filename = Path(title_url).name
with open(file_path, 'r', encoding='utf-8') as file:
original_content = file.read()
content = f"\n# {content}\n---"
# 在開頭添加新內容
new_content = content + '\n' + original_content
# 寫入新內容
with open(file_path, 'w', encoding='utf-8') as file:
file.write(new_content)您需要將其和main.py、各函數文件放在同一路徑目錄下,并在后續調用該文件中的函數。
整合圖文素材
我們將調用前文步驟二中“提煉內容”部分介紹的函數call_with_stream得到文檔各段落關鍵要點、標題、圖片鏈接等內容,并將它們整合為Markdown格式,輸出Markdown文件。新建一個名為json2md.py的函數文件,代碼示例如下:
import json
import os
import re
from qwen_plus_marp import call_with_stream
from pathlib import Path
def is_link(text):
"""檢查給定的文本是否為鏈接。"""
return text.startswith("http://") or text.startswith("https://")
def parse_json_list_to_markdown(json_list, theme_url):
"""
將 JSON 對象列表轉換為 Markdown 格式,并通過 call_with_stream 處理 'content'。
參數:
- json_list (list): 字典列表,每個字典都包含 'title' 和 'content' 鍵。
返回:
- str: Markdown 格式的字符串。
"""
theme = "\n\n"
theme_filename = Path(theme_url).name
markdown_content = ""
for item in json_list:
title = item.get('title', '未命名')
processed_content = call_with_stream(item.get('content', ''))
if is_link(processed_content):
markdown_content += f"---\n\n\n\n---"
else:
markdown_content += f"\n\n# {title}\n\n{processed_content}\n\n---"
return markdown_content
def parse_json_list_to_markdown_new(json_list, theme_url):
"""
將 JSON 對象列表轉換為 Markdown 格式,并通過 call_with_stream 處理 'content'。
參數:
- json_list (list): 字典列表,每個字典都包含 'title' 和 'content' 鍵。
返回:
- str: Markdown 格式的字符串。
"""
theme_filename = Path(theme_url).name
theme = f"\n\n"
markdown_content = ""
for i, item in enumerate(json_list):
title = item.get('title', '未命名')
processed_content = call_with_stream(item.get('content', ''))
if processed_content.startswith("```") and processed_content.endswith("```"):
processed_content = processed_content[11:-3].strip()
if not is_link(json_list[i].get('content')):
# 如果是列表中的最后一個元素
if i == len(json_list) - 1:
markdown_content += f"\n\n## {title}\n\n{processed_content}\n\n{theme}\n\n---"
else:
if not is_link(json_list[i + 1].get('content')):
# 當前不是鏈接且下一個也不是鏈接
markdown_content += f"\n\n## {title}\n\n{processed_content}\n\n{theme}\n\n---"
else:
# 當前不是鏈接但下一個是鏈接
markdown_content += f"\n\n## {title}\n\n{processed_content}\n\n---"
else:
# 當前是鏈接
markdown_content += f"---\n\n})\n\n---"
return markdown_content
def convert_json_file_to_md(json_file_path, output_dir, theme_url):
"""
讀取 JSON 文件,通過 call_with_stream 轉換其內容,然后保存為 Markdown 文件。
參數:
- json_file_path (str): JSON 文件的路徑。
- output_dir (str): Markdown 文件將被保存的目錄。
"""
if not os.path.exists(output_dir):
os.makedirs(output_dir)
with open(json_file_path, 'r', encoding='utf-8') as file:
json_data = json.load(file)
markdown_content = parse_json_list_to_markdown_new(json_data, theme_url)
base_name = os.path.splitext(os.path.basename(json_file_path))[0]
md_file_name = f"{base_name}.md"
output_path = os.path.join(output_dir, md_file_name)
with open(output_path, 'w', encoding='utf-8') as file:
file.write(markdown_content)
def save_markdown_to_file(content, filename):
""" 保存Markdown內容到文件 """
with open(filename, 'w', encoding='utf-8') as file:
file.write(content)
def process_markdown(input_file):
""" 處理Markdown文本,按要求分割并保存 """
with open(input_file, 'r', encoding='utf-8') as file:
input_text = file.read()
# 使用正則表達式確保每個部分都包含 "---"
parts = re.split(r'(?<=---\n)', input_text)
# 移除空字符串部分
parts = [part.strip() for part in parts if part.strip()]
filenames = []
base_path = os.path.dirname(input_file) # 獲取基礎文件的路徑
for i, part in enumerate(parts):
# 生成文件名
filename = f'{os.path.splitext(os.path.basename(input_file))[0]}_{i}.md'
# 構建完整路徑
full_filename = os.path.join(base_path, filename)
save_markdown_to_file(f'{part}', full_filename)
filenames.append(full_filename)在json2md.py中,我們定義了多個函數,主要作用如下:
將歸屬于同一段落的標題、文本內容與其對應的圖片鏈接整合在一起;
使用“---”分隔不同段落的內容,以生成多張演示文稿圖片。
設置演示文稿背景。
您需要在main.py中導入并調用json2md.py中的函數,代碼如下:
# 導入
from json2md import convert_json_file_to_md
# 調用
# 總結各段落內容,保存為Markdown格式,并設置背景圖片,可自行將style文件夾下的theme.png替換為自定義背景
for filename in os.listdir(args.json_path):
    if filename.endswith('.json'):
        json_file_path = os.path.join(args.json_path, filename)
convert_json_file_to_md(json_file_path, args.markdown_path, args.theme_path)為了美化演示文稿,我們進一步添加阿里云Logo、標題頁,并調整Markdown格式以適配Marp語法。我們通過導入并調用前文提供的markdown_gather.py中的函數實現,代碼如下:
# 導入
from markdown_gather import insert_logo, remove_empty_lines, title_to_md

# 調用
# 將文檔標題添加到Markdown文件開頭作為標題頁,并設置標題頁背景,可自行將style文件夾下的title.png替換為自定義標題頁背景
title_to_md(os.path.join(args.markdown_path,f'{input_base_name}.md'), theme, args.title_path)

# 刪除空行,符合Marp格式
remove_empty_lines(os.path.join(args.markdown_path,f'{input_base_name}.md'))

# 添加阿里云logo。可自行替換為其他logo:將logo圖片命名為logo.png,放到style文件夾下
insert_logo(os.path.join(args.markdown_path,f'{input_base_name}.md'), os.path.join(args.logo_path))將步驟二中輸出的section_1.json作為輸入,輸出的Markdown文件section_1.md會被保存在./material/markdown中,效果演示如下:

素材整合后的示例輸出section_1.md。
生成演示文稿
接下來我們基于Marp生成演示文稿。在使用Marp生成演示文稿前,我們需要定義Marp的整體風格及全局樣式。我們可以在Markdown文件的頂部設置,例如:
---
marp: true
theme: gaia

---
marp: true,表示該Markdown文件會被當作Marp演示文稿來處理;
theme: gaia,表示將Marp的主題設置為gaia(Marp官方主題之一)。
您可以在本實踐教程的完整代碼中style文件夾里獲取我們為您準備的Markdown風格文件style.md,并將其置于Markdown文件的開頭。您可以通過在main.py中導入并調用markdown_gather.py中的函數來實現,具體代碼如下:
# 導入
from markdown_gather import merge_style_with_md_files, remove_trailing_dashes
# 調用
process_markdown(os.path.join(args.markdown_path,f'{input_base_name}.md'))

# 定義并添加Marp樣式文件。可查閱Marp官方文檔自定義樣式:將樣式文件命名為style.md,放到style文件夾下
merge_style_with_md_files(args.markdown_path, args.markdown_style_path)

# 刪除Markdown文件末尾的“---”,避免生成空白圖片
remove_trailing_dashes(args.markdown_path)
得到的輸出如下:
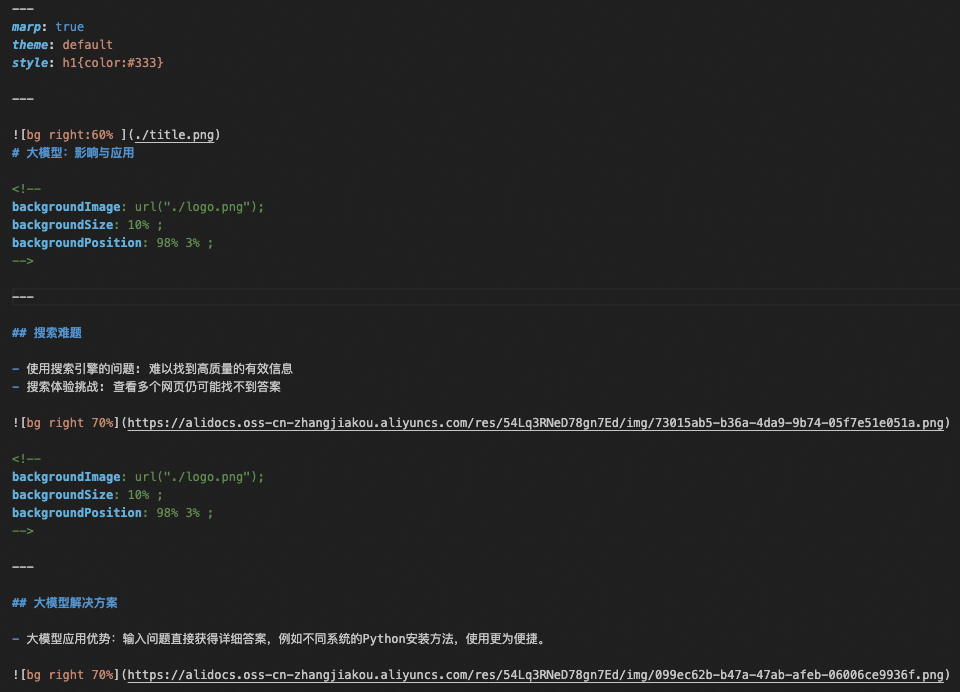
加載風格文件style.md之后的Markdown示例輸出。
得到上述的輸出后,如果您是VS Code用戶且已經安裝了Marp for VS Code插件,那么您可以實時預覽Marp演示文稿的輸出效果。點擊界面右上角的預覽圖標:

在VS Code界面左上角點擊預覽圖標。
實時預覽效果如下:

Marp實時預覽效果演示。
通過預覽確認了Marp演示文稿的輸出內容無誤后,我們將其導出為圖片。新建一個名為marp2image.py的Python文件,代碼示例如下:
import os
import re
from pathlib import Path
import os
def merge_style_with_md_files(md_file_path, style_file_path):
# 檢查樣式文件是否存在
if not os.path.isfile(style_file_path):
raise FileNotFoundError(f"樣式文件 {style_file_path} 不存在。")
# 讀取樣式文件內容
with open(style_file_path, 'r', encoding='utf-8') as f:
style_content = f.read()
# 遍歷指定目錄下的所有文件
for filename in os.listdir(md_file_path):
if filename.startswith('section') and filename.endswith('.md'):
file_path = os.path.join(md_file_path, filename)
# 合并樣式內容與 .md 文件內容
if os.path.exists(file_path):
with open(file_path, 'r+', encoding='utf-8') as f:
original_content = f.read()
# 將指針移動到文件開頭以覆蓋原有內容
f.seek(0)
f.write(style_content + '\n\n' + original_content)
# 清除輸出緩沖區以確保所有數據都已寫入文件
f.truncate()
def remove_trailing_dashes(directory):
"""
從 Markdown 文件中移除位于文件末尾且后面沒有其他內容(除了可能的換行符)的連續破折號(---)。
"""
for filename in os.listdir(directory):
# 檢查文件是否以 section 開頭且為 .md 文件
if filename.startswith('section') and filename.endswith('.md'):
filepath = os.path.join(directory, filename)
# 讀取文件內容
with open(filepath, 'r', encoding='utf-8') as file:
content = file.read()
# 檢查文件末尾是否有連續的破折號(---),并且之后沒有其他內容(除了可能的換行符)
if content.rstrip().endswith('---') and content.rstrip('---').endswith('\n'):
# 移除末尾的連續破折號(---)及其后面的換行符
content = content.rstrip('---\n')
# 替換文件中的所有 "------" 為空字符串
content = content.replace("------", "")
content = re.sub(r'\n{3,}', '\n\n', content)
# 寫入更新后的內容
with open(filepath, 'w', encoding='utf-8') as file:
file.write(content)
def remove_empty_lines(filename):
# 讀取文件內容
with open(filename, 'r', encoding='utf-8') as file:
content = file.read()
# 替換文件中的所有 "------" 為空字符串
content = content.replace("------", "")
with open(filename, 'w', encoding='utf-8') as file:
file.write(content)
def append_string_to_file(file_path):
# 讀取文件內容
with open(file_path, 'r', encoding='utf-8') as file:
content = file.read()
# 在文件末尾追加字符串 '---'
new_content = content + '---'
# 寫入新內容
with open(file_path, 'w', encoding='utf-8') as file:
file.write(new_content)
def insert_logo(file_path, logo_path):
# 讀取文件內容
with open(file_path, 'r', encoding='utf-8') as file:
content = file.read()
# 獲取 Logo 文件名
logo_filename = Path(logo_path).name
# 定義要插入的字符串
insert_str = f"""<!--\nbackgroundImage: url("./{logo_filename}");\nbackgroundSize: 10% ;\nbackgroundPosition: 98% 3% ;\n-->
"""
# 使用正則表達式替換
# 只替換獨立出現的 "---",不包括被其他破折號包圍的情況
new_content = re.sub(r'(?<!-)---(?!-)', f'\n{insert_str}\n---', content, flags=re.DOTALL)
# 寫入新內容
with open(file_path, 'w', encoding='utf-8') as file:
file.write(new_content)
def insert_bg_if_no_link(filename, theme_url):
# 用于存儲最終結果的列表
result = []
# 讀取文件內容
with open(filename, 'r', encoding='utf-8') as file:
content = file.read()
# 獲取 Logo 文件名
theme_filename = Path(theme_url).name
# 使用正則表達式分割文本
sections = re.split(r'---+', content)
# 遍歷每個部分
for i, section in enumerate(sections):
# 查找 "# {字符串內容}" 的模式
header_match = re.search(r'# \{(.+?)\}', section)
if header_match:
# 提取 "# {字符串內容}" 后面的內容
header_content = section[header_match.end():].strip()
# 檢查這部分內容是否包含  格式的鏈接
if not re.search(r'!\[[^\]]*\]\([^\)]*\)', header_content):
# 如果沒有鏈接也沒有背景圖片,在 "# {字符串內容}" 之后添加指定文本
section = f'{section[:header_match.end()]}\n{section[header_match.end():]}\n---'
# 將處理后的部分添加到結果列表中
result.append(section)
# 如果不是最后一個部分,保留原始的分隔符
if i < len(sections) - 1:
result.append('---')
# 將結果寫回文件
with open(filename, 'w', encoding='utf-8') as file:
file.write(''.join(result))
def title_to_md(file_path, content, title_url):
# 讀取原文件內容
title_filename = Path(title_url).name
with open(file_path, 'r', encoding='utf-8') as file:
original_content = file.read()
content = f"\n# {content}\n---"
# 在開頭添加新內容
new_content = content + '\n' + original_content
# 寫入新內容
with open(file_path, 'w', encoding='utf-8') as file:
file.write(new_content)在marp2image.py中,我們定義了一個函數convert_md_files_to_png,將Markdown文件導出為png格式的Marp演示文稿。在main.py中導入并調用函數convert_md_files_to_png,代碼示例如下:
# 導入
from marp2image import convert_md_files_to_png
# 調用
# 使用Marp生成演示文稿圖片
convert_md_files_to_png(os.path.join(args.markdown_path,f'{input_base_name}.md'), args.image_path)調用函數得到的所有的輸出圖片均會被保存到./material/image中,示例如下:

示例圖片。
步驟四:生成講解語音與字幕
在這一部分中,我們利用多模態語音大模型將文字內容合成為音頻,并且精確計算音頻的時長,隨后自動生成對應的字幕時間戳。
文字合成音頻
我們將文檔內容劃分為若干個句子,然后通過API調用阿里云百煉提供的語音合成大模型CosyVoice,將所有句子全部合成為mp3格式的音頻文件。新建一個名為audio_generate_each_sentence.py的Python文件,代碼示例如下:
import json
import os
import re
import time
import dashscope
from dashscope.audio.tts_v2 import SpeechSynthesizer

import traceback

def read_json_file(file_path):
    with open(file_path, 'r', encoding='utf-8') as file:
        data = json.load(file)
    return data


def split_into_sentences(text):
    # 中文標點符號列表
    punctuation = [',', '。', ';', '?', '!']
    brackets = {'(': ')', '[': ']', '{': '}', '(': ')', '【': '】', '《': '》'}

    # 初始化結果列表和臨時句子存儲
    sentences = []
    temp_sentence = ''
    bracket_stack = []

    # 遍歷文本中的每一個字符
    for char in text:
        # 如果是左括號,壓入棧
        if char in brackets:
            bracket_stack.append(char)
        # 如果是右括號且與棧頂匹配,彈出棧
        elif char in brackets.values() and bracket_stack and brackets[bracket_stack[-1]] == char:
            bracket_stack.pop()

        # 如果字符是中文標點之一且括號棧為空,表示句子結束
        if char in punctuation and not bracket_stack:
            # 添加臨時句子到結果列表,并清空臨時句子
            sentences.append(temp_sentence.strip())
            temp_sentence = ''
        else:
            # 否則,將字符添加到臨時句子中
            temp_sentence += char

    # 處理最后一個可能沒有標點結尾的句子
    if temp_sentence:
        sentences.append(temp_sentence.strip())

    return sentences


def save_sentences_to_markdown(sentences, base_dir, index1):
    for index2, sentence in enumerate(sentences, start=1):
        # 創建目錄
        dir_name = f'audio_for_paragraph_{index1}'
        dir_path = os.path.join(base_dir, dir_name)
        os.makedirs(dir_path, exist_ok=True)

        # 構建文件名
        file_name = f'paragraph_{index1}_sentence_{index2}.md'
        file_path = os.path.join(dir_path, file_name)

        # 寫入Markdown文件
        with open(file_path, 'w', encoding='utf-8') as file:
            file.write(sentence + '\n')


def process_json_file(json_file_path, base_dir):

    if not os.path.exists(base_dir):
        os.makedirs(base_dir)

    file_prefix = os.path.splitext(os.path.basename(json_file_path))[0]

    base_dir = os.path.join(base_dir, file_prefix)

    # 讀取JSON文件
    json_data = read_json_file(json_file_path)

    # 處理JSON數據中的每個條目
    for index1, item in enumerate(json_data):
        if 'content' in item:
            content = item['content']
            # 檢查content是否為鏈接
            if not is_url(content):
                sentences = split_into_sentences(content)
                save_sentences_to_markdown(sentences, base_dir, index1+1)

def is_url(s):
    url_pattern = re.compile(r'http[s]?://(?:[a-zA-Z]|[0-9]|[$-_@.&+]|[!*\\(\\),]|(?:%[0-9a-fA-F][0-9a-fA-F]))+')
    return bool(url_pattern.match(s))


def synthesize_md_to_speech(base_directory):
    """
    識別指定目錄下的所有.md文件,讀取其內容并使用DashScope API將其轉換為語音,
    保存為同名.mp3文件在同一目錄下。

    參數:
    base_directory (str): 包含.md文件的頂層目錄路徑。
    """
    # 確保環境變量中存在DashScope API密鑰
    if 'DASHSCOPE_API_KEY' not in os.environ:
        raise ValueError("DashScope API key must be set in the environment variables.")

    # 遍歷指定目錄及其子目錄
    for root, dirs, files in os.walk(base_directory):
        for file in files:
            if file.endswith('.md'):
                # 構建完整文件路徑
                md_file_path = os.path.join(root, file)

                # 讀取.md文件內容
                with open(md_file_path, 'r', encoding='utf-8') as f:
                    text = f.read()

                # 初始化語音合成器
                speech_synthesizer = SpeechSynthesizer(model='cosyvoice-v1', voice='longxiaochun')


                # 合成語音
                audio_data = speech_synthesizer.call(text)

                # 構建輸出.mp3文件路徑
                mp3_file_path = os.path.splitext(md_file_path)[0] + '.mp3'

                # 保存音頻到文件
                with open(mp3_file_path, 'wb') as f:
                    f.write(audio_data)

print(f'Synthesized text from file "{md_file_path}" to file: {mp3_file_path}')我們在audio_generate_each_sentence.py定義了兩個函數,其作用分別為:
process_json_file:將文檔內容劃分為若干個句子。
synthesize_md_to_speech:通過API調用百煉提供的語音合成模型CosyVoice,將所有句子全部合成為mp3格式的音頻文件。
在main.py中導入并引用這兩個函數,代碼如下:
# 導入
from audio_generate_each_sentence import process_json_file, synthesize_md_to_speech
# 調用
# 將各段落文檔劃分為若干句子,并通過API調用CosyVoice合成語音
process_json_file(os.path.join(args.json_path,f'{input_base_name}.json'), args.audio_path)
synthesize_md_to_speech(os.path.join(args.audio_path, input_base_name))調用函數后,所有的音頻文件會被保存到./material/audio中的相應文件夾下,示例展示如下:
文字內容為:你有過使用搜索引擎搜索問題卻怎么也找不到有效信息的時候嗎?
生成字幕
接下來,我們將通過讀取音頻的時長以及其對應的文字內容,來生成SRT格式的字幕文件。新建一個Pyhton文件,命名為srt_generate_for_each_sentence.py,代碼示例如下:
import os
import re
from moviepy.editor import AudioFileClip
from typing import List

def format_time(seconds):
    hours, remainder = divmod(seconds, 3600)
    minutes, seconds = divmod(remainder, 60)
    milliseconds = int((seconds - int(seconds)) * 1000)
    seconds = int(seconds)
    return f"{int(hours):02d}:{int(minutes):02d}:{int(seconds):02d},{milliseconds:03d}"

# 定義一個函數來獲取音頻文件的時長
def get_audio_duration(file_path):
    audio = AudioFileClip(file_path)
    duration = audio.duration
    audio.close()
    return duration

# 定義一個函數來生成SRT格式的字幕行
def create_srt_line(index, start_time, end_time, text):
    return f"{index}\n{start_time} --> {end_time}\n{text}\n\n"

def generate_srt_from_audio(base_dir: str, output_dir: str, output_srt_file: str) -> None:
    """
    從指定目錄下的音頻文件夾生成SRT字幕文件。

    :param base_dir: 包含音頻文件夾的根目錄。
    :param output_dir: 輸出SRT文件的目錄。
    :param output_srt_file: 輸出SRT文件的完整路徑。
    """

    # 創建輸出目錄,如果它不存在
    if not os.path.exists(output_dir):
        os.makedirs(output_dir)

    # 確保輸出文件名有.srt后綴
    if not output_srt_file.endswith('.srt'):
        output_srt_file += '.srt'


    # 初始化當前時間
    current_time = 2.000  # 初始時間

    # 打開SRT文件進行寫入
    with open(output_srt_file, 'w', encoding='utf-8') as srt_file:
        srt_index = 1

        # 獲取所有符合條件的子目錄,并按索引排序
        sub_dirs = [d for d in os.listdir(base_dir) if d.startswith('audio_for_paragraph_')]
        sub_dirs.sort(key=lambda x: int(re.search(r'\d+', x).group()))

        # 遍歷所有子目錄
        for sub_dir in sub_dirs:
            sub_dir_path = os.path.join(base_dir, sub_dir)

            # 查找所有的.md和.mp3文件
            files = [f for f in os.listdir(sub_dir_path) if f.endswith('.md') or f.endswith('.mp3')]
            md_files = [f for f in files if f.endswith('.md')]

            # 按照index1和index2排序.md文件
            md_files.sort(key=lambda x: (int(x.split('_')[1]), int(x.split('_')[3].split('.')[0])))

            # 處理每個.md文件
            for md_file in md_files:
                md_file_path = os.path.join(sub_dir_path, md_file)
                mp3_file_path = os.path.splitext(md_file_path)[0] + '.mp3'

                # 確保對應的.mp3文件存在
                if os.path.exists(mp3_file_path):
                    # 讀取.md文件內容
                    with open(md_file_path, 'r', encoding='utf-8') as f:
                        text = f.read().strip()

                    # 獲取.mp3文件時長
                    duration = get_audio_duration(mp3_file_path)

                    # 生成SRT格式的字幕行
                    start_time_str = format_time(current_time)
                    end_time_str = format_time(current_time + duration)
                    srt_line = create_srt_line(srt_index, start_time_str, end_time_str, text)

                    # 寫入SRT文件
                    srt_file.write(srt_line)

                    # 更新當前時間
                    current_time += duration + 0.3  # 加上0.5秒以避免時間重疊

                    srt_index += 1
                else:
                    print(f"No corresponding MP3 file found for {md_file}")

    print("SRT file generated successfully.")
在srt_generate_for_each_sentence.py中我們定義了一個函數generate_srt_from_audio,該函數通過讀取輸入音頻的時長以及其對應的文字內容,來生成SRT格式的字幕文件。
在main.py中導入并調用函數generate_srt_from_audio,代碼示例如下:
# 導入
from srt_generate_for_each_sentence import generate_srt_from_audio
# 調用
# 生成srt字幕文件
generate_srt_from_audio(os.path.join(args.audio_path, input_base_name), args.srt_and_video_path, os.path.join(args.srt_and_video_path, input_base_name))調用函數會自動生成srt文件并保存在./material/video中,示例輸出如下:

步驟五:生成視頻
在這一部分中,我們將生成的演示文稿剪輯為視頻,并將音頻文件和字幕文件嵌入到視頻中。
剪輯視頻
首先我們計算每一張演示文稿在視頻中的持續時間。新建一個Python文件,命名為calculate_durations_for_each_image.py,代碼示例如下:
import os
from pydub import AudioSegment

def calculate_audio_durations(directory):
    """
    計算指定目錄下所有以 audio_for_paragraph_{index} 命名的文件夾中 mp3 文件的總持續時間(以秒為單位)。

    參數:
        directory (str): 需要掃描的根目錄路徑。

    返回:
        list: 每個 audio_for_paragraph_{index} 文件夾中 mp3 文件總持續時間(秒)的列表。
    """
    # 初始化結果列表
    durations = []

    # 遍歷目錄下的所有子目錄
    for entry in os.scandir(directory):
        if entry.is_dir() and entry.name.startswith("audio_for_paragraph_"):
            # 提取 index
            index = int(entry.name.split("_")[-1])

            # 初始化當前文件夾的總持續時間為0
            total_duration_ms = 0

            # 遍歷子目錄中的所有文件
            for file_entry in os.scandir(entry.path):
                if file_entry.name.endswith(".mp3"):
                    # 加載 mp3 文件并計算持續時間
                    audio = AudioSegment.from_mp3(file_entry.path)
                    delay = 300
                    total_duration_ms += len(audio) + delay

            # 將當前文件夾的總持續時間轉換為秒,并添加到結果列表中
            total_duration_seconds = total_duration_ms / 1000.0
            durations.append((index, total_duration_seconds))

    # 按照 index 排序結果列表
    durations.sort(key=lambda x: x[0])


    # 只保留持續時間(秒)
    durations = [duration for _, duration in durations]

    durations.insert(0, 2)

    return durations
在calculate_durations_for_each_image.py中,我們定義了函數calculate_audio_durations,其功能為計算每一張演示文稿在視頻中的持續時間。
在main.py中導入并調用函數calculate_audio_durations,代碼示例如下:
# 導入
from calculate_durations_for_each_image import calculate_audio_durations
# 調用
# 計算各段落的所有音頻時長
durations = calculate_audio_durations(os.path.join(args.audio_path, input_base_name))接著我們將所有演示文稿剪輯為視頻。新建一個函數文件,命名為movie_editor.py,代碼示例如下:
from moviepy.editor import *
import os
import re
from PIL import Image
import natsort
import math
import numpy as np

def images_to_video_with_durations(input_image_path, output_video_path, durations, fps, base_name):
    # 獲取所有符合條件的圖片,并按文件名中的數字排序
    pattern = r'^' + re.escape(base_name) + r'_(\d+)\.png$'
    image_files = [
        f"{input_image_path}/{file}"
        for file in os.listdir(input_image_path)
        if re.match(pattern, file)
    ]
    image_files = natsort.natsorted(image_files, key=lambda x: int(re.match(pattern, os.path.basename(x)).group(1)))

    # 確定視頻的背景尺寸
    target_width, target_height = 1280, 720
    background_size = (target_width, target_height)

    # 為每張圖片創建一個單獨的剪輯
    clips = []
    for i, file in enumerate(image_files):
        img = Image.open(file)
        width, height = img.size
        ratio = width / height
        if width > target_width or height > target_height:
            if ratio > target_width / target_height:
                new_width = target_width
                new_height = math.floor(new_width / ratio)
            else:
                new_height = target_height
                new_width = math.floor(new_height * ratio)
        else:
            new_width, new_height = width, height

        img = img.resize((new_width, new_height), resample=Image.Resampling.LANCZOS)
        img_clip = ImageClip(np.array(img)).set_duration(durations[i])
        img_clip = img_clip.set_position('center')

        bg_clip = ColorClip(size=background_size, color=(255,255,255), duration=durations[i])
        composite_clip = CompositeVideoClip([bg_clip, img_clip])
        # 添加轉場效果(除了最后一個剪輯)
        # if i < len(image_files) - 1:  # 確保不是最后一個剪輯
        #     composite_clip = composite_clip.fx(vfx.fadein, duration=0.3).fx(vfx.fadeout, duration=0.3)


        clips.append(composite_clip)

    # 使用concatenate_videoclips函數將所有剪輯串聯起來
    final_clip = concatenate_videoclips(clips, method="compose")


    # 寫入視頻文件
    output_filename = f"{base_name}.mp4"

    final_clip.write_videofile(os.path.join(output_video_path, output_filename), fps=fps)
在movie_editor.py中,我們定義了函數images_to_video_with_durations,其功能是將所有輸入演示文稿按順序剪輯為視頻。在main.py中導入并調用函數images_to_video_with_durations,代碼示例如下:
# 導入
from movie_editor import images_to_video_with_durations
# 調用
images_to_video_with_durations(os.path.join(args.image_path,f'{input_base_name}'), args.srt_and_video_path, durations, args.fps, input_base_name)調用代碼后,生成的視頻section_1.mp4會被保存在./material/video中,效果演示如下:
以上視頻不包含音頻與字幕。
嵌入音頻與字幕
接下來我們將音頻文件嵌入到視頻中。新建一個函數文件,命名為audio2video.py,代碼示例如下:
import os
from moviepy.editor import *
from glob import glob
import re
def merge_audio_and_add_to_video(video_path, audio_base_dir, output_path):
    """
    合并多個音頻文件并添加到視頻中。

    :param video_path: 視頻文件的路徑。
    :param audio_base_dir: 包含音頻文件夾的基目錄。
    :param output_path: 輸出視頻的路徑。
    """
    # 加載視頻文件
    video_clip = VideoFileClip(video_path)

    # 初始化音頻列表
    audio_clips = []

    silent_audio_start = AudioClip(lambda t: [0,0], duration=2)
    audio_clips.append(silent_audio_start)

    # 遍歷所有子目錄,按數字大小排序
    audio_dirs = glob(os.path.join(audio_base_dir, "audio_for_paragraph_*"))
    audio_dirs.sort(key=lambda x: int(re.search(r'\d+', os.path.basename(x)).group()))

    # 遍歷所有子目錄
    for audio_dir in audio_dirs:
        # 獲取當前目錄的index
        index = int(os.path.basename(audio_dir).split("_")[-1])

        # 遍歷目錄中的所有mp3文件
        mp3_files = glob(os.path.join(audio_dir, f"paragraph_{index}_sentence_*.mp3"))
        mp3_files.sort(key=lambda x: int(re.search(r'_sentence_(\d+)', os.path.basename(x)).group(1)))

        # 遍歷排序后的mp3文件列表
        for mp3_file in mp3_files:
            # 加載音頻文件
            audio_clip = AudioFileClip(mp3_file)

            # 添加到音頻列表
            if audio_clips:
                # 如果不是第一個音頻,則在前一個音頻之后添加0.5秒的靜音
                # 替換原有的 AudioNullClip 代碼
                silent_audio = AudioClip(lambda t: [0,0], duration=0.3)
                audio_clips.append(silent_audio)
            audio_clips.append(audio_clip)

    # 合并所有音頻片段
    final_audio = concatenate_audioclips(audio_clips)

    # 將音頻添加到視頻中
    video_with_audio = video_clip.set_audio(final_audio)

    # 輸出帶有新音頻的視頻文件
    video_with_audio.write_videofile(output_path, codec='libx264', audio_codec='aac')

    # 關閉剪輯對象,釋放資源
video_clip.close()我們在函數文件audio2video.py中定義了函數merge_audio_and_add_to_video,其功能為將音頻文件嵌入到視頻中。
在main.py中導入并調用函數merge_audio_and_add_to_video,代碼如下:
# 導入
from audio2video import merge_audio_and_add_to_video
# 調用
merge_audio_and_add_to_video(os.path.join(args.srt_and_video_path,f'{input_base_name}.mp4'), os.path.join(args.audio_path,f'{input_base_name}'), os.path.join(args.srt_and_video_path,f'{input_base_name}_with_audio.mp4'))調用代碼后,生成的視頻會保存在./material/video中。
最后我們將字幕文件嵌入到視頻中。新建一個函數文件,命名為srt2video.py,代碼示例如下:
import subprocess
import os
def merge_video_and_subtitle(video_and_srt_path, base_name):
    video_ext = ".mp4"
    srt_ext = ".srt"

    video_path = os.path.join(video_and_srt_path, f"{base_name}_with_audio" + video_ext).replace("\\", "/")
    srt_path = os.path.join(video_and_srt_path, base_name + srt_ext).replace("\\", "/")
    output_path = os.path.join(video_and_srt_path, f"{base_name}_with_audio_with_subs" + video_ext).replace("\\", "/")

    command = [
        'ffmpeg',
        '-i', video_path,
        '-vf', f'subtitles={srt_path}',
        '-c:a', 'copy',
        output_path
    ]

    try:
        subprocess.run(command, check=True)
    except subprocess.CalledProcessError as e:
print(f"An error occurred while merging video and subtitles: {e}")我們在函數文件srt2video.py中定義了函數merge_video_and_subtitle,其功能為將srt字幕文件嵌入到視頻中。在main.py中導入并調用函數merge_video_and_subtitle,代碼示例如下:
# 導入
from srt2video import merge_video_and_subtitle
# 調用
merge_video_and_subtitle(args.srt_and_video_path, input_base_name)調用代碼后,生成的視頻section_1_with_audio_with_subs.mp4會被保存在./material/video中,視頻效果展示如下:
以上視頻為最終效果輸出,包含音頻與字幕。
步驟六(可選):生成長文檔視頻
通過以上步驟,相信您已經成功地構建了完整的文檔生成視頻項目工程,并且能夠成功地將我們提供的示例文檔section_1.md轉化為視頻。在實際應用中,您可能會有將更長篇幅的文檔轉化為視頻的需求,例如阿里云大模型工程師ACA認證課程第一章第一課時認識大模型。我們建議您將長篇幅文檔劃分為若干短文檔,并生成所有短文檔對應的視頻,最終將所有視頻整合為一個完整的視頻。
劃分文檔
您需要將長篇幅文檔按順序劃分為若干短文檔,并按特定的命名格式保存到input文件夾中。其命名要求為section_index.md,index為短文檔索引。示例如下:
生成長文檔視頻
新建一個Python文件,命名為merge_all_videos.py,代碼示例如下:
import os
import re
from moviepy.editor import VideoFileClip, concatenate_videoclips

def merge_videos(input_directory):
    # 定義視頻文件的模式
    video_pattern = r"section_(\d+)_with_audio_with_subs\.mp4"

    # 查找并排序符合模式的文件
    files = sorted(
        (fn for fn in os.listdir(input_directory) if re.match(video_pattern, fn)),
        key=lambda x: int(re.match(video_pattern, x).group(1))
    )

    # 讀取所有視頻片段
    clips = [VideoFileClip(os.path.join(input_directory, file)) for file in files]

    # 合并所有視頻片段
    final_clip = concatenate_videoclips(clips)

    # 輸出合并后的視頻
    output_path = os.path.join(input_directory, 'output_merge_all_video.mp4')
    final_clip.write_videofile(output_path, audio_codec='aac')

merge_videos("./material/video")在merge_all_videos.py中,我們定義了函數merge_videos來將合并所有視頻。
為了更便捷地實現所有短文檔視頻生成及合并所有視頻的全過程,我們新建一個名為run.sh的shell腳本,代碼示例如下:
#!/bin/bash

# 日志文件路徑
log_file="./result.log"

# 清空日志文件
> "$log_file"

# 記錄腳本開始時間
start_time=$(date +%s)

# 定義Python腳本路徑
python_main_script_path="main.py"
python_merge_script_path="merge_all_videos.py"

# 定義視頻輸出路徑
video_path=“./material/video/”
# 獲取所有符合條件的文件名,并按數字排序
files=$(find ./input -maxdepth 1 -type f -name "section_*.md" | sort -V)

# 遍歷文件列表
index=0
for file in $files; do
    index_part=$(basename "$file" .md | cut -d '_' -f 2)
    echo "正在處理第${index_part}部分" >> "$log_file"
    python "$python_main_script_path" --input_txt_path "$file" >> "$log_file" 2>&1
    if [ $? -ne 0 ]; then
        echo "Error processing $file" >> "$log_file"
        exit 1
    fi
    ((index++))
done

# 合并視頻
python "$python_merge_script_path" --input_directory video_path >> "$log_file" 2>&1

# 記錄腳本結束時間
end_time=$(date +%s)

# 計算腳本運行時間
runtime=$((end_time - start_time))

# 格式化運行時間為 xx時xx分xx秒
hours=$((runtime / 3600))
minutes=$(((runtime % 3600) / 60))
seconds=$((runtime % 60))

# 輸出提示信息
echo "視頻已生成完畢" >> "$log_file"
echo "總計時間: $hours 時 $minutes 分 $seconds 秒" >> "$log_file"

# 輸出日志信息
cat "$log_file"在run.sh中,順序讀取所有文檔并將其依次轉化為視頻,最終將所有視頻合并輸出。您可以運行run.sh腳本來實現上述過程,代碼示例如下:
MacOS
# 更改權限
chmod +x run.sh
# 運行腳本
./run.sh
Windows
# 運行腳本,您可以在result.log中查看代碼運行日志
bash run.sh運行腳本后,您可以在./result.log中查看代碼運行日志。最終合并完成的視頻output_merge_all_video.mp4會被保存在./material/video中,其內容可以參考效果演示。
總結
通過本實踐教程,您將能夠:
了解如何綜合運用大語言模型、多模態應用、Marp等工具將一篇圖文并茂的文檔轉化為更生動的講解演示視頻;
通過我們提供的完整代碼上手完整地體驗文檔生成視頻的端到端全過程;
自行調整輸入文檔、Marp風格文件、渲染素材等內容,個性化地打造具有您專屬風格的視頻。